


Inputting Application Collateral
While processing an application, users are able to input loan collateral information. Collateral is collected within user-defined application screens and panels. Framework users are able to add Collateral to an application in the following ways:
- Navigating the workflow
- Selecting the screen
- Selecting the Collaterals section in the Application Navigator
 |
Depending on the configuration of collateral screens, actual screen content and names may vary. The images and processes listed below may not reflect your institution’s loan terms screen. Refer to the following processes for example purposes only. |
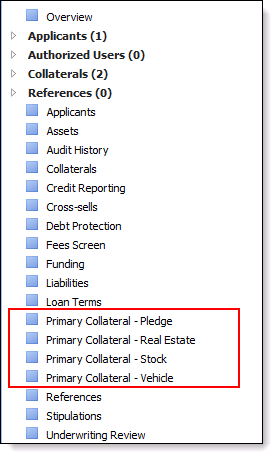
Depending on the configuration of the workflow model, the Application Navigator may contain a screen that allows users to identify collateral. Upon selecting the collateral screen, users are able add, edit and delete the collateral to be added to the loan application.
|
For more information on adding collateral, refer to the Adding Collateral section. |
Depending on the configuration of the workflow model, the Workflow may contain the option to add, edit and delete application collateral. When proceeding through an application’s workflow, collateral information may be collected in user-defined application screens that exclusively contain collateral panels. Application screens may also be configured with a combination of applicant, loan and collateral panels. Both of these application screen types may be configured to a workflow’s Origination category.

|
For more information on adding collateral, refer to the Adding Collateral section. |
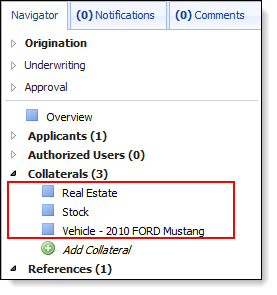
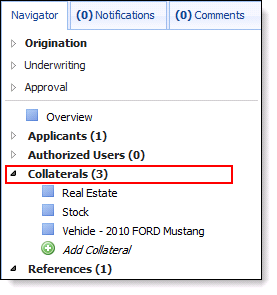
When collateral is added to an application, the collateral records appear in the Application Navigator for easy access. Each collateral record is added to the Collaterals list located beneath the Workflow. If multiple collaterals are assigned to the application, a number corresponding to the amount of collaterals displays next to the Collaterals heading.
|
For the Collaterals section to be available, a collateral screen must be mapped to the Workflow Model. |
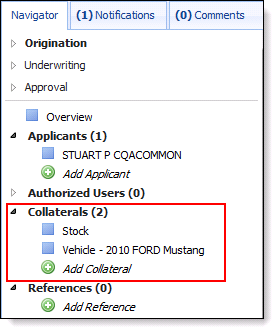
In addition to indexing each collateral record, users are able to add, edit and delete collateral to an application from the Collaterals screen.
There are two methods to add collateral:
- Selecting Add Collateral
- Selecting the Collaterals heading
|
For more information on adding collateral, refer to the Adding Collateral section. |
When processing an application, collateral information may be collected through panels that are configured to user-defined application screens. There are two types of panels that may be configured to an application screen:
- Collateral grid
- Descriptive collateral panel
|
The application screen(s) that contain these panels may be assigned to both the Workflow and screens sections. |
Additionally, collateral may be added from the Collaterals section in the Application Navigator.
|
When inputting collateral, some fields may not apply across all collateral types. For example, Property Address fields would not be required for any collateral types other than Real Estate. |
|
If not manually updated the Adjustment Percentage, Equity Lending Cap Percentage and Trustee Percentage fields defaults to 100, which denotes that 100% of the value is to be included in the in the application. |
Collaterals Panel (Collateral Grid)
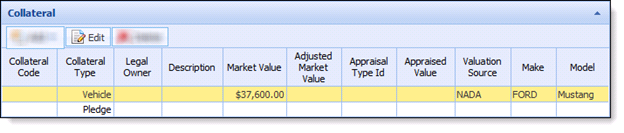
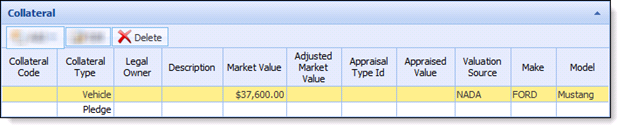
The collaterals panel is a user-defined grid that displays various pieces of collateral information across multiple collaterals.

The collaterals panel contains a toolbar that allows users to perform the following functions:
| Icon | Title | Description |
|
|
Add | Allows a user to add collateral to the application. When collateral is added, a row is added to the collateral grid. |
|
|
Edit | Allows a user to edit collateral currently on the application. |
|
|
Delete | Allows a user to remove collateral from the application. When collateral is deleted, a row is removed from the collateral grid. |


When the Add button is clicked, a drop-down appears that prompts users to select the collateral type. Indicate the type of collateral by clicking the type from the drop-down list.
When the type of collateral has been selected, the collateral screen opens in a new window. Within the collateral screen, complete all fields required to accurately add and valuate the collateral.
 |
If vehicle collateral is being added via a Collaterals panel, a save must be performed prior to clicking Valuate. Failure to click Save may result in a second collateral record being added to the application. One collateral record is complete, including the valuation result and vehicle details, and the other is incomplete, only including the valuation results. If this situation should occur, delete the incomplete record. |
When all applicable fields have been completed, process a valuation (if applicable). Finalize the collateral addition by clicking Save and Close at the top of the screen. When the collateral window closes, the collateral populates in the grid.

|
Upon successfully adding collateral to the collateral grid, the collateral also populates in the Collaterals grouping located in the Application Navigator. |
Descriptive Collateral Panel
A descriptive collateral panel is a user-defined panel that is able to collect information for a single piece of collateral. Descriptive collateral panels may be used for all collateral types and added to any user-defined application screen.
To add collateral to an application with a descriptive collateral panel, navigate to the screen that contains the panel. Complete all necessary and required fields.
 |
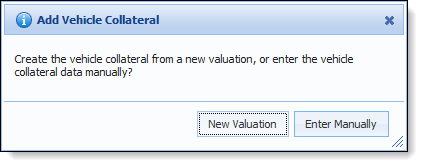
Upon navigating to the Vehicle Collateral panel, users will be required to select a check box to indicate vehicle collateral is being added. Once the check box is selected, a window titled Add Vehicle Collateral appears which prompts users to select either New Valuation or Enter Manually.
|
Once the screen containing the descriptive collateral panel is saved, the collateral is added to the loan application.
|
Upon successfully adding collateral with a descriptive collateral panel, the collateral also populates in the Collaterals list located in the Application Navigator and in any collateral grids in the application. |
Collaterals Section – Add Collateral
Collateral can be added to a loan application by clicking Add Collateral from the Application Navigator. The Add Collateral option is located beneath the Workflow section and indexed under Collaterals.
|
Users are unable to edit or delete collateral by clicking Add Collateral. |
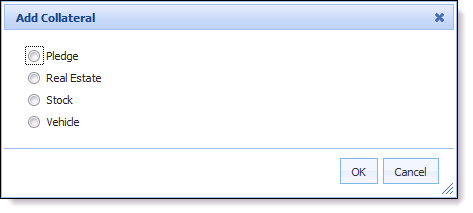
Clicking Add Collateral opens the Add Collateral screen in a new window.

In the Add Collateral screen, select the radio button that corresponds with the type of collateral being added and click OK. Once OK has been the selected, the corresponding collateral screen opens in the application workspace.
|
At this time, the collateral type selected appears under the Collaterals section. |
Complete all applicable fields, panels and grids in the collateral screen. Once all collateral information has been entered, save the screen to finalize the collateral addition.
|
When the save completes, the collateral populates in the Collaterals grouping located and in any collateral grids in the application. |
Collaterals Heading
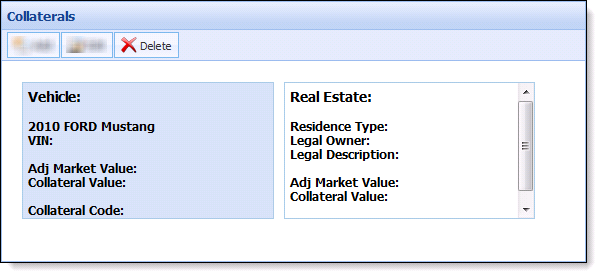
Selecting the Collaterals heading navigates users to the Collaterals screen.

A toolbar is located at the top of the Collaterals screen that allows users to perform the following actions:
| Icon | Title | Description |
|
|
Add | Allows a user to add collateral to the application. When collateral is added, a row is added to the collateral grid. |
|
|
Edit | Allows a user to edit collateral currently on the application. |
|
|
Delete | Allows a user to remove collateral from the application. When collateral is deleted, a row is removed from the collateral grid. |
When the Add function is selected, the Add Collateral screen opens in a new window.
In the Add Collateral screen, select the radio button that corresponds with the type of collateral being added and click OK. Once OK has been the selected, the corresponding collateral screen opens in the application workspace.
|
At this time, the collateral type selected appears under the Collaterals section. |
Complete all applicable fields, panels and grids in the collateral screen. Once all collateral information has been entered, save the screen to finalize the collateral addition.
|
When the save completes, the collateral populates in the Collaterals section located in the Application Navigator and in any collateral grids in the application. |
When processing an application, collateral information may be edited. Editing collateral provides users the opportunity to revisit collateral that has been previously added to the application and update the accuracy of the information previously provided. Collateral may be edited within:
- Collateral grids
- Descriptive collateral panels
- Collaterals section
Collateral Grid
Select the collateral that is to be edited from the collateral grid and click the Edit button.
The collateral screen opens in a new window. The current collateral values remain populated in the corresponding fields. Update the information or perform a new valuation. Once the new information has been entered, click Save and Close to finalize the collateral updates. The updated information populates in the collateral grid.
|
After an application has been decisioned or disbursed, users may revisit the screen containing the collateral grid to update collateral information if editability rights have been granted. |
Descriptive Collateral Panel
To edit collateral with a descriptive collateral panel, navigate to the screen that contains the panel. Update the collateral information or perform a new valuation.
Once the screen containing the descriptive collateral panel is saved, the updated collateral information is saved to the loan application.
|
After an application has been decisioned or disbursed, users may revisit the screen containing the descriptive collateral panel to update collateral information if editability rights have been granted. |
Collaterals Section
The Collaterals section contains an itemized list of the collaterals associated with an application. Select the desired collateral from the list to edit the collateral information.
When the desired collateral’s screen is the active screen, make the necessary modifications. When all collateral changes are complete, save the screen.
In addition to selecting the specific collateral from the list, users are able to access the collateral screen by clicking the Collaterals heading.
Selecting the Collaterals heading opens the Collaterals screen. Users are able to edit a collateral’s information by double-clicking the desired collateral or highlighting the desired collateral and clicking Edit.
When the desired collateral’s screen is the active screen, make the necessary modifications. When all collateral changes are complete, save the screen.
When processing an application, collateral information may be deleted from the application. Deleting collateral provides users the ability to remove collateral from an application that is no longer relevant. Collateral may be deleted within:
- Collateral grids
- Collaterals section heading
|
Users are unable to delete a collateral record from an application using a descriptive collateral panel. Users are able to delete values that are entered in a descriptive collateral panel field, however, removing information from all of a descriptive collateral panel’s fields does not delete a collateral record. |
Collateral Grid
Select the collateral that is to be deleted from the collateral grid.
Click the Delete button. The Framework prompts the user to confirm the collateral deletion. Click Yes to remove the collateral. Click No to keep the collateral and return to the application screen.
Collaterals Section
Users are able to select the Collaterals section heading to remove a collateral record.

Upon selecting the Collaterals heading, the Collateral screen becomes the active screen. Highlight the collateral record that is to be removed and click Delete from the Collateral toolbar.
When processing an application, users are able to input the following types of loan collateral:
Depending on the screen’s configuration, users may be able to select the core account that is to be held as collateral from a Pledge Collateral grid. Additionally, users may be able to provide additional information about the pledge in fields such as Description, Identification and Legal Owner.
The Pledge Collateral grid contains Asset information for all applicants stored on the Core Processor. Information within this grid includes the Account Type, Account Number, Balance, Available Balance and Maturity Date.
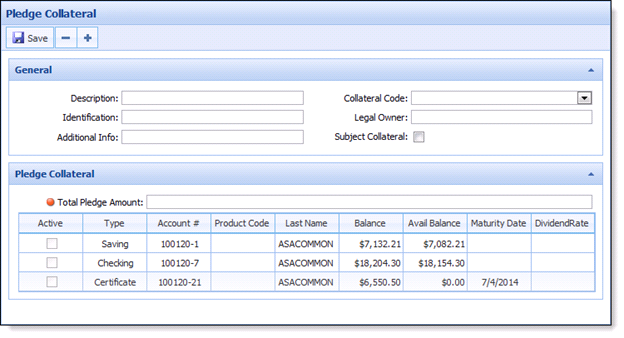
Complete the required fields and enter the amount to be placed on hold in the account until the loan is paid off in the Total Pledge Amount field. If the screen contains a Pledge Collateral grid, select the check box that corresponds with the asset to be held as collateral.
There must be a sufficient Available Balance in order for a Collateral Pledge to be made on an asset. It should be in an institution’s best practice to ensure a collateral pledge does not mature prior to the loan’s maturity.
Once all collateral information has been entered, the collateral addition finalizes when the screen is saved or Next is selected in the workflow.
|
The Framework updates the Core Processor with the hold information on the Pledge Collateral at Disbursement. |
When adding real estate collateral to a loan application, users are prompted to input various types of information on the property being used to collateralize the loan. This information is able to be collected in collateral or application panels.
Depending on the configuration of the user-defined screen, it may contain panels to record the following information:
- General real estate information
- Real estate valuation information
- Real estate location information
- Additional housing expense information
- Lien information
- Other owner information
Additional panels or screens may be configured to record optional real estate information such as:
- Loan Information – Deed
- Loan Information – Preparer
- Loan Information – Lienholder
- Loan Information – Recording
- Loan Information – Trustee
Depending on the configuration of the Real Estate Collateral screen, a general panel may be configured to capture basic collateral information.

Basic real estate collateral fields such as Description, Collateral Code and Legal Owner may appear in this panel.
Complete all required fields and continue inputting real estate collateral information in subsequent panels.
Depending on the configuration of the Real Estate Collateral screen, a valuation panel may be configured to capture the real estate valuation information.

Collecting valuation information allows users to record important real estate valuation information such as Market Value, Appraised Value, Appraisal Date, Available Equity, Equity Lending Cap, Tax Value and Last Assessment Date.
Complete all fields required to accurately valuate the real estate collateral. Once complete, continue inputting real estate collateral information in the subsequent panels.
Depending on the configuration of the Real Estate Collateral screen, a panel may be configured to capture the location information for the real estate collateral.
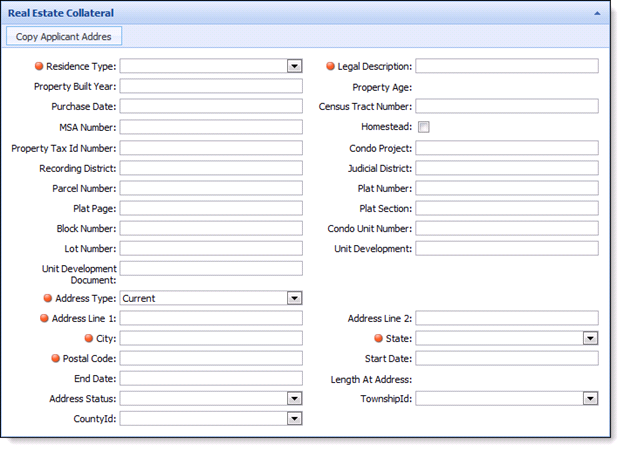
Collecting property location information allows users to record important real estate location information such as Residence Type, Census Tract Number, Recording District, Street Address, City, State, Postal Code, Township and County.
Complete all fields required to accurately locate the real estate collateral. Once complete, continue inputting real estate collateral information in the subsequent panels.
Copy Applicant Address Button
Depending on the configuration of the collateral screen, a button titled Copy Applicant Address may be configured to the panel. The Copy Applicant Address enables users to cut down on application processing time by enabling the current address of the primary applicant to be prepopulated in the address information fields.
When the Copy Applicant Address button is selected, the Copy From Applicant screen opens in a new window.
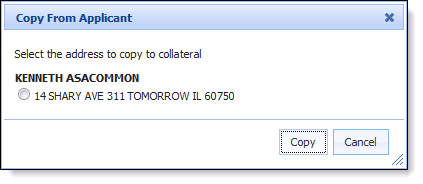
Select the radio button that corresponds with the address of the real estate collateral. Click Copy to import the applicant address into the real estate location address fields on the Real Estate Collateral screen. Click Cancel to return to the Real Estate Collateral screen.
 Additional Housing Expense Information
Depending on the configuration of the collateral screen, a grid may be configured to capture any additional housing-related expense information.

NOTE: The housing-related expense grid/panel may also be configured to Pledge, Stock and Vehicle collateral screens.
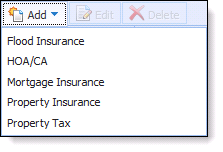
The additional housing expense grid enables users to indicate payment, policy and coverage information for additional housing-related expenses such as:
- Flood insurance
- Homeowners or condo association
- Mortgage insurance
- Property insurance
- Property tax
The additional housing expense grid contains a toolbar that allows users to perform the following functions:
| Icon | Title | Description |
|
|
Add | Allows a user to add additional housing-related expenses record. When an additional housing-related expense is added, a row is added to the grid. |
|
|
Edit | Allows a user to edit additional housing-related expenses currently on the application. |
|
|
Delete | Allows a user to remove additional housing-related expenses from the application. When an additional housing-related expense is deleted, a row is removed from the grid. |
Adding Additional Housing Expenses
When the Add button is clicked, a drop-down appears that prompts users to select the expense type. Indicate the type of expense by clicking the type from the drop-down list.
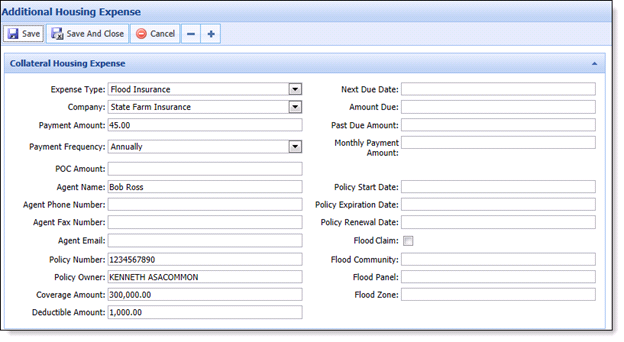
When the type of expense has been selected, the Additional Housing Expense screen opens in a new window. Within the Additional Housing Expense screen, complete all fields required to accurately add and valuate the collateral.
When all applicable fields have been completed, finalize the housing expense addition by clicking Save and Close at the top of the screen. When the collateral window closes, the additional housing expense populates in the grid.
When all applicable fields have been completed, finalize the housing expense addition by clicking Save and Close at the top of the screen. When the collateral window closes, the additional housing expense populates in the grid.

Editing Additional Housing Expenses
Select the additional housing expense that is to be edited from the grid and click the Edit button.

The Additional Housing Expense screen opens in a new window. The current values remain populated in the corresponding fields. Update the information. Once the new information has been entered, click Save and Close to finalize the housing expense updates. The updated information populates in the collateral grid.
Deleting Additional Housing Expenses
Select the additional housing expense that is to be deleted from the grid.

Click the Delete button. The Framework prompts the user to confirm the housing expense deletion. Click Yes to remove the housing expense. Click No to keep the housing expense and return to the collateral screen.
Depending on the configuration of the collateral screen, a grid may be configured to capture any additional liens on the collateral.

The lien information grid enables users to indicate existing lien information on the collateral such as Lien Type, Lien Amount and Lien Description.
|
The lien grid/panel may also be configured to Pledge, Stock and Vehicle collateral screens. |
The lien information grid contains a toolbar that allows users to perform the following functions:
| Icon | Title | Description |
|
|
Add | Allows a user to add existing lien information to a collateral record. When lien information is added, a row is added to the grid. |
|
|
Edit | Allows a user to edit lien information currently on the application. |
|
|
Delete | Allows a user to remove lien information from the application. When lien information is deleted, a row is removed from the grid. |
Adding Lien Information
To add lien information to collateral record, select the Add button. When the Add button has been selected, the Collateral Lien screen opens in a new window. Within the Collateral Lien screen, complete all fields required to accurately indicate the other lien information.
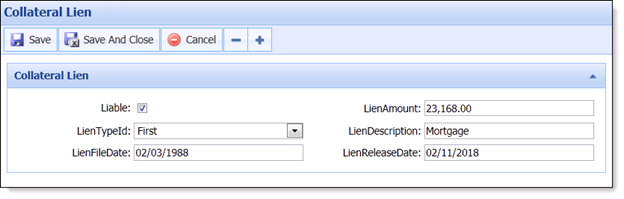
When all applicable fields have been completed, finalize the addition of the lien information by clicking Save and Close at the top of the screen. When the Collateral Lien screen closes, the lien information populates in the grid.

Editing Lien Information
Select the lien information that is to be edited from the grid and click the Edit button.

The Collateral Lien screen opens in a new window. The current values remain populated in the corresponding fields. Update the information. Once the new information has been entered, click Save and Close to finalize the lien information updates. The updated information populates in the lien information grid.
Deleting Lien Information
Select the lien information that is to be deleted from the grid.

Click the Delete button. The Framework prompts the user to confirm the lien deletion. Click Yes to remove the lien. Click No to keep the lien and return to the collateral screen.
Depending on the configuration of the collateral screen, a grid may be configured to capture the additional owners of the collateral.

The Other Owner Information grid allows users to indicated additional owner of the collateral and capture information such as Name, Address, Phone Number and Email Address for each.
|
The other owner information grid/panel may also be configured to Pledge, Stock and Vehicle collateral screens. |
The other owner information grid contains a toolbar allowing users to perform the following functions:
| Icon | Title | Description | ||
|
|
Add |
Allows a user to add other owner information to a collateral record. When other owner information is added, a row is added to the grid. | ||
|
|
Edit |
Allows a user to edit other owner information currently on the application. | ||
|
|
Delete |
Allows a user to remove other owner information from the application. When other owner information is deleted, a row is removed from the grid. | ||
|
|
Copy Other Owner |
Allows a user add an additional owner by copying information from previously added collateral records with multiple collateral owners.
|
Adding Other Owner Information
To add additional owners to collateral, select the Add button. When the Add button has been selected, the Collateral Other Owner screen opens in a new window. Within the Collateral Other Owner screen, complete all fields required to accurately indicate the other owner information.
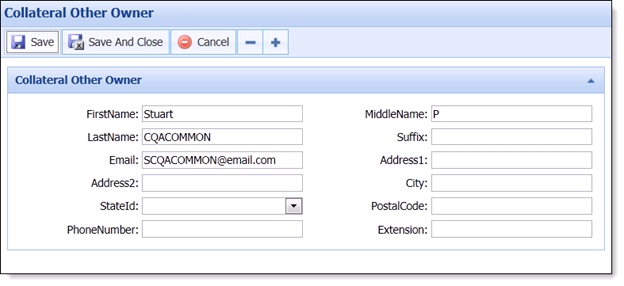
When all applicable fields have been completed, finalize the addition of the other owner information by clicking Save and Close at the top of the screen. When the Collateral Other Owner screen closes, the other owner information populates in the grid.

Editing Other Owner Information
Select the other owner information that is to be edited from the grid and click the Edit button.

The Collateral Other Owner screen opens in a new window. The current values remain populated in the corresponding fields. Update the information. Once the new information has been entered, click Save and Close to finalize the lien information updates. The updated information populates in the other owner information grid.
Deleting Other Owner Information
Select the other owner information that is to be deleted from the grid.

Click the Delete button. The Framework prompts the user to confirm the other owner deletion. Click Yes to remove the lien. Click No to keep the other owner and return to the collateral screen.
Copy Other Owner Button
Depending on the configuration of the collateral screen, a button titled Copy Other Owner may be configured to the panel. The Copy Other Owner button enables users cut down on application processing time by adding an additional owner from previously added collateral records with multiple collateral owners.
When the Copy Other Owner button is selected, the Copy Other Owner screen opens in a new window.
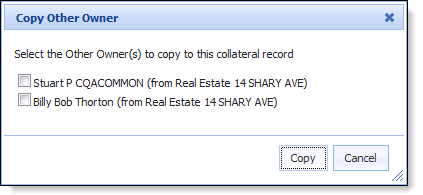
Select the radio button that corresponds with the other owner of the collateral. Click Copy to import the other owner information to the other owner information gird on the collateral screen. Click Cancel to return to the collateral screen.
When adding stock collateral to a loan application, users are prompted to input various types of information on the stocks/shares being used to collateralize the loan. This information can be collected in collateral or application panels.
Depending on the configuration of the user-defined screen, it may contain panels to record the following information:
- General stock information
- Stock valuation information
- Other owner information
General Information
Depending on the configuration of the stock collateral screen, a general panel may be configured to capture basic collateral information.
Basic stock collateral fields such as Description, Collateral Code, Legal Owner, Stock Collateral Type and Stock Certificate Numbers may appear in this panel.
Complete all required fields and continue inputting stock collateral information in subsequent panels.
Valuation Information
Depending on the configuration of the stock collateral screen, a valuation panel may be configured to capture the stock valuation information.
Collecting valuation information allows users to record important stock valuation information such as Adjustment Percentage, Market Value, Appraised Value, Stock Price, Stock Margin and Stock Valuation Date.
Complete all fields required to accurately valuate the stock collateral. Once complete, continue inputting stock collateral information in the subsequent panels.
When adding vehicle collateral to a loan application, users are prompted to input information on the vehicle being used to collateralize the loan. This information is able to be collected in collateral or application panels.
Depending on the configuration of the user-defined screen, it may contain panels to record the following:
- General vehicle information
- Vehicle valuation information
- Vehicle insurance information
- Other owner information
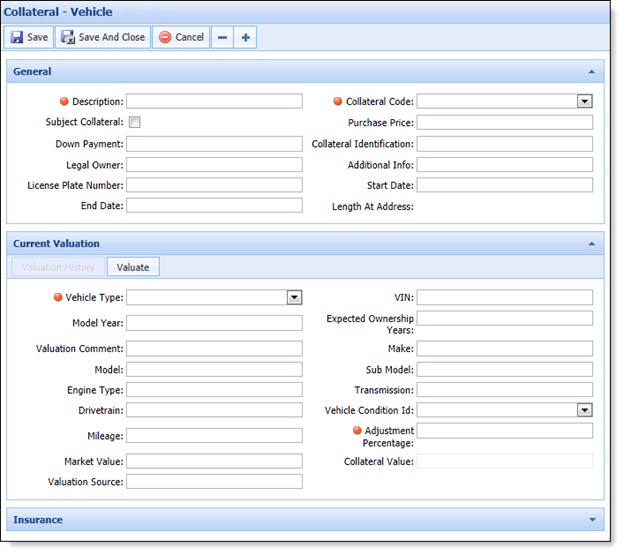
General Information
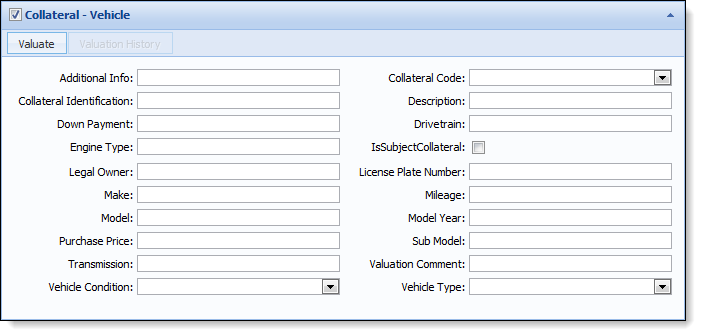
Depending on the configuration of the vehicle collateral screen, a general panel may be configured to capture basic collateral information.
Basic vehicle collateral fields such as Description, Collateral Code, Legal Owner, and Purchase Price may appear in this panel.
Complete all required fields and continue inputting vehicle collateral information in subsequent panels.
Valuation Information
Depending on the configuration of the vehicle collateral screen, a valuation panel may be configured to capture the vehicle valuation information.
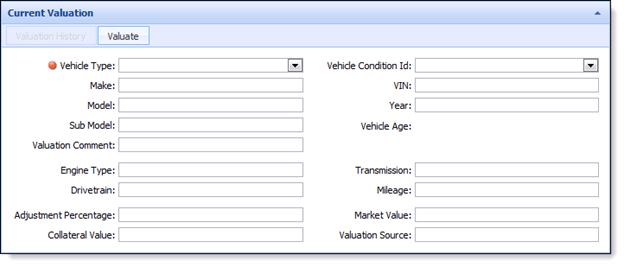
Collecting valuation information allows users to record important vehicle valuation information such as VIN, Vehicle Type, Vehicle Condition, Make, Model, Sub Model and Collateral Value. Complete a vehicle valuation and input any other fields required to accurately valuate the vehicle collateral.
The valuation panel may be configured with the following buttons:
| Icon | Title | Description |
|
|
Valuate | Allows a user to process a vehicle valuation. |
|
|
Valuation History | Allows a user to review the details of previously processed vehicle valuation. |


Valuating Vehicle Collateral
While inputting vehicle collateral, select the Valuate button to initiate the vehicle valuation process. The Valuation screen opens in a new window.
|
Information that is manually entered on the Collateral screen does not migrate to the Valuation screen. It should be a user’s best practice to click the Valuate button prior to entering vehicle collateral information so the vehicle information does not need to be entered a second time. |
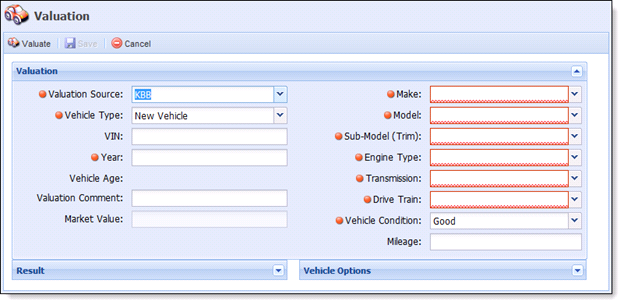
Starting with Valuation Source, complete all the required fields.
|
The required fields that appear in the Valuation screen vary according to the selections made in the Valuation Source and Vehicle Type fields. |
After identifying the Year, the choices available within subsequent fields depend on the selection made within the previous field. For example, when the year 2013 is selected the Pontiac Make is not available. Where if the year 2008 is selected, Pontiac would be a valid choice.
Use the following table to assist completing a vehicle valuation:
| Field Name | Details | ||
| Valuation Source | Select appropriate vendor from drop-down list (e.g. NADA, KBB). | ||
| Vehicle Type | Select appropriate option from drop-down list (e.g. Car, Truck, Boat, Motorcycle). This list is filtered by the selected options available under Valuation Source. | ||
| Year | Enter the year of the vehicle. | ||
| VIN |
VIN is not required to get a valuation but may be entered if it is available.
|
||
| Valuation Comment |
Enter a comment specific to this Valuation.
|
||
| Make | Select appropriate option from drop-down list (e.g. Chevrolet, Ford, Jeep). This list is filtered based on the vehicle Year that was entered. | ||
| Model | Select appropriate option from drop-down list (e.g. Impala, Focus, Wrangler). This list is filtered based on the vehicle Year and Make that was selected. | ||
| Sub-Model (Trim) | Select appropriate option from the drop-down list (e.g. Sedan, Coupe). This list is filtered based on the vehicle Year, Make and Model selected. | ||
| Engine Type | Select the appropriate option from drop-down list (e.g. V-6). | ||
| Transmission | Select the appropriate option from drop-down list (e.g. Automatic, Manual). | ||
| Drivetrain | Select the appropriate option from drop-down list (e.g. FWD, AWD). | ||
| Vehicle Condition | Select the condition of the vehicle. For example: Excellent, Good | ||
| Mileage | Enter the mileage of the vehicle. If not known, leave blank and the average mileage for the vehicle age will be used for valuation purposes. |
The following buttons are also included in the Valuation screen:
| Button | Description |
| Valuate | Processes the valuation request. The returned default value will populate the Market Value field. All values and options returned from the valuation source will show in the Results and Vehicle Options boxes. |
| Save | Saves the valuation to the application. |
| Cancel | Cancels the valuation process. |
| Set as Market Value | Select a specific Value Type to be used as the Market Value for the application. |
Once all the required vehicle fields have been completed, click the Valuate button to process the valuation. The Framework transmits the request to the selected valuation source.
|
If vehicle collateral is being added via a Collaterals panel, a save must be performed prior to clicking Valuate. Failure to clicking Save may result in a second collateral record being added to the application. One collateral record is complete, including the valuation result and vehicle details, and the other is incomplete, only including the valuation results. If this situation should occur, delete the incomplete record.
|
Before the collateral value is returned, users are prompted to select any additional options from the Vehicle Options panel.
|
The standard vehicle options are pre-selected. Cancel the selections that may not apply to the vehicle. |
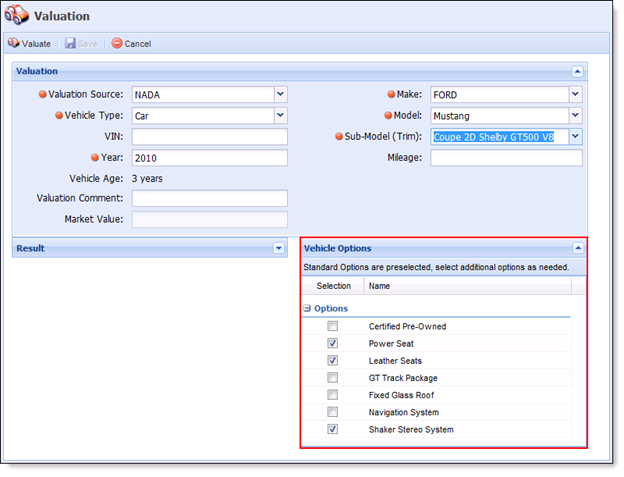
Once the Vehicle Options have been selected, click the Valuate button once more to receive the valuation results.
|
If the Mileage is unknown, the valuation connector inputs an assumed mileage based upon the age of the vehicle. |
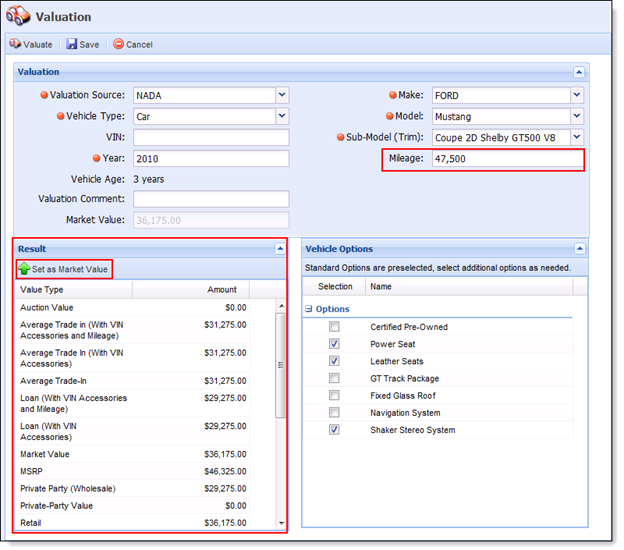
The institution’s preferred Value Type pre-populates in the Market Value field. Additional values populate within the Results panel. Review the additional results. If a more appropriate Value Type is applicable, highlight the Value Type and click the Set as Market Value button.
After the valuation is complete, click the Save button to finalize the vehicle valuation. Click Cancel to close the Valuation screen without saving the valuation. When the valuation is saved, the Valuation screen closes and the vehicle information populates in the vehicle collateral screen.
Once back on the vehicle collateral screen, the Valuation History button is enabled for selection (if configured to the screen).
Valuation History
Depending on the configuration of the vehicle collateral screen, a Valuation History button may be configured to display previous vehicle valuation results.

Click the Valuation History button to access the previous vehicle valuation results. When the Valuation History button is clicked, the Valuation History screen opens in a new window. By default, the information from the most recent valuation is displayed in the fields. If multiple valuations exist, click the drop-down located in the top-right and select the desired valuation to review.

Click OK or Cancel to close the Valuation History screen and return to the vehicle collateral screen.
Continue inputting vehicle collateral information in the subsequent panels.
Insurance Information
Depending on the configuration of the vehicle collateral screen, a panel may be configured to capture insurance information for the collateral.

Collecting insurance information allows users to record important insurance information such as Insurance Carrier, Policy Number, Policy Expiration Date and Policy Deductible. Complete all required fields and continue inputting vehicle collateral information in subsequent panels.