


The application toolbar is located at the top of the workspace. The application toolbar contains a series of icons that relate to linked screens and actions.

The following table displays the icons available in the Application Toolbar along with their descriptions:
| Icon | Title | Description | ||
|
|
Refresh | Refreshes the application and the current screen. | ||
|
|
Allows a user to print the screen currently open in the Application Workspace.
|
|||
|
|
Calculate |
Allows a user to refresh loan calculations.
|
||
|
|
Decision | Allows a user to submit an application to the decision model assigned to the Sub-Product. | ||
|
|
Approve | Allows a user (with the proper permissions) to approve an application that has not been decisioned. | ||
|
|
Decline | Allows a user to select an Adverse Action, Declined Reason and decline an application. | ||
|
|
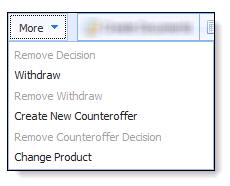
More Drop-down Menu |
Users are able to select additional Decision options by selecting the drop-down adjacent to the Decline button. The additional options include:
|
||
|
|
Create Documents | Allows a user to generate loan documents for the current application. | ||
|
|
Attach |
Allows a user to browse their local or network drive to attach supporting documents to the current application.
|
||
|
|
Disburse | Allows a user to disburse the current loan application. | ||
|
|
Post Comment | Allows a user to post a comment to the current application. | ||
|
|
Send Email | Allows a user to send an Ad Hoc email regarding the current application. | ||
|
|
Links | Allows a user to navigate to external websites by selecting a link from the drop-down. These are maintained by your financial institution. | ||
|
|
Queuing |
Displays the application’s is Current Queue and allows a user to:
|
||
|
|
Core |
Allows a user to:
|


 Calculate
Calculations are performed based on the Loan Terms entered within a given application. They also take into consideration any financed Debt Protection, Fees, Cross-sell amounts, etc. that are included in the loan amount.
Calculations run synchronously during the processing of an application and are triggered by the following events within the Framework:
- During Decision Processing
- Prior to Creating Loan Documents
- Prior to Loan Disbursement
- Upon Closing the Current Application
- Upon selecting the Calculate button within the Loan Terms panel
- Upon selecting the Calculate button within any application Toolbar
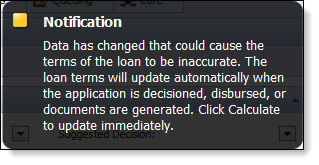
Since Calculations only occur during the above six events, calculated payment amounts may not be accurate if loan terms have changed or fees have been included in the loan amount. To ensure the most accurate figures are quoted to customers/applicants, a system Notification alerts users when calculations become outdated or inaccurate.
The Decision button is used to render the decision of a loan application. Decisioning occurs one of the following ways:
- Selecting the Decision button located within the Application Toolbar.
- Selecting Approve or Decline buttons from the Application Toolbar.
- Selecting the Decision button located at the top of the final screen of a Workflow’s Origination category.
- Selecting Approve or Decline buttons located at the final screen of a Workflow’s Underwriting category.
Decision
When a user clicks Decision from the Application Toolbar, the Framework submits the current application to the Decision Model assigned to the selected Loan Sub-Product. Depending on the configuration of the Decision Model and Decisioning Rules, an application may have one of the following decision results:
| Decision | Description |
| Auto Approve | The application has been automatically approved by Automated Decision Processing. |
| Auto Decline | The application has been automatically declined by Automated Decision Processing. |
| Auto Reject | The application has been automatically rejected by Automated Decision Processing. |
| None |
The Automated Decision Process may not render an Approve or Decline Decision. Applications may have their Status set to Pending Review, which requires a Senior Loan Officer or Underwriter review. For more information on processing Decisions manually, see the Underwriting section. |
Approve
Clicking Approve from the Application Toolbar allows a user to bypass the automated decision processing/model to render an approved decision. When manually approving an application the Decision is set to LO Approved.
Clicking Approve opens the Approve Application screen in the workspace.
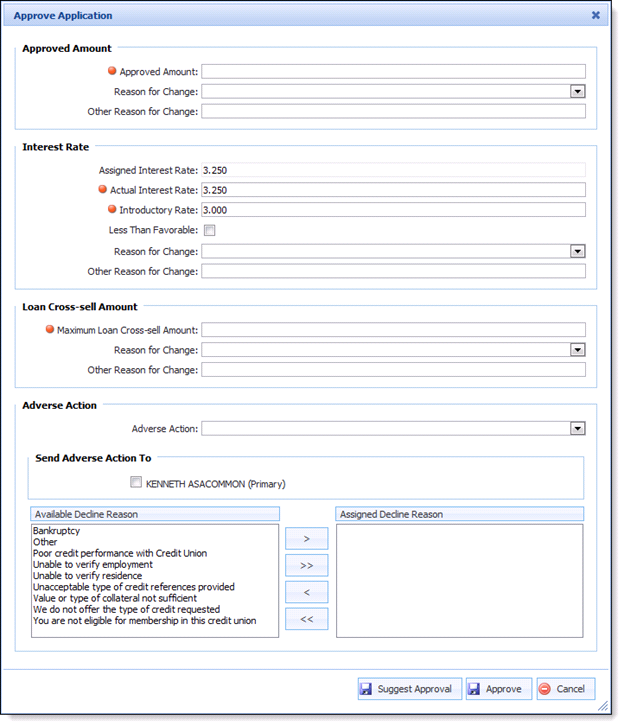
For more information, refer to the Underwriting Review section.
Decline
Clicking Decline from the Application Toolbar allows a user to bypass the conventional automated decision processing/model to render an approved decision. When manually declining an application the Decision is set to LO Rejected.
Clicking Decline opens the Decline Application screen in the workspace.
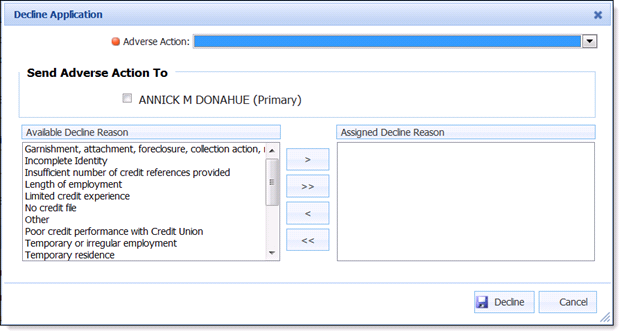
For more information, refer to the Underwriting section.
Remove Decision
If the current application has already gone through the decision process, the decision can be removed by selecting Remove Decision in the Application Toolbar. A Success message appears when the application is completed. Click OK to proceed with processing the current application.
For more information, refer to the Underwriting section.
WithdrawWhile processing an application, a user is able to click Withdraw from the Application Toolbar to remove an application from the active application pool. Clicking Withdraw opens the Withdraw Application screen in the Workspace.
For more information, refer to the Underwriting section.
Remove WithdrawIf an application has been withdrawn and needs to be reactivated, a user with appropriate permissions is able to click Remove Withdraw from the Application Toolbar to reactivate the application.
For more information, refer to the Underwriting section.
Create New Counteroffer
Rather than rejecting an application if the current Loan Terms are undesirable to an institution or a decision cannot be reached using the current terms, a user with appropriate permissions is able to create counteroffer(s) that contain alternative Loan Terms that are more desirable to the institution. In order for a Counteroffer to be issued, the application must have a status of In Progress, Pending Review or Countered. Once created, Counteroffers are able to be reviewed with applicants prior to acceptance.
 |
A single loan application can contain multiple Counteroffers. |
Counteroffer processing can proceed automatically, if indicated, without resubmitting to the decision engine.
Clicking Create New Counteroffer opens the Counteroffer screen in a new window.
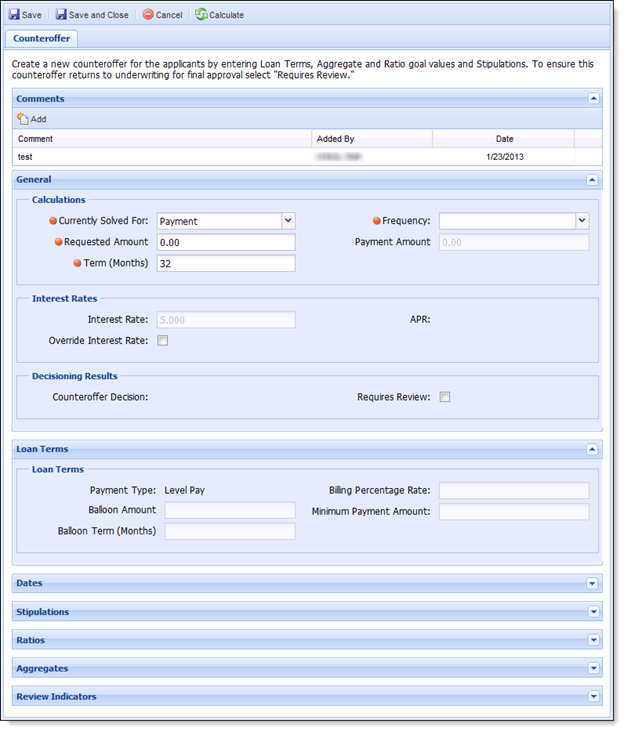
For more information, refer to the Underwriting section.
Remove Counteroffer Decision
If the current application has been Countered, the original Loan Terms can be restored by clicking Remove Counteroffer Decision in the Application Toolbar. Clicking Remove Counteroffer Decision processes the operation. A Success message appears when the process completes. Click OK to proceed with processing the application.
For more information, refer to the Underwriting section.
Change Product
Within the current loan application, a user with appropriate permissions is able to change the loan product assigned to the current application. Selecting Change Product opens the Change Product screen in the Workspace.
For more information, refer to the Underwriting section.
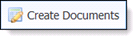
The Create Documents function enables users to create loan documents for the current application. The Framework uses two connectors to create lending documents:
- IMM
- CUNA Loanliner
Clicking the Create Documents button navigates users to the screen that corresponds with the documents connector implemented at your institution.
For more information on creating documents refer to the IMM or CUNA Loanliner connector guides.
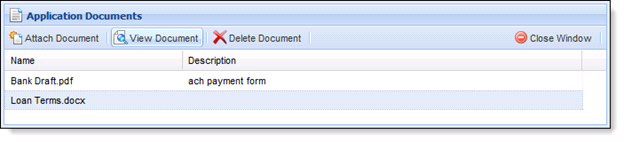
The Attach File function allows users to browse their local or network drive to attach supporting documents to a particular application (for example, copies of paystubs or copy of insurance).
Clicking the Attach button opens the Application Documents screen in a new window. The Application Document screen contains a toolbar that allows users to perform the following functions:
| Function | Description |
| Attach Document | Enables a user to attach a document to the loan application. |
| View Document | Enables a user to view a document that is attached to the application. |
| Delete Document | Enables a user to remove an attached document from an application. |
| Close Window | Enables a user to close the Application Documents screen. |
Attach Document
Clicking the Attach Document button opens the Attach Document screen in a new window.
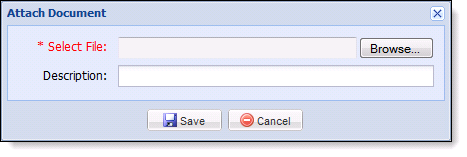
Click Browse to locate the desired document. Selecting the desired document populates it in the Select File field. Prior to attaching the file, a user is able to add a description to the document.
Once the document is attached, it populates in the document grid on the Application Documents screen.
How To: Attach Document
To attach a document on the hard drive to an application:
- Click the Attach button from the application toolbar.
- Select Attach Document.
- Click the Browse button.
- Search the local or network drive for documents to be added to the application.
- Select the document.
- Click the Open button.
- Enter a description.
- Click Save.
- Click Close Window.
View Document
Clicking the View Document button opens the selected document in a new window. When finished reviewing the document, close the document.
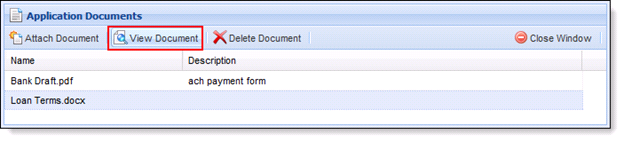
How To: View a Document
To view a document that is attached to the application:
- Click the Attach button from the application toolbar.
- Highlight the desired document.
- Click the View Document button.
Delete Document
Clicking the Delete button prompts user to confirm the deletion.
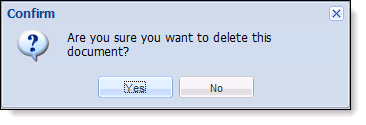
Click Yes to remove the document or No retain the item.
How To: Delete Document
To delete a document that is attached to the application:
- Click the Attach button from the application toolbar.
- Highlight the desired document.
- Click the Delete Document button.
- Click Yes.
The disbursement function allows users to disburse an approved loan application to an institution’s core. If an application is not approved, the Disburse button is not able to be selected.

For more information on disbursing an application, refer to the Post-Decision Processing section
The Post Comment function enables users to add Comments to the current application. Clicking the Post Comment icon opens the Post Comment screen within the Workspace.
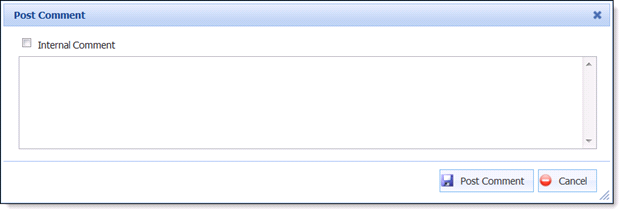
When posting comments to an application, users are able to flag the Comment as an Internal Comment so it is not transmitted to anyone outside of the institution. By default, the Internal Comment check box is cleared. To flag a comment as internal, select the Internal Comment check box.
NOTE: Comments can be added to an application in multiple Framework locations.
How To: Post Comment
To Post an Internal Comment to an application:
- Click Post Comment from the Application Toolbar.
- Select the Internal Comment check box.
-
Enter the desired comment in the text box.
-
Click the Post Comment button to post the comment to the application.
o Click Cancel to return to the application without posting a comment.
Users with appropriate permissions are able to compose and send emails regarding the current application.
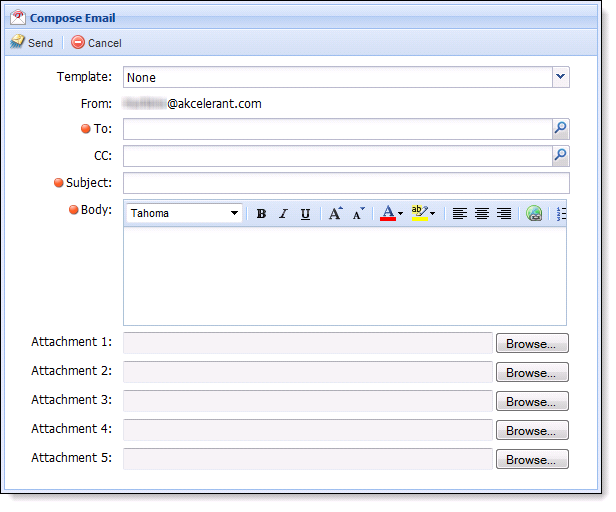
When composing an email, users have two options:
- Template – Users are able to compose an email by choosing a predefined template from the Template field drop-down. Templates allow an email to be generated with Company Approved text to maintain standards and consistency.
- Manually – Users may also choose to send an email by manually entering text. The user can select the search icon to search for email addresses that were defined for the Applicant.
|
An email can include up to five attachments. |
|
Attachments sent through email are stored based on association with the email and are not stored with the other attachments in the Attachments screen. When an email is successfully sent, the details of the email along with the attachments are saved to the Email History screen. |
Email History Screen
The Email History screen displays all emails sent within a specific Framework loan application. Emails populate within a grid that displays the Message Type, Subject, Recipient(s), Sent Date and Sent By information.

Users can refresh the emails that populate in the grid and specify the emails that populate in the grid according to a specified date range.
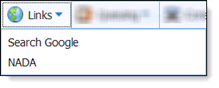
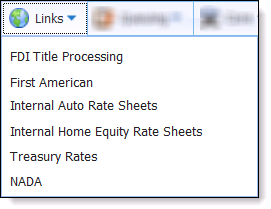
The Links button allows users to access a variety of institution-approved webpages by selecting a hyperlink stored within the Framework. Clicking the Links icon opens a drop-down list with all the company-approved links. Select a link from the drop-down to navigate to the external web page.
|
Users with appropriate permissions are able to manage Links by navigating to System Management>Lending>Hyperlinks. For more information on managing Links, refer to the Administrator Guide. |
The Queuing button allows a user to select a variety of queuing options on the current application.
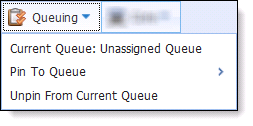
Clicking the Queuing icon populates a drop-down list with the following queuing options:
- Current Queue
- Pin To Queue
- Unpin From Current Queue
Current Queue
The Current Queue option displays the queue that the current application is assigned to.
Pin To Queue
The Pin To Queue option enables a user to disregard queuing rules and assign the current application to a specific queue.
|
If an application has been pinned to a specific queue, it will remain pinned to the specified queue until a user with the appropriate permission unpins the application from the specified queue. |
Unpin From Current Queue
The Unpin from Current Queue option enables a user with appropriate permissions to unpin the current application from a user-designated queue.
|
When an application is unpinned from a queue, queuing rules run after exiting the application. |
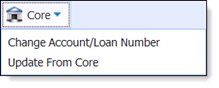
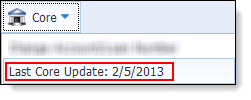
The Core button allows a user to perform a variety of core-specific options on the current application.
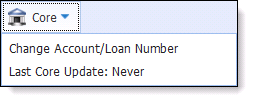
Clicking the Core button opens a drop-down list with the following Core options:
- Change Account/Loan Number
- Update From Core
Change Account/Loan Number
By selecting Change Account/Loan Number, users are able to reselect the Account Number and/or Loan Number that the application is assigned to. Selecting Change Account/Loan Number opens the Change Account Numbers screen within the workspace.
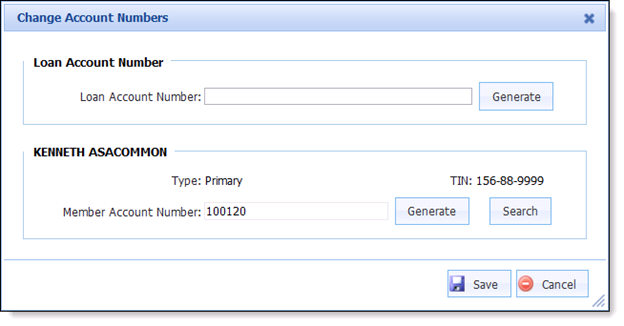
The Change Account Number screen contains the following sections:
- Loan Account Number
- Member Account
Loan Account Number
The Loan Account Number section allows users to manually enter or generate/reserve a new Loan Account Number (or suffix) in the core system. A user’s ability to enter or generate an account number depends on the loan type.
- Add-On/Refinance: The Loan Account Number automatically populates with the account number of the loan selected in the Add-On/Refinance panel. The Loan Account Number field is not editable.
- Non Add-On/Refinance: Users are able to manually enter the Loan Account Number or use the Generate button to reserve the next available account number in the core.
Once the Loan Account Number is determined, click the Save button to save the loan account number to the application. Click Cancel to return to the application without saving the loan account number.
Member Account Numbers
The Member Account Number section allows users to create a new account number for the loan applicant(s) or change the account number currently assigned to the loan application. All applicants assigned to the loan populate on the Change Account Number screen.
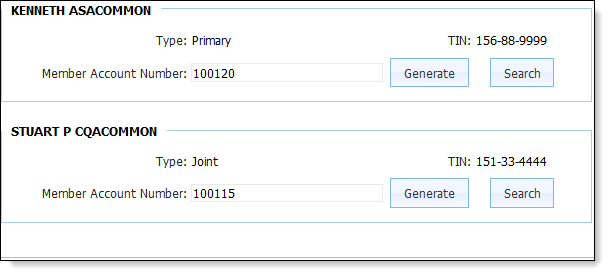
The Member Account Number section populates with the name, applicant type, tax identification number and account number. The Member Account Number section also contains two buttons.
- Generate
- Search
|
The Generate button is only active if the HOST_AUTOGEN_PERSONNUMBER parameter is configured as True in the Framework database. |
Generate
The generate account number process creates a member record in the core system and updates the applicant’s information on the Framework screen with the new account number. Click the Save button to retain the account number change. Click the Cancel button to return to the application without changing a loan or member account number.
Clicking the save button triggers the following processes:
- The new account number is assigned to the applicant.
- The application is converted to a member application.
- An Update from the Core is performed.
Search
The Search process enables users to change the account number assigned to the application. If the applicant is currently a member, the Framework searches the core for account numbers associated with the applicant’s TIN. Search results return in the Select Applicant screen.
|
If the applicant is configured as a non-member, the Search function can be used to locate existing member accounts that may be associated with the TIN provided. |
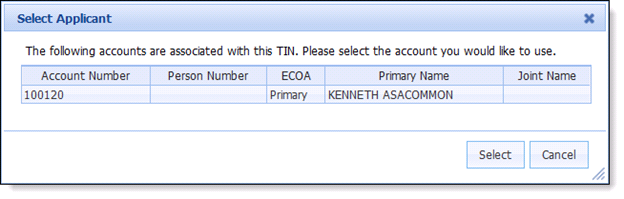
Associated accounts populate in the grid with the following information:
- Account Number
- Person Number
- ECOA
- Primary Name
- Joint Name
To choose the desired account, highlight the account and click the Select button. Click the Cancel button to return to the Change Account Numbers screen without selecting an account.
When a different account number is selected, it populates in the applicant’s Member Account Number field on the Change Account/Loan Number screen. Click Save to finalize the Account/Loan Number change. When Save is selected the Framework updates the Applicant from host, Demographics, Assets, Liabilities and Core Messages.
Update from Core
Update from Core enables users to update the application with the current information in the Core. The Update from Core function searches the core processor for current information based on the account number assigned to the application. When Update from Core is clicked, the process initiates and an indicator appears in the application workspace.
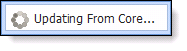
The following information updates from this process:
- Assets
- Liabilities
- Core Messages
Once the update from core process completes, the Last Core Update information populates with the date it was processed.
|
An application cannot be updated from the core if it is disbursed, withdrawn, had a disbursement error or a disbursement is pending. |