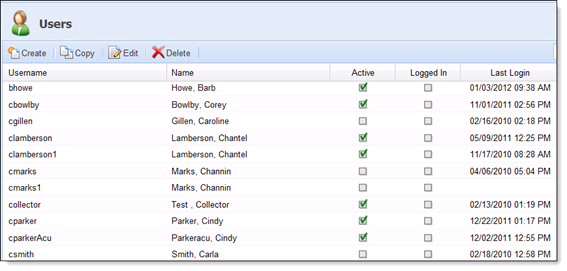
Utilize the system User functionality to create and maintain the Akcelerant Framework users for the organization. The ‘Users Listing’ page displays all users for the organization. The default view of this page is the "All Users" view, which lists all users in alphabetical order by username.
Users are created for Administrators and End Users. Individual Users can have permissions that differ from other users. These differences can be easily maintained by adding users to a variety of Security Groups. From these Security Groups, permissions can be set on the group level rather than changing a specific permission for every user.
|
Column/Heading Name |
Description |
|
Username |
|
|
Name |
|
|
Active |
|
|
Logged In |
|
|
Last Login |
|
| Filter |
|
Users are able to Create, Copy, Edit or Delete users from the Users Listing page.
Create a User
User Information Tab
Certain fields within this section can be included within letter and email templates. The following fields display within the User Information section in the tab:
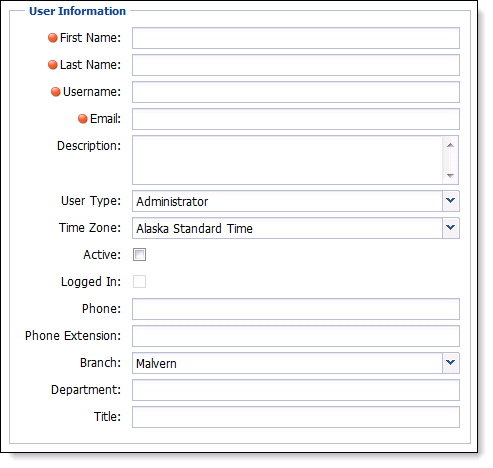
The below table describes the fields listed under the User Information heading:
|
Field |
Description |
| First Name, Last Name, Username, Email | Fill in the First Name, Last Name, Username and Email. All of these fields are required. |
| Description | Fill in a description of the user (position held). |
| User Type | Select the user type of Administrator, Casual User, Collector or Manager. The user types do not control the security for the user within the Framework. The User Type is not applicable to the lending solution. |
| Time Zone | Specify the time zone where the User works. This value defaults to Easter Standard Time Zone. |
| Active | Elect to make the user active in Akcelerant Framework checkbox. If a User is not marked as Active, they will not be able to log in to the system. |
| Logged In |
The Logged In checkbox shows if the user is currently logged into the system. If the user becomes ‘stuck’ in the application, simply open a new session of the Akcelerant Framework and log in. A message is returned asking to replace the current session. Click "OK" and the application reopens. |
| Phone, Phone Extension, Branch, Department, Title |
If applicable fill in the phone, phone extension, branch, department and title. |

The below table describes the fields listed under the 1st Framework Authentication heading:
| Field | Description |
| Method | Specify the user’s security type as System. |
| Password, Confirm Password |
Insert the password and confirm the password. These Field Values must match and satisfy the length requirements specified. If the password entered is a temporary password, select the checkbox for ‘Force Password Change on next Login’ to direct the user to select a password. |
| Force password change on next login |
The ‘Force Password to Change on Next Login’ may be used at any time to force the user to change their password the next time they login to Framework. |
| Password never expires | Check that the user's password will never expire. |
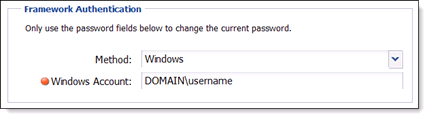
The below table describes the fields listed under the 2nd Framework Authentication heading:
| Field |
Description |
| Method | Specify the user’s security type as Windows. |
| Windows Account | The format for this field is Domain\Username. This allows the user to utilize their network login rather than creating a separate system password. |
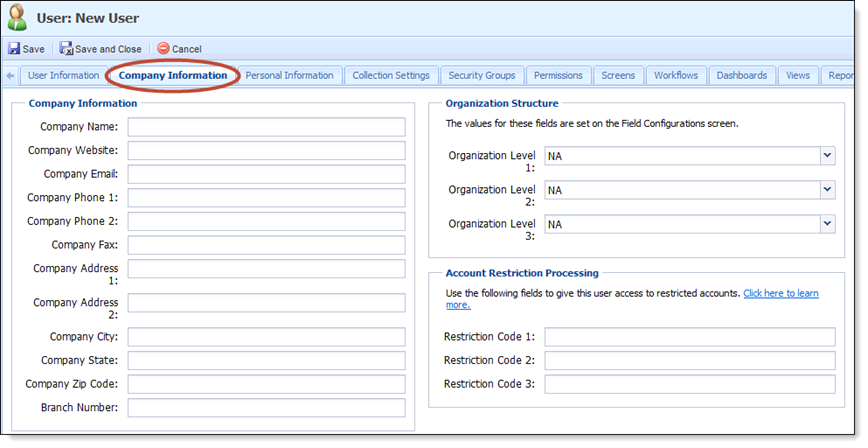
Company Information Tab
Within the Company Information tab the following sections display: Company Information, Organization Structure and Account Restriction Processing.
| Columns/Headings |
Description |
| Company Information |
|
| Organization Structure |
|
| Account Restriction Processing |
|
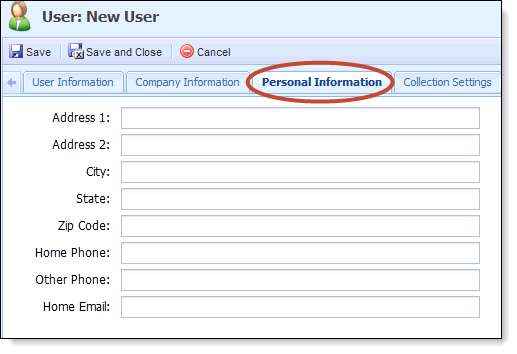
Personal Information Tab
- Define personal information about the user. All fields on this page are optional. Information from this page can be formatted into Emails.
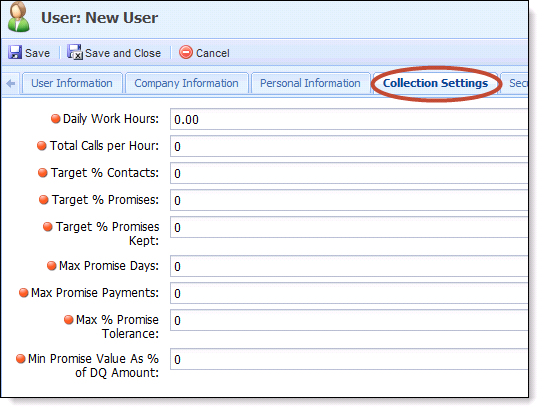
Collection Settings Tab
The Collections Settings define the parameters to monitor the performance of a user. These settings should be configured for users whose performance is being tracked within the Framework. For users whose performance is not being tracked, these numbers can be left at 0.
| Field Name | Description | How contributes to User Performance | ||
| Daily Work Hours | Identifies the number of hours per a day that the user is expected to work. | N/A | ||
| Total Calls per Hour | Identifies the number of calls that a collector is expected to make per hour. |
Used to determine:
|
||
| Target % Contacts | Identifies the percentage of calls placed by the user expected to result in a successful, valid contact. |
Used to determine:
|
||
| Target % Promises | Define the percentage of successful promises the user must meet. |
Used to determine:
|
||
| Target % Promises Kept | Define the percentage of successful promises kept the user must meet. |
Used to determine:
|
||
| Max Promise Days | Identifies the maximum number of days a collector can define for the time period in which the total promise must be fulfilled. For example, if the max promise days is set to 30 days and the user sets the promise to be completed in 45 days, the promise goes to management for approval. to management approval. |
N/A | ||
| Max promise payments |
Identifies the maximum number of payments in which a user is able to divide a promise payment.
For example, if the max promise days in System Management>Solution>Collection is equal to 4, and the user sets up 5 payments, the promise is deferred to management approval. |
N/A | ||
| Max % Promise Tolerance |
Identifies the maximum percentage of the total promise amount that a user can accept to satisfy the promise payment. A promise payment can be short without being considered broken as long as the payment meets the discount requirement specified here.
|
N/A | ||
| Min Promise Value As % of DQ Amount |
Identifies the maximum percentage of the total promise amount that a user can accept to satisfy the promise payment. A promise payment can be short without being considered broken as long as the payment meets the discount requirement specified here. For example, if this setting is set to 10% and the total DQ amount is $10,000.00, the minimum promise that the user can take is $1,000.00. Otherwise the promise is sent for manager approval. |
N/A |
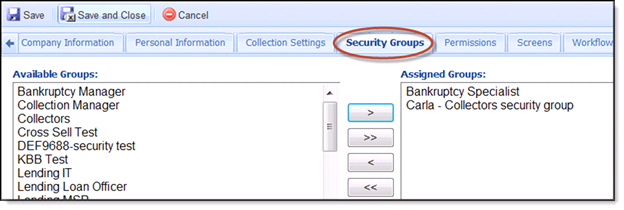
Security Groups Tab
Within the Security Groups tab, assign the new user to a Security Group. The Security Groups that are available are defined in System Management>Groups>Security Groups.
 |
A user can be assigned to multiple security groups. |

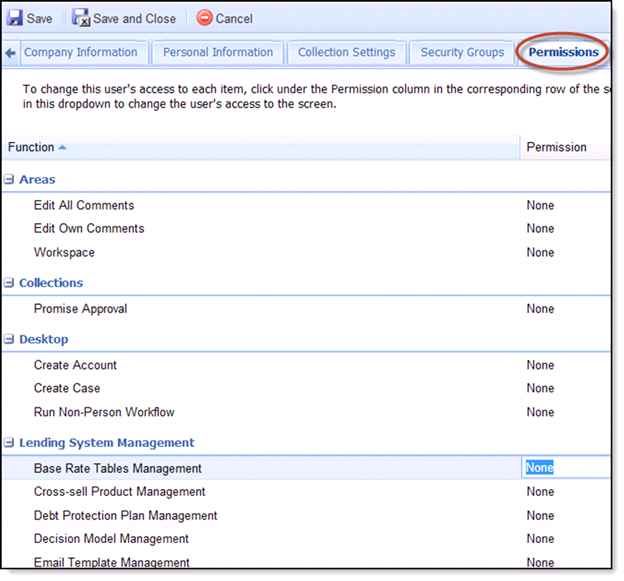
Permissions Tab
Within the Permissions tab, manage the new user’s access to several features throughout the Framework. This tab contains two columns: Function and Permission. Click under the Permission column in the corresponding row of the screen and a drop down appears. Change the value in this drop down to change the user's access to the screen. The following are permission options that are available through the permission drop down:
- None: If selected the user does not have permission to view or execute the feature.
- Change: If selected the user has full access to the feature. User can view and edit.
- View: If selected, the user has the ability to view the function but does not have the ability to change or execute it.

Security Groups Tab
- The Security Groups tab displays the Available Groups and the Assigned Groups for the selected user. This defines the users access within the Framework.
- Highlight one or more Groups in the Available Groups window and clicking the > button will move the Groups to the next window.
- Clicking the >> will move all Groups from the Available Groups window to the Assigned Groups window.
Permissions Tab
Permissions provide the ability to define individual user access to various areas within the Akcelerant Framework. Select the dropdown for each permission level granted for each option. Users will be presented with None, View and Change. Not all permissions will have all three options.
- None - The user is unable to access the specified area and a message to that effect will display.
- View - The user is able to access the specified area, but is unable to make any modifications to the information contained therein. If a modification is attempted, a message notifying the User of the security restriction will display.
- Change - The user has full access to that specified area.
|
|
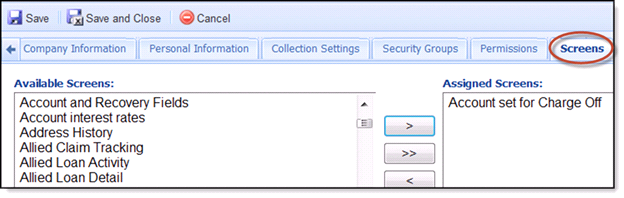
Screens Tab
- A list of screens that have been created in the Akcelerant Framework is displayed under the Available Screens window. If the user is assigned to Security groups, the system will grant the screens permissions defined in the Security Group without the need to define permission in the Screens section here.
- Highlight one or more Screens in the Available Screens window and clicking the > button will move the Screens to the next window.
- Clicking the >> will move all Screens from the Available Screens window to the Assigned Screens window.
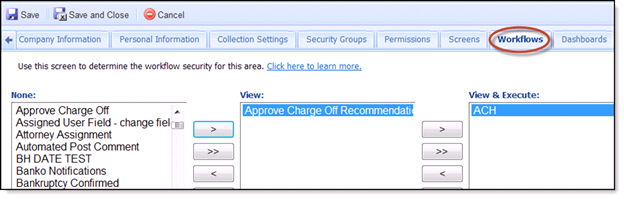
Workflows Tab
- A list of workflows that have been created in the Akcelerant Framework is displayed under the Available Workflows window. If the user is assigned to Security groups, the system will grant the workflow permissions defined in the Security Group without the need to define permission in the Workflow section here.
- Highlight one or more workflows in the Available Workflows window and clicking the > button will move the Workflows to the next window.
- Clicking the >> will move all Workflows from the Available Workflows (or Views window) window to the View and Execute window
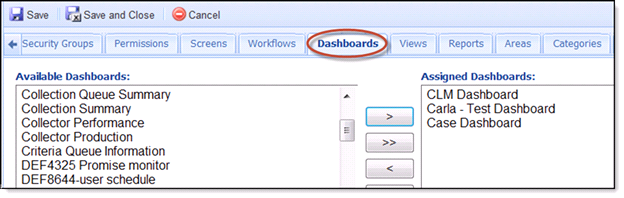
Dashboards Tab
- Lists of all Dashboards that have been created in the Akcelerant Framework are displayed under the Available Dashboards window. If the user is assigned to Security groups, the system will grant the Dashboard permissions defined in the Security Group without the need to define permission in the Dashboard section here.
- Highlight one or more Dashboards in the Available Dashboards window and clicking the > button will move the Dashboards to the next window.
- Clicking the >> will move all Dashboards from the Available Dashboards window to the Assigned Dashboards window.
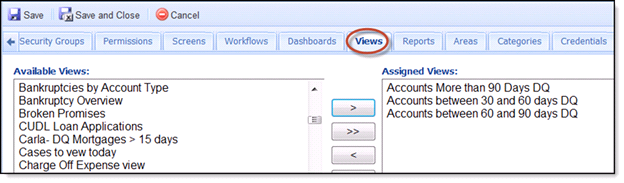
Views Tab
- A list of all Views created in the Akcelerant Framework displays under the Available Views window. If the user is assigned to Security groups, the system will grant the views permissions defined in the Security Group without the need to define permission in the Views section here.
- Highlight one or more Views in the Available Views window and clicking the > button will move the Views to the next window.
- Clicking the >> will move all Views from the Available Views window to the Assigned Views window.
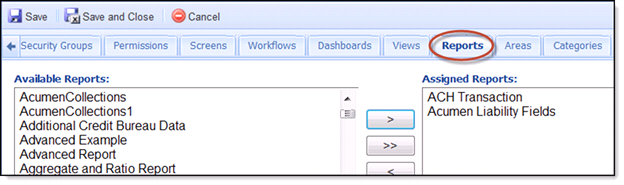
Reports Tab
- Lists of all Reports that have been created in the Framework are displayed under the Available Reports window. If the user is assigned to Security groups, the system will grant the reports permissions defined in the Security Group without the need to define permission in the Reports section here.
- Highlight one or more Reports in the Available Reports window and clicking the > button will move the Reports to the next window.
- Clicking the >> will move all Reports from the Available Reports window to the Assigned Reports window.
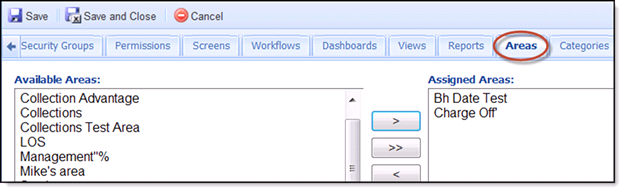
Areas Tab
- A list of all Areas that have been created in the Framework is displayed under the Available Areas window. If the user is assigned to Security groups, the system will grant the areas permissions defined in the Security Group without the need to define permission in the Areas section here.
- Highlight one or more Areas in the Available Areas window and clicking the > button will move the Areas to the next window.
- Clicking the >> will move all Areas from the Available Areas window to the Assigned Areas window.
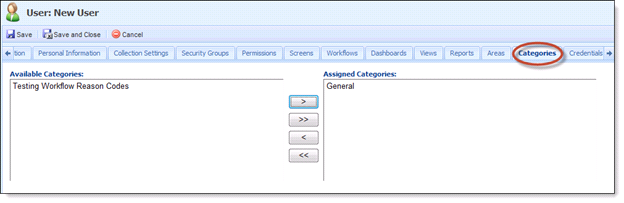
Categories Tab
- A list of all Categories that have been created in the Framework is displayed under the Available Categories window.
- Highlight one or more Categories in the Available Categories window and clicking the > button will move the Categories to the next window.
- Clicking the >> will move all Categories from the Available Categories window to the Assigned Categories window.
Restrictions Tab
This section allows System Administrators to restrict users from accessing specific accounts within the Framework. System Administrators can assign codes to a user that will give the user access to accounts that are restricted. Additionally, System Administrators can prevent users from accessing a person's account by adding the person's identifier to the Restricted Persons Grid.

Restricted Account
- Account Restriction allows access to restricted accounts to be controlled on an account by account basis. Permissions are set on each user to give access to restricted accounts.
- To enable Account Restriction in the Framework, click the "Enable Account Restriction" checkbox on the Security Tab under the Administrative Setting screen.
- The restriction level on an account is determined by the Account Restriction Code field in the Framework. If Account Restriction Processing is enabled, then a user must be given the appropriate permissions in order to view restricted accounts.
- By default, all users have access to account with a 0 or no Account Restriction Code. The possible values in the Restricted Access field on each account are 0-6. The numeric values represent the following types of restricted accounts:
(0) Normal
(1) Restricted
(2) Sensitive
(3) Employee
(4) Employee Family
(5) Employee Sensitive
(6) Employee Sensitive Family
- In order for a user to view an account with a Restricted Access level of 1 or higher, the user must have an Account Restriction Access of equal or greater value. For example, if an account has a Restricted Access level of 3, then a user must have a 3, 4, 5 or 6 entered in the "Restriction Code 1" field in order to view the account. The Restriction Code 1 and Restriction 3 fields are not used.
Restricted Persons
- System Administrators can now restrict persons from a user which prevents that user from gaining access to the person's account workspace.
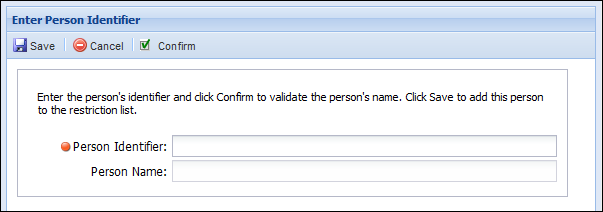
- To add a person's account, the System Administrator must select Add from the Restricted Persons grid.
- A screen appears asking for the Person Identifier of the person you wish to prevent the user from seeing. Insert the Person Identifier, and select Confirm. Once Confirm has been selected, the person's name should appear under the Person Identifier.
- If that is the correct person that should be restricted from that user, select Save. The Person Identifier will be added to the grid. To remove accounts, highlight the account and select Remove.
- If the user does not have appropriate permissions, the user will be given a message shown below stating that they do not have access to the account. This message will appear when users search for a user that they are restricted from viewing or when working a queue.
In order to view an account, the user must be allowed based on both the Restriction Code and Restricted Persons.