Cases are made up of Tasks which are the steps required for completion of the case. Case Tasks serve as a streamlined method of working specialty processes such as bankruptcies, repossessions and lawsuits.
The Case Tasks screen enables users to view, add, cancel, delete and perform tasks that are assigned to a case.
Case Selection
Select the case in context using the case drop down located on the Case Tasks tab.

Working a Task
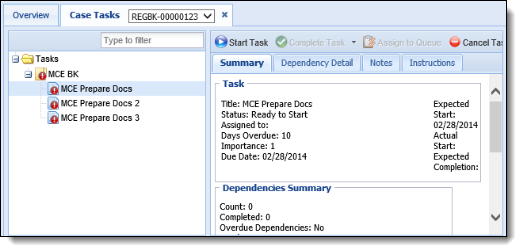
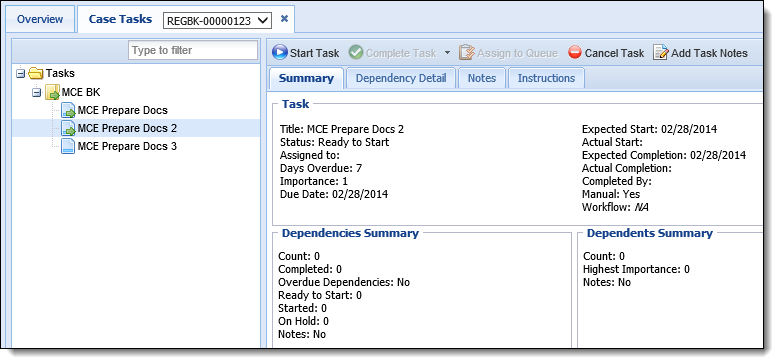
Upon selecting the desired case, the Case Tasks screen refreshes to display the tasks associated with the selected case. There are two sections of this screen: the Task Navigation Panel (purple) and the Task Panel (red).
Task Navigation Panel
The Task Navigation Panel shows all Task Processes and Tasks required to complete the case and the status of each. The Task Processes associated with the case are displayed as folders that contain the Tasks that make up that specific process.
To easily locate a specific Task, enter any text in the filter box at the top of the panel.
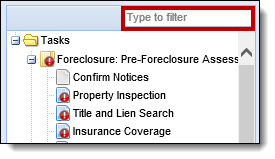
Icons are displayed next to the Task Process and Task to indicate whether it is ready to be started ![]() or it is overdue
or it is overdue  . Overdue items must be completed immediately.
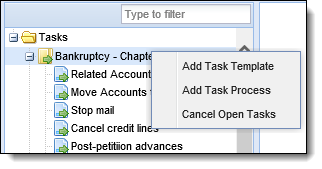
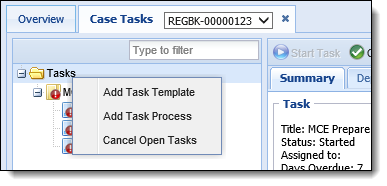
Right-click on a Task Process to add a Task Template, add a Task Process or to Cancel Open Tasks. More information on these features is outlined below.
Click to select a task to run from the Task Navigation Panel. The task populates in the Task Panel.
Task Panel
Upon selection of the task in the Task Navigation Panel, click Start Task on the Task Panel to begin working the task.
 |
A Task may have a dependency, which means that the task cannot be started until the task it is dependent on is completed. These are set by the System Administrator when creating Task Processes. |
If the task is configured to run a workflow, a Select Accounts prompt may appear to associate the workflow to the account(s) related to the case.
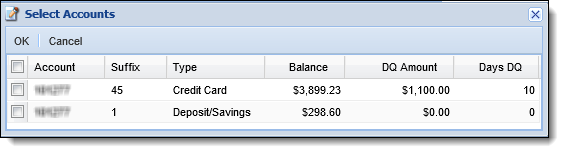
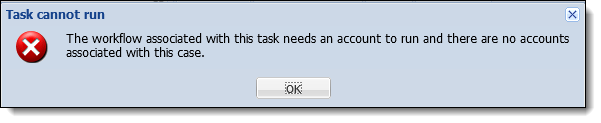
The appearance of the Select Accounts prompt is dependent upon the context of the workflow and only appears when workflows are configured in an Account context. If no accounts are associated to the case in context, the workflow cannot be executed and the following error message displays:
|
The context of a workflow is defined by the workflow steps added to the workflow by the system administrator in System Management > Workflow > Workflows. Workflows configured in an Account context include account-specific workflow steps, such as Next Contact Date. |
Reference the table below for an overview of this prompt’s functionality:
| Workflow Context | Single/Multi-Account Workflow | Number of Accounts Related to the Case | Action | End Result |
| Case or None | Both | N/A | Prompt does not appear and workflow automatically starts. | Workflow is only associated to the case being worked. |
| Account | Both | None | The preceding Error Message displays. | Workflow cannot be executed. |
| Both | One | Prompt does not appear and workflow automatically starts. | Workflow is associated to the account related to the case. | |
| Single | More than one | Prompt appears listing all accounts related to the case. Select an account to associate with the workflow. | Workflow is associated with the selected account. | |
| Multi-Account | More than one | Prompt appears listing all accounts related to the case. Select the account(s) to associate with the workflow. | Workflow is associated with the selected account(s). |
|
When a task workflow is configured in a BOTH context, the Select Accounts prompt functions as it does for a task workflow configured in an ACCOUNT context. |
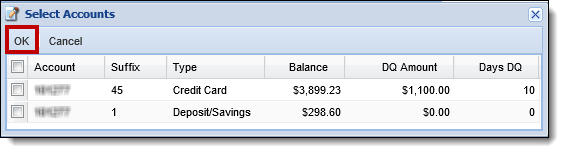
Select the account(s) to be included in the workflow by clicking the checkbox next to the desired account(s). Click OK to close the prompt and return to the Case Task screen.
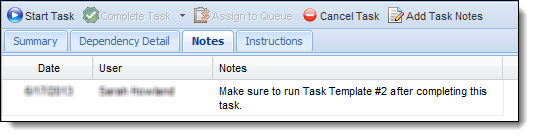
The top of the Task Panel contains a toolbar where task functions are performed.

| Button | Description |
| Start Task | Click this button to begin working the task. |
| Complete Task | Click this drop down button to mark the task as complete once it has been worked. |
| Assign to Queue | Click this button to assign the task to a task queue to be worked by another person/department. |
| Cancel Task | Click this button to cancel the task. For more information on cancelling a task, please see the Cancelling a Task section below. |
| Add Task Notes | Click this button to record any notes related to the task. The notes appear on the Notes tab of the Case Tasks screen. |
The details of the task in context are organized into the following tabs:
Summary
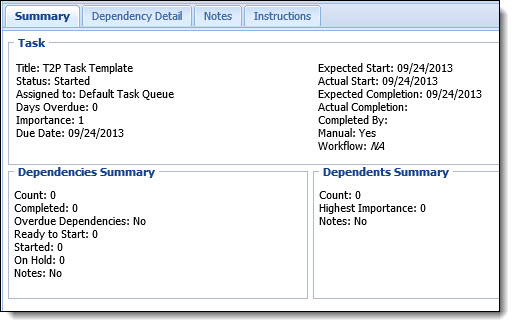
Task
| Field | Description |
| Title | Title of the Task Process that the user is working. |
| Status | Status of the task. The status can be Started, Canceled or Completed. |
| Assigned to | Displays if the Task is assigned to a specific Task Queue. The Task Queue Name is displayed. If it is not assigned to a queue, this field is blank. |
| Days Overdue | Displays how many days the task is Overdue. This is calculated from the Expected completion date and today's date. |
| Importance | This is set by the system administrator when creating the task process. Tasks with a higher importance rating (1) are worked first. 5 is the lowest importance rating. |
| Expected Start | This field is calculated from the Offset date entered by the System Administrator. This displays the expected start date of the task. |
| Actual Start | This field displays the actual start date of when the task began. |
| Expected Completion | This field displays the expected completion date of the task. |
| Actual Completion | This field displays the actual task completion date. |
| Completed By | Displays the name of the user that the task was completed by. |
| Manual | Displays if this a manual or automated task. |
Dependencies Summary
| Field | Description |
| Count | The number of dependencies tied to the process. |
| Completed | The number of completed dependencies tied to the process. |
| Overdue Dependencies | Indicates if there are any overdue dependencies tied to the process. |
| Ready to Start | The number of dependencies tied to the process that can be started. |
| Started | The number of dependencies tied to the process that have been started. |
| On Hold | The number of dependencies tied to the process that are on hold. |
| Notes | Indicates if there are notes tied to any dependencies. |
Dependents Summary
| Field | Description |
| Count | The number of dependents tied to the process. |
| Highest Importance | The number of dependents tied to the process that are marked with highest importance (1). |
| Notes | Indicates if there are notes tied to any dependents. |
Dependency Detail
The Dependency Detail Tab displays a list of all dependencies for the task process. The task Name, Status, Status Date, Assigned To, Importance, Overdue, Offset and Offset Unit fields are displayed.

Notes
Instructions
The Instructions Tab displays instructions that were entered by the System Administrator when creating the task process.

When finished working the Task, click the Complete Task button on the toolbar. A drop down displays with possible outcomes of the task. Select the result. Once the task is complete, all buttons in the toolbar are disabled and the task is disabled (cannot be selected) in the Task Panel.
Adding a Task Process/Template
If additional Task Processes or Templates need to be added, right-click a Task Process in the Task Navigation Panel. An item list appears. Select Add Task Process or Add Task Template. A new window appears to select a template from the pre-populated list.
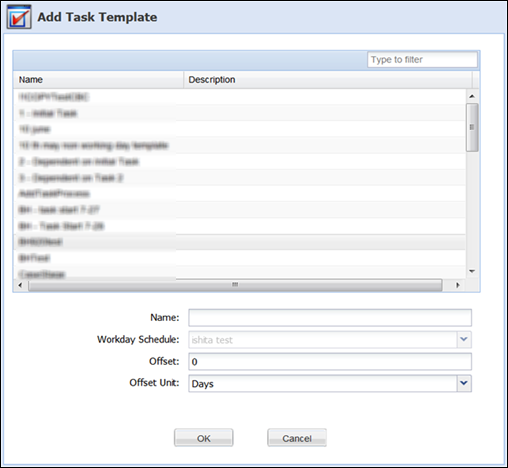
If the Task Template should be named something other than the name selected from the list, enter a new name in the Name field.
The Workday Schedule field displays the calendar selected during original configuration of the Task or Task Template. This field is not editable from this window.
Enter a value in the Offset field. This value overrides the value defined during original configuration of the Task or Task Template. The offset value sets a buffer of time that can elapse before the task process or template must be started.
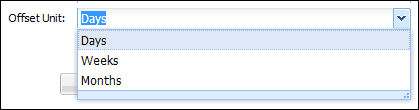
Select the Offset Unit from the drop down to determine if the Offset should be counted in days, weeks or months.
Click OK to add the new Task Process/Template to the Task Navigation Panel.
|
For information on configuring Task Processes and Task Templates, please refer to the Framework Administrator Guide. |
|
Appropriate permissions must be granted by a system administrator in order to add a new Task Process or Template to a case. |
Canceling a Task
Prior to completing a task within the task list, users are able to cancel it. Perhaps the task has already been completed outside of the process or the task no longer needs to be completed. A task can be canceled through the Task Process folder, or through the Task Template folder to cancel all task processes and the associated tasks.
To cancel a Task Process, click to highlight a specific task process folder within the task list and click Cancel Open Tasks.
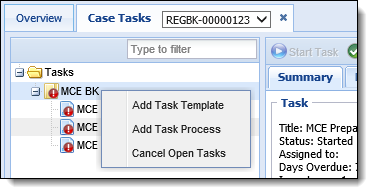
To cancel all tasks within the Task Template, right-click the Tasks folder and select Cancel Open Tasks.
A confirmation message displays and the Status of the Case is set to Canceled.