Temenos Lifecycle Management Suite - Loan Origination Product Guide
Installation
| Technical Guide > [No Target Defined] > New Installation > Installation |
This topic outlines the steps to perform a new installation of the Temenos Lifecycle Management Suite and contains:
The installer for the Temenos Lifecycle Management Suite is available on the Collaboration Portal.
 |
The screenshots below are for example purpose only and the Versions indicated may not represent your installation scenario. |
To download the appropriate installers:
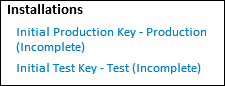
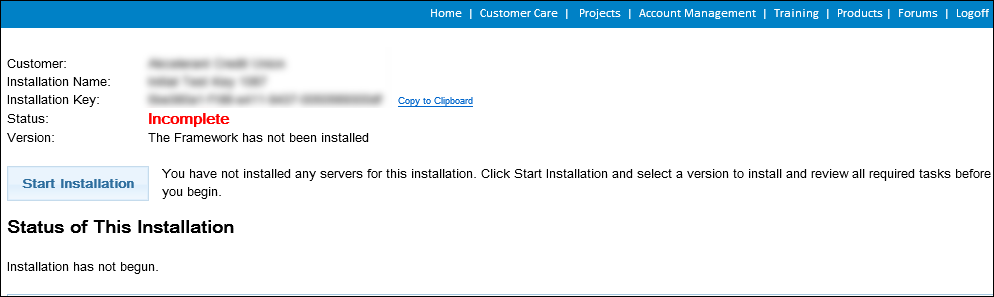
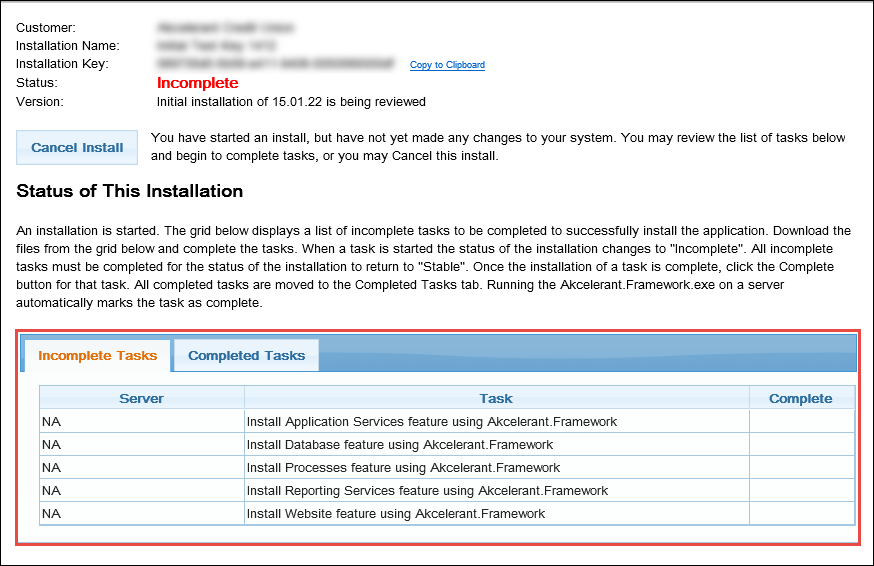
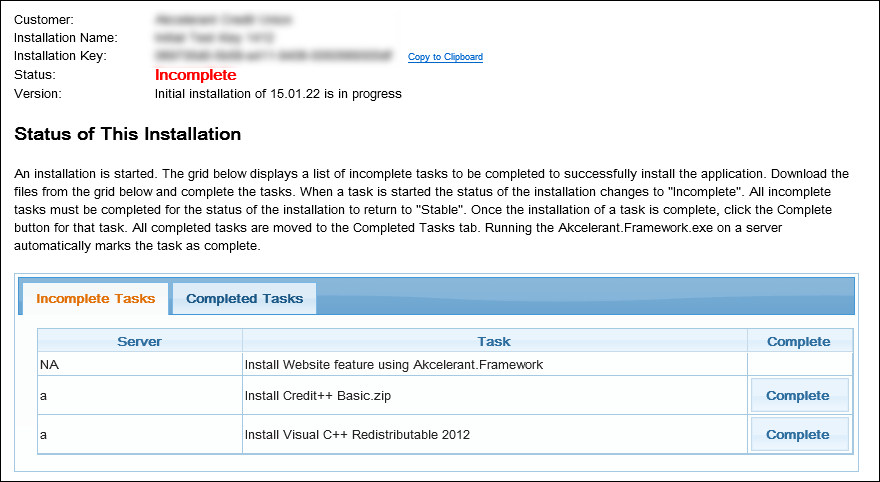
The installation is marked as Incomplete upon first receiving the installation key.
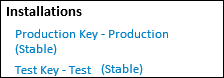
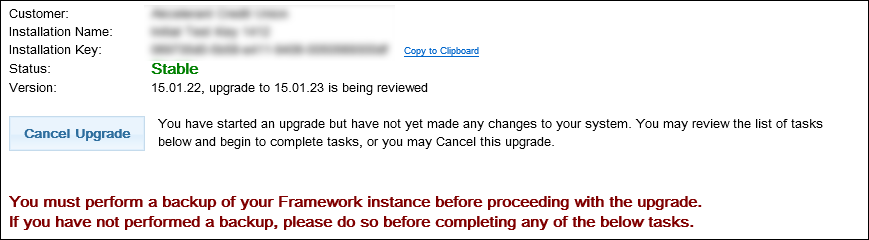
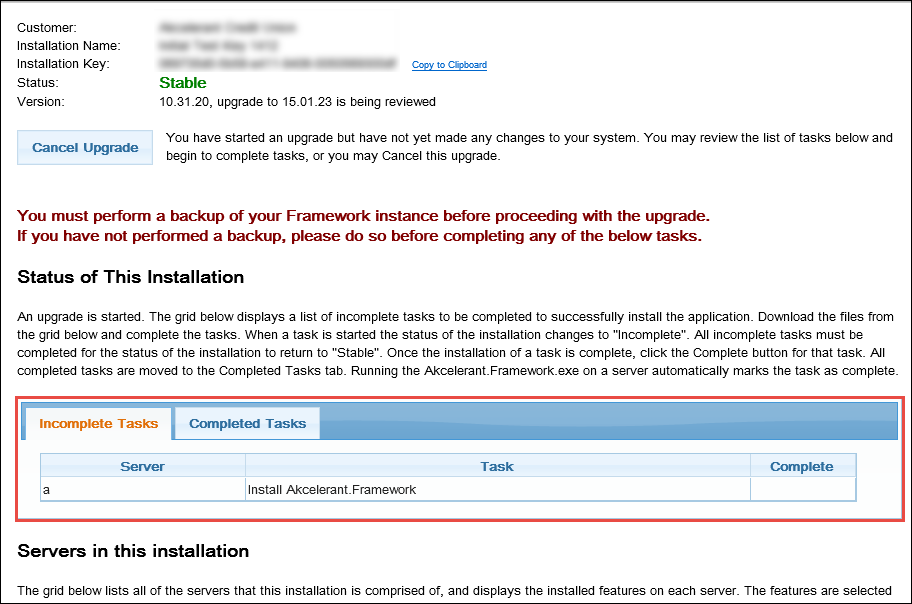
When upgrading with an installation key, the current production installation displays as Stable.
The installation key is listed as well as a link for quick copying the key to the clipboard in order to save it to the local machine. The status can be either Incomplete, which means that one or more tasks remain to complete the installation, or Stable, which means all tasks are complete for the given installation.
Once the installationupgrade initiates, it may be cancelled without affecting the current installation by clicking Cancel InstallUpgrade.
The previous screenshot contains five incomplete tasks (Application Services, Database, Processes, Reporting Services and Website) that are completed by installing the Lifecycle Management Suite. Once the installation is complete, the five tasks are removed from the Incomplete Tasks list and listed in the Completed Tasks list.
In the above screenshot, there is one incomplete task that is completed by installing the Lifecycle Management Suite.
Based upon the Connectors installed, the Incomplete Tasks list may update to include additional tasks, such as: Install Credit ++ Basic and Install Visual C++. For more information, refer to the Review Installation Status section within this topic.
Upon selecting Run as Administrator, the file extraction begins. A pop-up window displays the status.
|
Upon launching the installer, it disappears from the task bar. It may take up to ten minutes to reappear and initiate. Do not attempt to re-launch the installer. |
Once the extraction completes, the InstallShield Wizard opens. Click Next to proceed with the installation. Click Cancel to abort the installation.
Read the Temenos Lifecycle Management Suite License Agreement. If the terms are acceptable, click I accept the terms in the license agreement. Click the Print button to print a copy of the Temenos Lifecycle Management Suite License Agreement.
|
If the terms are not acceptable, select I do not accept the terms in the license agreement or click Cancel to exit the installation. |
Click Next to proceed to the next installation step.
Enter the installation key provided by a Temenos Customer Care Representative.
|
If the installation key is unknown, it is available on the Collaboration Portal within the Installation Summary page. Refer to the Downloading the Installers section within this guide for help locating the installation key on the Collaboration Portal. |
Click Next to proceed to the next installation step.
The installer validates the installation key. Upon successful validation, a prompt requests the user to verify the installation key’s description. If valid, click Yes to proceed to the next installation step.
A default installation directory is selected by the installer, but can be changed to a custom path by clicking the Browse button. Once the destination folder is selected, click Next to proceed to the next installation step.
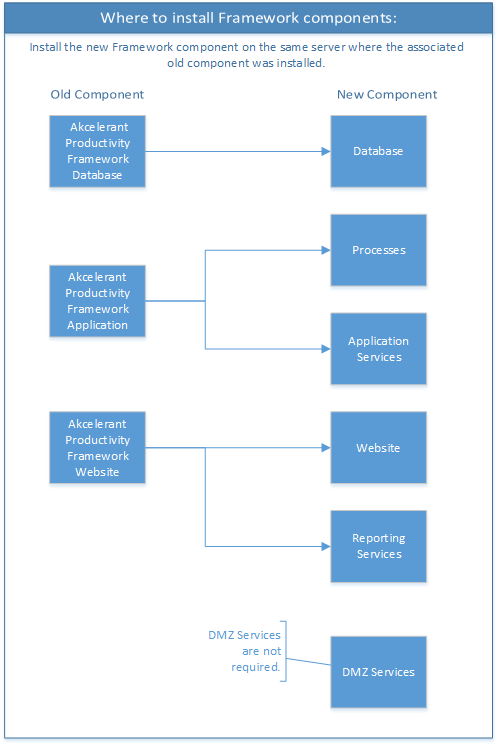
Six features are available for installation. Each feature, except for the DMZ services, must be installed. These features can be installed on one server or across multiple servers depending on the financial institution's configuration. Select the features to be installed by choosing This feature will be installed on local hard drive from the associated drop-downs.
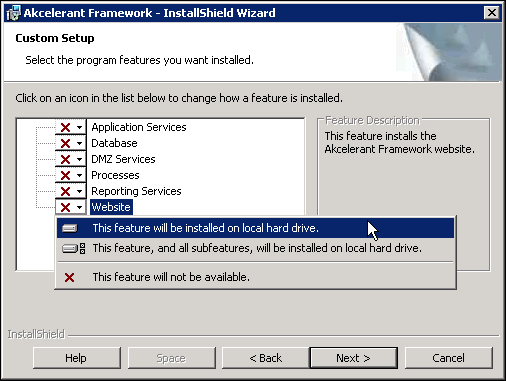
The following table provides a description of each feature.
| Feature | Description | ||||
| Application Services | This feature is required and includes critical service applications that support the website and the API. This feature is typically installed on the same server as the Website feature. | ||||
| Database |
This feature is required and installs the Temenos SQL Server database on the SQL server. This feature should be installed on the application server as it creates the database remotely on the SQL server.
|
||||
| DMZ Services |
This feature is optional and provides services used by externally facing connectors for the Collection solution and the Loan Origination solution such as WebLoan, CUDL, Dealertrack, and RouteOne.
|
||||
| Processes |
This feature is required and includes Windows services and batch executable programs which are critical for daily processing. This feature is typically installed on the same server as the Web and Application Services features.
|
||||
| Reporting Services |
This feature is required and installs all of the Temenos Lifecycle Management Suite's pre-defined reports as well as the services that support capabilities to create, edit, and execute reports. This feature is typically installed on the same server as the Web and Application Services features and, when configured, attach to the SQL Server for linking data to the reports.
|
||||
| Website |
This feature is required and installs the Temenos Lifecycle Management Suite website that end users access through their browsers.
|
Once all applicable features have been identified, click Next.
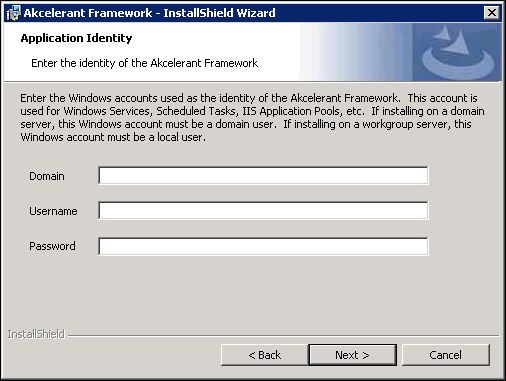
Enter the Domain, Username and Password credentials created in the "Obtain Requirements" step included in the Pre-Installation Requirements topic.
 |
This account is used for critical services that support the Temenos Lifecycle Management Suite and should never be the same as the account used to log into the server. Using the server account results in critical services shutting down upon logging off the server. |
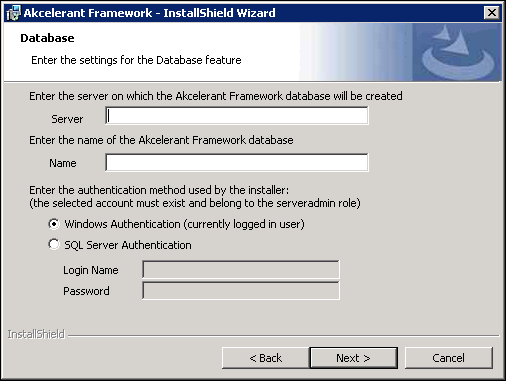
Enter the server name of the SQL instance where SQL Server is installed and provide a name for the database. Use the radio buttons to choose either Windows Authentication or SQL Server Authentication. Select Windows Authentication to use the credentials of the current logged in user. Select SQL Server Authentication to provide the username and password.
|
The login entered here is used for the initial database installation and should be a member of the serveradmin role. These credentials are not stored for future installations and upgrades. |
Once all values have been entered, click Next.
|
A prompt may appear indicating that the database already exists. Verify the database is correct by clicking Yes to use the existing database, or clicking No to choose a different database. |
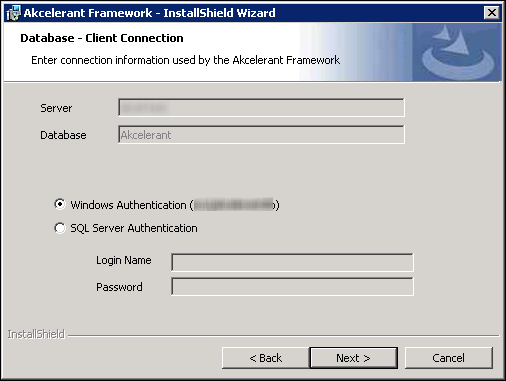
The Server and Database fields pre-populate based upon selections made in the previous steps.
|
If using Windows Authentication to connect, the credentials populate. However if using SQL Server Authentication to connect, these credentials must be provided. |
Once the client connection credentials have been verified, click Next.
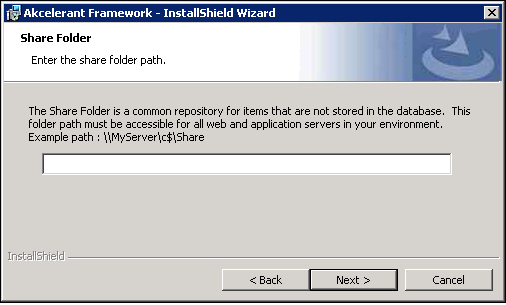
Enter the path to the common folder that can be accessed by any non-DMZ server in the configuration. This directory contains various system logs and content files.
|
Temenos recommends using a network share. |
|
For more information on the share directory, refer to the "Obtain Requirements" step included in the Pre-Installation Requirements topic. |
Once the Share Directory has been entered, click Next.
Enter the following credentials to configure Reporting services:
| Field | Description |
| Server | Enter the name of the server or the fully qualified URL hosting Microsoft Reporting Services. |
| Name | Identify the name of the virtual directory for the Reporting Services Web Service. The virtual directory defaults to ReportServer but may be different in each environment and should be updated accordingly. |
| Name | Identify the name of the Akcelerant Reports Folder. The reports folder defaults to Framework but can be changed. |
| Use SSL? | Select the check box if the Report Server is configured for SSL. |
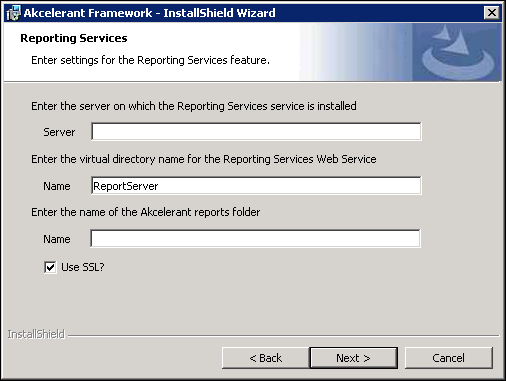
Once all Reporting Services credentials have been entered, click Next.
The Temenos Lifecycle Management Suite is installed as a web application underneath a parent website in IIS. The installer lists all of the parent websites configured on the server in a drop-down. Use the Choose Website drop-down to select a parent website for the Temenos Lifecycle Management Suite web application.
|
If nothing is listed in the drop-down, the websites must be configured in IIS. Exit the installer, configure a website and then run the installer again. |
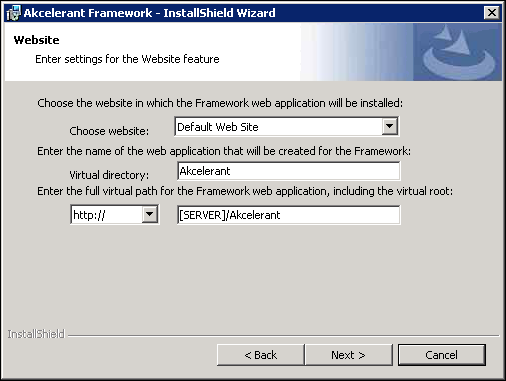
Once a parent website is selected, specify a virtual directory name. This is part of the final URL end users use to access the site. The default virtual directory is Akcelerant.
Choose either http or https and replace [SERVER] with the name of the web server. If using a load balanced environment, enter the name that routes traffic to the load balancer.
|
For https to function, a SSL certificate is required to configure SSL. For more information on configuring SSL, refer to How to Set Up SSL on IIS 7. |
Once all website credentials have been entered, click Next.
Application services are used to communicate with third party service providers. They also provide the processing power for the Lifecycle Management Suite, making this feature a good candidate for load balancing to help distribute the processing load.
From the drop-down list, select the website where the application services virtual directories should be installed. Once selected, click Next.
The configuration of the Temenos Lifecycle Management Suite installation is complete. Click Install to begin. The Status bar displays the progress of the installation. Once the installation has completed, click Finish to exit the InstallShield Wizard.
|
By default, the Launch Server Manager check box is selected. Clear the check box to launch Server Manager manually. For more information on Server Manager, refer to Framework Server Manager document. |
Return to the installation summary screen to view the updated installation status.
If the incomplete tasks tab contains outstanding items, the installation status remains as Incomplete. Each task must be completed in order to complete the installation. When the installer is run on the server(s), those tasks automatically move to the Completed tab.
There will be other tasks; however, that require manual confirmation to identify these tasks were completed. These tasks are identified by a Complete button.
For these tasks:
|
Some examples of these manual tasks are the Credit ++ toolkit (used for credit reporting) and programs that must be installed on the core system for imports/real time processes to function. |
The Completed Tasks grid displays all completed tasks. This grid also displays the servers where each feature/task was installed. Depending on the server configuration, additional server names may be listed.
|
In a load balanced set up, the Completed Task grid displays one row for each server the feature was installed on. The image above displays two rows for the Installed Application Services task. The first row of the task displays the first load balanced server and the second displays the second server. |
Once all tasks are marked as completed, the overall installation is marked as Stable. Stable indicates that all of the required features for the application are installed. Once the status is Stable, all end users can log into the Akcelerant Framework.
|
Configurations outside of the scope of this document exist that end users and administrators must perform prior to going live. It is also strongly recommended that a testing period is planned with end users prior to placing the Lifecycle Management Suite into production. Please contact a Temenos Customer Care Representative for more information about training. |