Temenos Lifecycle Management Suite - Loan Origination Product Guide
Stipulations Panel
| End-User Guide > Application Processing > Post-Decision > Approval > Stipulations Panel |
The Stipulations panel allows users to view and maintain the conditions required to approve and/or disburse an application.
 |
The stipulations panel displays any stipulations added through the Approve Loan screen. |

The Stipulations panel contains a grid that displays all stipulations. Each stipulation is a table row that displays the associated details in the following columns:
| Column | Description | ||
| Stipulation |
Displays the name of the condition that must be met before the application can be approved or disbursed.
|
||
| Required For |
Indicates the application process which the stipulations must be met prior to executing.
There are three types of stipulations that can be added in the Loan Origination module:
|
||
| Other Description | Displays the associated comment, if an "Other" stipulation was selected. | ||
| Added By | Displays the name of the user who added the stipulation. | ||
| Met | Displays a check box that indicates whether a stipulation has been met. Select the check box to indicate the condition has been met by the applicant. | ||
| Waived | Displays a check box that indicates whether a stipulation has been waived. Select the check box to indicate the condition has been waived by the institution. | ||
| Comments | Displays any user comments for a stipulation. Select the row and click the comments field to add a comment to a stipulation. | ||
| Date Fulfilled | Displays the date the stipulation was met. | ||
| Fulfilled By | Displays the name of the user who met or waived the stipulation. | ||
| Security Groups |
Displays the number of security groups that can fulfill a stipulation. If the number is 0 (zero), all security groups can fulfill this stipulation. If a number > 0 populates, only the specified security group may fulfill the stipulation.
|
||
| Documents | Displays  to allow documents to be attached to the stipulation if the STIPULATION_CODE field lookup has a 'Y' value in the Requires Document column. The numerical value displayed next to the Attach button signifies the number of documents currently attached to the stipulation. to allow documents to be attached to the stipulation if the STIPULATION_CODE field lookup has a 'Y' value in the Requires Document column. The numerical value displayed next to the Attach button signifies the number of documents currently attached to the stipulation. |
||
| Applies To |
Indicates whether the stipulation applies to the approval, document generation, or disbursement of a loan application. |
In addition to displaying stipulations, users are able to perform the following actions within the Stipulations panel:
| Icon | Description |
 |
Allows a user to add a stipulation to the application. When a stipulation is added, a row is added to the Stipulation grid. |
 |
Allows a user to simultaneously add multiple stipulations to an application. |
 |
Allows a user to edit an existing application stipulation. |
 |
Allows a user to remove a stipulation from the application. When a stipulation is deleted, a row is removed from the Stipulation grid. |
|
When a stipulation is added to an application, a To Do is also added to the application. Once the stipulations are met or waived, the To Do is removed from the application. |
Stipulations may be added to an application automatically via rules or manually within the Stipulations panel.
System administrators have the ability to author rules within the Stipulation category that determine the stipulations which are automatically added to an application, if the defined conditions are met. Once defined, these rules are assigned to applicable sub-products.
Stipulation rules execute when the Process Stipulation Rules action is triggered by a corresponding event. All stipulation rules assigned to the application type execute as Event Processing does not allow selection of specific stipulation rules.
|
If an automated stipulation has already been waived or met, it is not removed when the action is triggered |
For more information on stipulations assigned by rules, please see the Rules Management section.
Add a stipulation by clicking the Add button within the Stipulations panel. A new row is created in the Stipulations grid. Clicking within the Stipulation column populates the stipulation drop-down list. Select the desired stipulation.
|
To enter a user-defined stipulation, select the “Other” stipulation. When Other is selected, the Other Description column must also be completed. |
After the stipulation is selected, click the Required For column to indicate whether the stipulation must be met or cleared prior to the application’s approval or disbursement.
|
Users may assign a stipulation to one or more security groups, thus enabling only the users in the specified group to take action on the stipulation.
|
Finalize the addition of the stipulation by saving the screen.
|
A value for Required For and Applies to must be specified for each stipulation. If a stipulation does not contain a value for the Required For or Applies To field, a Validation error is received upon saving the screen that includes the Stipulation Panel. |
To add multiple situations at once, click . The Add Multiple Stipulations pop-up window appears. The Applies To drop-down in the top of the window identifies whether the stipulations are being applied to the approval or disbursement of a loan application. This drop-down defaults to the type of application in progress, such as Loan.
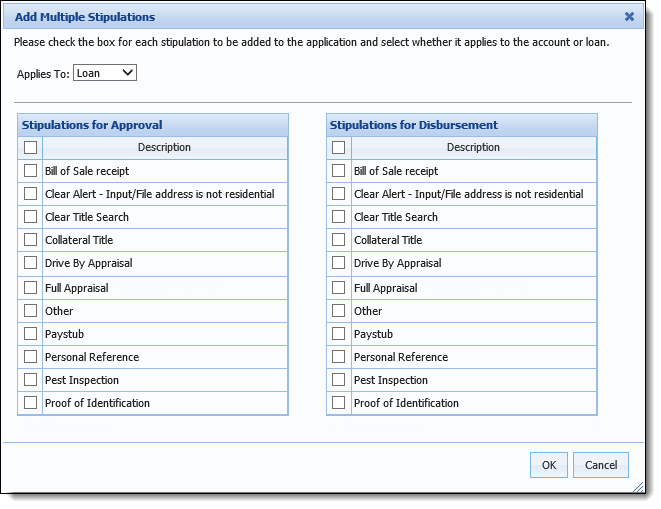
The Applies To drop-down in the top of the window identifies whether the stipulations are being applied to the approval or disbursement of a loan application. This drop-down defaults to the type of application in progress, such as Loan.
Select the check boxes that correspond with the desired stipulations to add them to the application. To select all stipulations, click the check box in the top of the Add Multiple Stipulations grid.
|
Users are unable to simultaneously add multiple stipulations and assign security groups. Once multiple stipulations have been assigned, users must manually edit the security group for each condition. |
Once all the desired stipulations have been selected, click OK. The selected stipulations populate in the Stipulations panel.
Editing stipulations allows users to modify details of a stipulation. To edit a stipulation, select the stipulation from the list and click Edit.
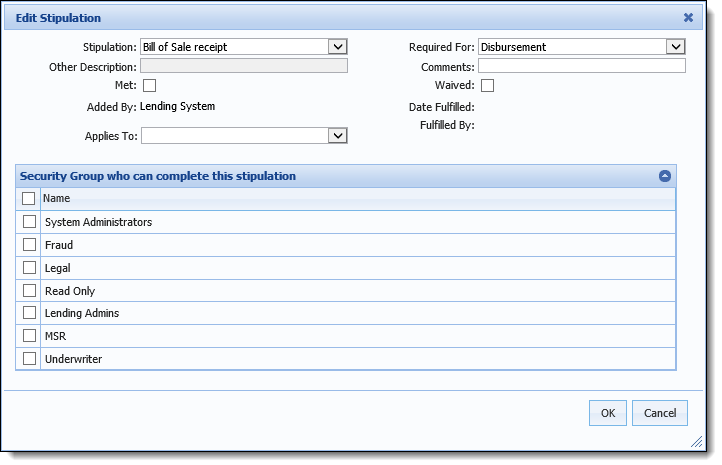
Update the desired fields and assign the appropriate security groups.
 |
If the editing user assigns security groups and does not belong to one of the security groups being assigned, he or she is unable to update the stipulation after clicking OK. |
Once all fields have been updated, click OK to retain the changes. The window closes and the changes reflect in the Stipulations table.
Select the stipulation that is to be removed and click Delete.
When completing an application’s underwriting review process, users are able to clear outstanding stipulations by selecting the Met or Waived check boxes.
![]()
|
Users can only meet and waive stipulations that appear in the "Items you can complete" section. |
When stipulations are Met, the Date Fulfilled and Fulfilled By columns are automatically populated with the information of the user that cleared the stipulation. Enter any supporting information in the Comments column.
Finalize clearing a stipulation by saving the screen.
If documents are required to clear a stipulation, a  is displayed in the documents column. Clicking
  displays a Stipulation Documents window that allows a user to browse their local or network drive to attach supporting documents to the current stipulation. Users can also view or delete existing documents from the list displayed in the Stipulation Documents window.

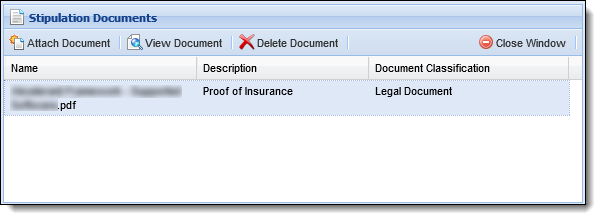
Within this screen, the following columns of information appear for each document:
| Column | Description | ||
| Name | Displays the name of the document in the following format: <document name>.<file extension>. | ||
| Description | Displays the description provided for the document. | ||
| Document Classification | Displays the document classification. | ||
| Source |
Displays the source of the document, such API, Virtual Capture, the name of the user who attached the document within the Lifecycle Management Suite, or the name of the third party connector from which the documents were received.
|
The buttons in the top of the screen provide users with the ability to perform the following functions:
| Function | Description |
 |
Enables a user to attach a document to the application. Clicking this button opens the Attach Document window. |
 |
Enables a user to edit the attributes of a previously attached document. Clicking this button opens the Edit Document window. |
 |
Enables a user to view a document that is attached to the application. |
 |
Enables a user to remove an attached document from an application. |
 |
Enables a user to close the Application Documents screen. |
Clicking opens the Attach Document window.
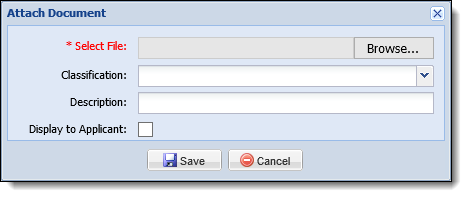
Within the Attach Document window, the following fields display:
| Field | Description | ||
| Select File |
Read-only field that indicates the name of the attached document. Click
|
||
| Classification | Allows users to select the classification of the attached document from the drop-down list. This drop-down includes a list of the values configured for the DOCUMENT_CLASSIFICATION lookup in System Management > Origination > Field Configurations. | ||
| Description | Allows users to enter a brief statement that describes the attached document. | ||
| Display to Applicant | Allows users to indicate whether or not the attached document displays to applicants in Virtual Capture. |
Clicking opens the Attach Document window.

Within the Edit Document window, the following fields display:
| Field | Description | ||
| Classification | Allows users to edit the classification of the attached document from the drop-down list. This drop-down includes a list of the values configured for the DOCUMENT_CLASSIFICATION lookup in System Management > Origination > Field Configurations. | ||
| Description | Allows users to edit the statement that describes the attached document. | ||
| Display to Applicant |
Allows users to indicate whether or not the attached document displays to applicants in Virtual Capture.
|
From the Stipulation Documents window, add a new document by clicking  .
.
 . The document populates in the Stipulation Documents list.
|
If a document does not include an approved file extension, has more than one period in the filename, or has a unicode character in the filename, the document is unable to be uploaded, and an error is received upon clicking . For a list of the approved file extensions, please see the Attach Document Window section in this topic. |
To edit document attributes:
within the toolbar. opens the Edit Document window. to close the Edit Document window and save the changes. Click  to discard changes and close the window.
To view a document:
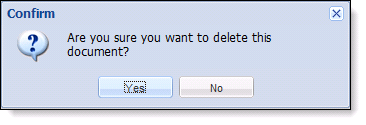
. opens the selected document in a new window.To delete a document:
. prompts the user to confirm the deletion. Click Yes to remove the document or No retain the item. |
Documents attached to a stipulation are also included in the Application Documents list that can be accessed by clicking  in the Application Workspace toolbar. If the stipulation is deleted, the document remains in the application documents list. in the Application Workspace toolbar. If the stipulation is deleted, the document remains in the application documents list. |

 to locate the document to be attached within File Explorer. Once the document is attached, the document name and file path populates within this field.
 Attach a Document