
| End-User Guide > Recovery Process > Recovery Transactions |
Throughout the recovery process, payments from debtors can be applied to recovery accounts and repayment plans through transactions. The Recovery module's transaction processing engine provides the ability to apply transactions to repayment plans and multiple accounts at one time as well as generate General Ledger (GL) entries in a few simple steps.
Within the Recovery module, the following actions can be performed for each recovery account or repayment plan transaction:
In the Recovery module, transactions can be processed directly within an Account or Repayment Plan screen that is configured to include the Recovery Transaction button by the system administrator in System Management > Screens. Clicking this button opens the Recovery Transaction window to enable users to define the details for the transaction and apply the transaction directly to a repayment plan and/or recovery account.
To process a transaction on a recovery account or repayment plan, click the Recovery Transaction button ( ).
).

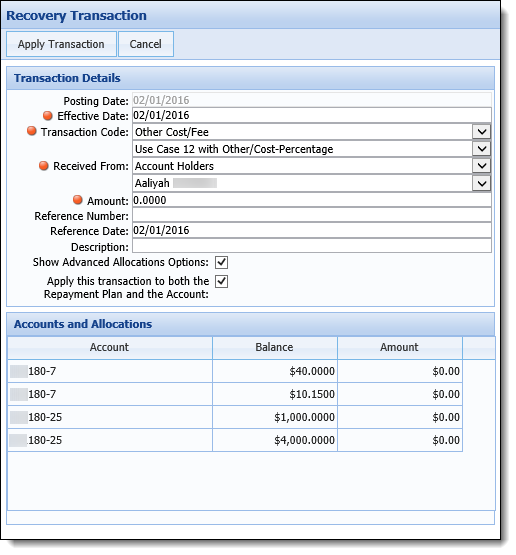
Upon clicking  , the Recovery Transaction pop-up window displays.

This window is composed of two sections: Transaction Details and Accounts and Allocations.
 |
Depending on how a user reaches the Recovery Transaction window, the content varies.
|
The Transaction Details section provides users with the ability to define the specific details of each transaction, such as effective date, amount, and the location from where the transaction originated.
In the Transaction Details section of the window, information about the transaction can be entered within the following fields:
| Field | Description | ||||||||||
| Posting Date | By default, displays today's date as the date the transaction is being applied. This field is read-only and cannot be changed. | ||||||||||
| Effective Date |
By default, displays today's date as the date the transaction is to be considered effective. To change the date, click within the Effective Date field and select a new date from the calendar.
|
||||||||||
| Transaction Code |
From the top Transaction Code drop-down, select the category associated with the transaction code used to determine the GL accounts to which the transaction applies. The transaction code also determines account allocations. The following transaction categories populate within the drop-down:
Once the transaction category is selected, select the specific Transaction Code from the second Transaction Code drop-down.
|
||||||||||
| Received From and Received From Name |
From the Received From and Received From Name drop-downs, select one of the following options to indicate where the transaction originated:
|
||||||||||
| Amount |
Enter the amount of the transaction.
|
||||||||||
| Reference Number | If desired, enter a check number, a Visa card number, or any other number related to the transaction. | ||||||||||
| Reference Date | If desired, click within the Reference Date field to select the date in which the Reference Number was entered from the calendar. | ||||||||||
| Description | If desired, enter any additional information regarding the transaction. | ||||||||||
| Show Advanced Allocations Options |
Select this check box to display the Accounts and Allocations section in the Recovery Transactions window. This section provides users with the ability to indicate how the transaction should be split between the recovery accounts associated with a repayment plan.
For more information, see the Account and Allocations section within this topic. |
||||||||||
| Apply this transaction to both the Repayment Plan and the Account |
Select this check box to apply the transaction to both the repayment plan and recovery account.
|
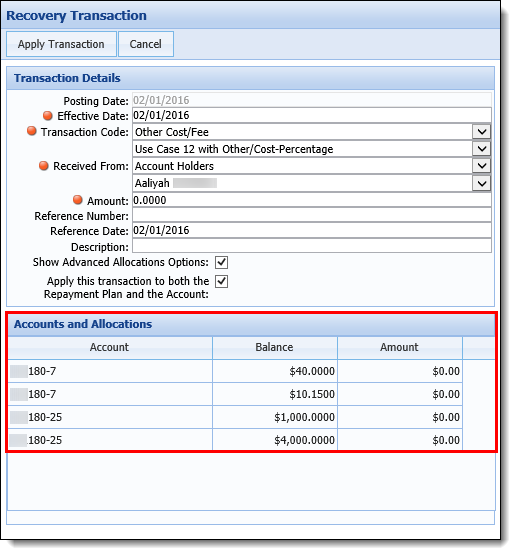
The Accounts and Allocations section provides users with the ability to determine the amount of funds allocated to each account within a repayment plan. The Accounts and Allocations section displays for repayment plans when the Show Advanced Allocations Options check box is selected within the Transaction Details section.
Upon selecting the Show Advanced Allocations Options check box, the Recovery Transaction window updates to display a table that contains all the recovery accounts included in a repayment plan.

Each account is listed as a row that contains the following column data:
| Column | Description | ||
| Account | Displays the account number of the repayment plan account. | ||
| Balance |
Displays the current balance of the repayment plan account.
|
||
| Amount | Allows users to determine the amount to be allocated to each account within the repayment plan. |
To modify the distribution of transaction funds between the accounts in the repayment plan, click within the Amount field of the desired account and enter a new allocation amount.
 |
If the total of the allocation amounts of each account does not equal the total amount of the transaction reflected in the Transaction Details section, an error is received upon clicking  indicating that the allocation amounts must be equal to the transaction amount in order to proceed with the transaction. indicating that the allocation amounts must be equal to the transaction amount in order to proceed with the transaction. |
Once all information has been entered within the Recovery Transaction window, clicking  launches the Recovery module's transaction processing engine.
 |
Upon clicking  , the transaction processing engine places a lock on the transaction currently in process. This lock ensures that only one recovery account or repayment plan transaction is processed at a time, mitigating the possibility of corrupt transaction data. If a transaction is currently in process and a user attempts to process another transaction, a "transaction in process" message is displayed indicating that the second transaction cannot be processed until the current transaction has completed processing. , the transaction processing engine places a lock on the transaction currently in process. This lock ensures that only one recovery account or repayment plan transaction is processed at a time, mitigating the possibility of corrupt transaction data. If a transaction is currently in process and a user attempts to process another transaction, a "transaction in process" message is displayed indicating that the second transaction cannot be processed until the current transaction has completed processing. |
During transaction processing, transactions for the repayment plan/recovery accounts are created based on the details defined within the Recovery Transaction window. If the "Apply this transaction to both the Repayment Plan and the Account" parameter is selected, the transaction is divided between the repayment plan and recovery accounts according to the allocations configured within the Accounts and Allocations section.
 |
If the transaction is applied to both the repayment plan and the account, two transactions are created for each account. If the transaction is only applied to the repayment plan, only one transaction is created for each account. |
When processing completes, the Recovery Transaction Summary pop-up window appears to indicate that transaction processing has completed. The summary lists each GL entry created as a result of the transaction as well as the Transaction IDs that were created, the accounts that were affected, the names of the ledgers that were used, and the amount of the transaction that went towards the affected accounts. The transactions are also added to the Recovery Account or Repayment Plan Transactions screens.
 |
If the default account allocations were used during transaction processing, the confirmation message displays the default allocations and GL accounts for the repayment plan/recovery account. |

Click  to return to the account or repayment plan screen.
 |
Balance fields (such as Current Balance, Current Interest, and Current Principal) that display on the account or repayment plan screen containing the  button are automatically updated after the transaction is applied. Other screens that contain balance fields must be manually refreshed in order to see the updated balances after a transaction is applied. button are automatically updated after the transaction is applied. Other screens that contain balance fields must be manually refreshed in order to see the updated balances after a transaction is applied. |
 |
Each time a transaction posts to the repayment plan, the Recovery module sets Date Paid and Remaining Amount for the Scheduled Payments, as well as recalculates the Remaining Balance for each payment affected by the transaction. For example, if the payment received is greater than the scheduled payment amount, the payment schedule adjusts appropriately. Starting with the final payment scheduled, the Payment Amount and Remaining Balance fields update to reflect the adjusted final payment and remaining balance. The Recovery module adjusts any scheduled payments that are not necessary to equal a zero remaining balance. |
Recovery agents are able to view processed recovery account or repayment plan transactions by navigating to the Recovery Account or Repayment Plan Transactions screens in the workspace.

For more information on viewing recovery account or repayment plan transactions, see Recovery Account and Repayment Plan Transactions.
Recovery agents are able to reverse non-interest transactions that have been processed by clicking the  button at the top of a Recovery Account or Repayment Plan Transactions screen. When clicked, the user is prompted to confirm the reversal.
For more information on reversing transactions, see Recovery Account and Repayment Plan Transactions.
Recovery agents are able to export a .CSV file containing all transactions based on the current selected View by clicking the  button at the top of a Recovery Account or Repayment Plan Transactions screen.
For more information on exporting transactions, see Recovery Account and Repayment Plan Transactions.