Temenos Lifecycle Management Suite - Collection Product Guide
Emails
| Administrator Guide > Communication > Emails |
The Emails page allows administrators to manage email templates within the Lifecycle Management Suite. The emails listed on the System Management > Communication > Emails page can be incorporated into the Send Email workflow step by the system administrator and run by users when working persons or accounts.
 |
For more information on the configuration of the Send Email workflow step, please see the Send Email Workflow Step topic in this guide. |
 |
To see the Emails functionality in action for account recipients, view the Creating Emails video tutorial. |
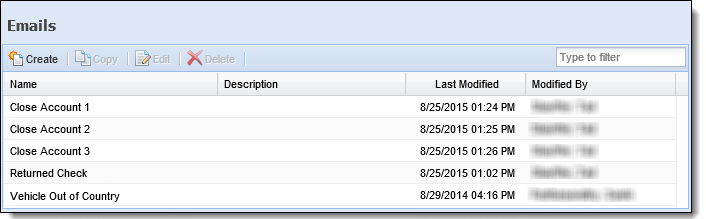
The grid on this page displays the following columns of information for each email:
| Column Name | Description |
| Name | Displays the name of the email template. |
| Description | Displays a description of the email template. |
| Last Modified | Denotes when the last modification to the email was made. |
| Modified By | Denotes who made the last modification to the email. |
From the Emails page, administrators can create new email templates, copy existing templates, edit existing templates, and delete templates.
The Emails topic provides administrators with the following information to create and manage email templates:
All emails share common attributes that are defined when creating, copying, or editing email templates.
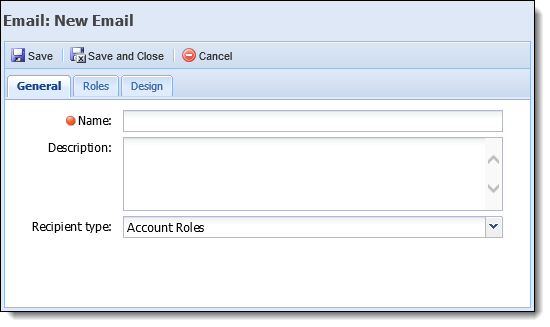
The following attributes are defined within the General tab:
| Attribute | Description | ||
| Name |
Enter a name for the email template. This is the name that appears when incorporating the email into a Send Email workflow step.
|
||
| Description | If desired, enter a description to provide more information for the email template. | ||
| Recipient Type |
Select an option to identify the type of recipient to receive the email, such as Account Roles or Contact Roles. The selection made within this drop-down determines which roles are available to assign to an email. For example, when Account Roles is selected as the recipient type, all of the account roles configured in System Management > Role Types are available to assign within the “TO” box in the Roles tab. All of the Contact Roles configured for the CONTACT_RELATIONSHIP lookup in System Management > Field Configurations are available to assign within the “CC” box in the Roles tab.
|
Role attributes are used to define which roles are to receive the email. The Recipient Type option that is selected in the General tab determines the roles that are available in both the “TO” recipients and "CC" recipients sections.
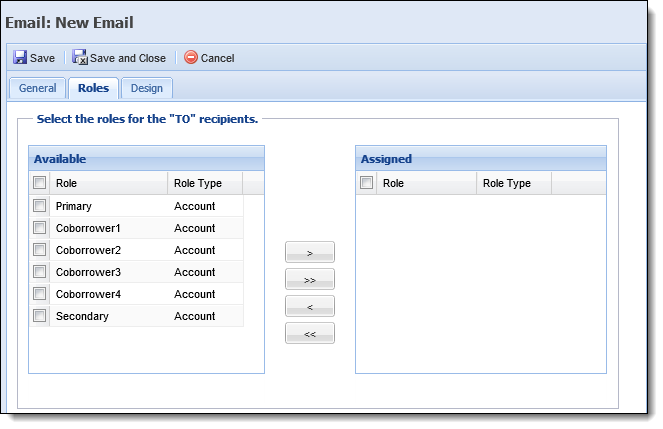
When Account Roles is selected within the Recipient type drop-down, the Available box in the "TO" section displays a list of the account roles configured in System Management > Role Types as shown below:
When Contact Roles is selected as the Recipient type, a list of the configured values for the CONTACT_RELATIONSHIP lookup in System Management > Field Configurations is displayed within the "To" section.
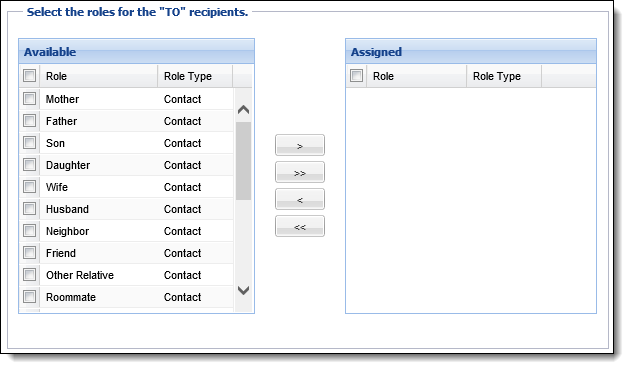
Regardless of the Recipient Type selected, the “CC” section displays the available Contact roles configured for the CONTACT_RELATIONSHIP lookup.

The following role attributes are assigned within the Roles tab:
|
If Administrator and Primary are assigned as recipients of the email in the “TO” section, and the same person has both of these roles on the account, the person receives one email. If Primary was assigned to the “CC” section, the person still receives one email with all of the information in it. |
| Attribute | Description |
| Roles for "To" recipients | |
| Available | Displays a list of the roles available to assign as primary recipients of the email. Select the desired role(s) from the Available list and move them to the Assigned list by dragging and dropping the desired role or using the arrows that display. |
| Assigned | Displays the roles for which the email is to be generated. |
| Roles for "CC" recipients | |
| Available | Displays a list of the roles available to assign as secondary recipients of the email. Select the desired role(s) from the Available list and move them to the Assigned list by dragging and dropping the desired role or using the arrows that display. |
| Assigned | Displays the roles that are carbon copied on the email when generated. |
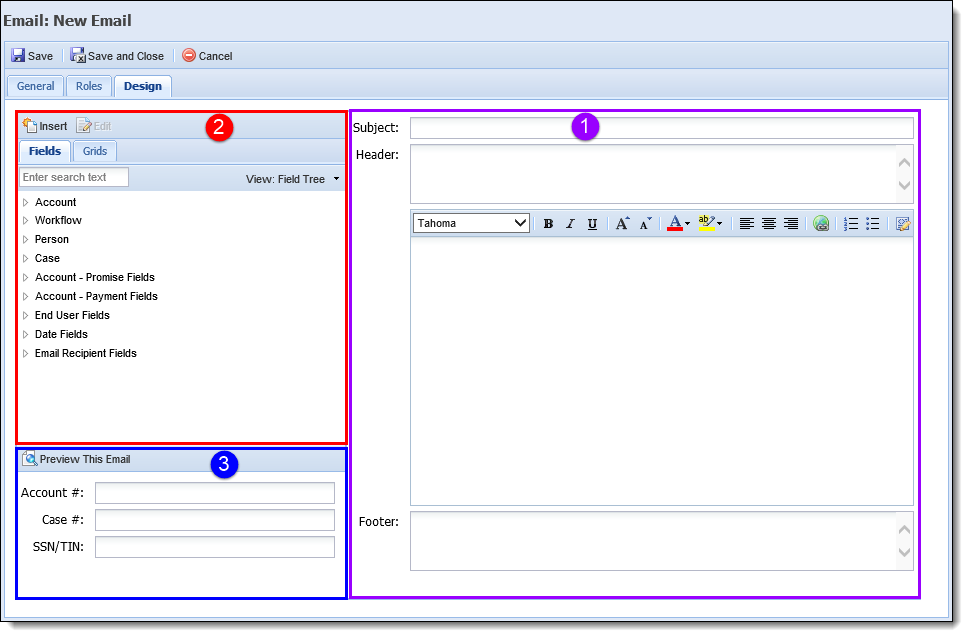
Design attributes are defined within the Design tab. This tab provides administrators with the ability to customize the email template as well as preview the email before it is generated.
The Design tab consists of the following sections:
The Email Body section allows administrators to define the content that is included in the email template. Within this section, administrators are able to configure the following attributes:
| Attribute | Description |
| Subject | Enter the subject to be displayed when the email is generated. |
| Header | Enter the header to appear in the email to identify specific information about the email or highlight the purpose of the email. |
| Body | Enter the message to appear within the email template. This section consists of the email text as well as any desired fields and/or grids. |
| Footer | Enter the footer to appear in the email to include any institution specific information and/or links within the bottom of the email message. |
|
Administrators can configure a default header and footer to automatically appear in emails within the Email Settings tab in System Management > Modules > Collection. If a header and/or footer is set within the Design tab, it automatically overwrites the default header and footer configured by the administrator. |
The left panel of the design tab enables administrators to easily insert fields and/or grids into an email template. This functionality provides the ability to automatically populate and/or calculate data from the Lifecycle Management Suite when the email is generated.
The following actions can be performed within the top toolbar:
| Button | Description | ||
 |
Enables administrators to insert a field or grid into the email template. | ||
 |
Enables administrators to modify the properties of a grid that has been added to the email template. This tab is only enabled when a grid is selected within the Grids tab.
|
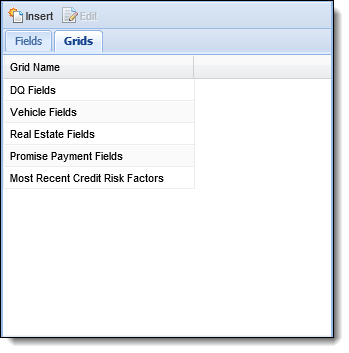
The Fields tab displays a list of the fields that are available to add to an email, grouped into the following folders:
|
For details on when Account > Persons fields or Person fields should be used, please see the Letters and Forms: Person vs. Account > Person Fields example in this guide. |
| Folder Name | Description | ||
| Account | Contains all of the fields associated to the account. The Account folder contains the Primary and Secondary folders. Select fields from these folders if more than one person is being added to the email. | ||
| Workflow | Contains all of the fields customized in the Configure Fields tab when building a workflow. | ||
| Person | Contains all of the fields associated to the person. | ||
| Case | Contains all of the fields that are associated to a case, including Case Custom fields. | ||
| Account - Promise Fields |
Contains the fields relative to promise amounts, such as First Promise amount, last promise amount, etc.
|
||
| Account - Payment Fields | Contains the fields associated to payments such as payment amount, payment date, transfer source account, and transfer destination account. | ||
| End User Fields | Contains all of the fields that can be used in relation to the user. Use these fields to sign an email with institutions employees contact information. | ||
| Date Fields | Contains Current Date Fields. These fields are used when the current date or a current day plus a designated amount of days date range needs to be added. | ||
| Email Recipient Fields | These fields are used to populate the Contacts information. This folder contains two fields: Recipient First Name and Recipient Last Name. |
Grids can be used to present a variety of information in an easy-to-read table format within an email.
The table below provides an overview of each grid that is available to add to an email along with a description of the grid and example of the default properties that are set for each grid within the Grid configuration window:
| Grid Name | Description | Default Grid Properties |
| DQ Fields | This grid contains account related delinquency information such as Balance, DQ Amount, Due Date, etc. | 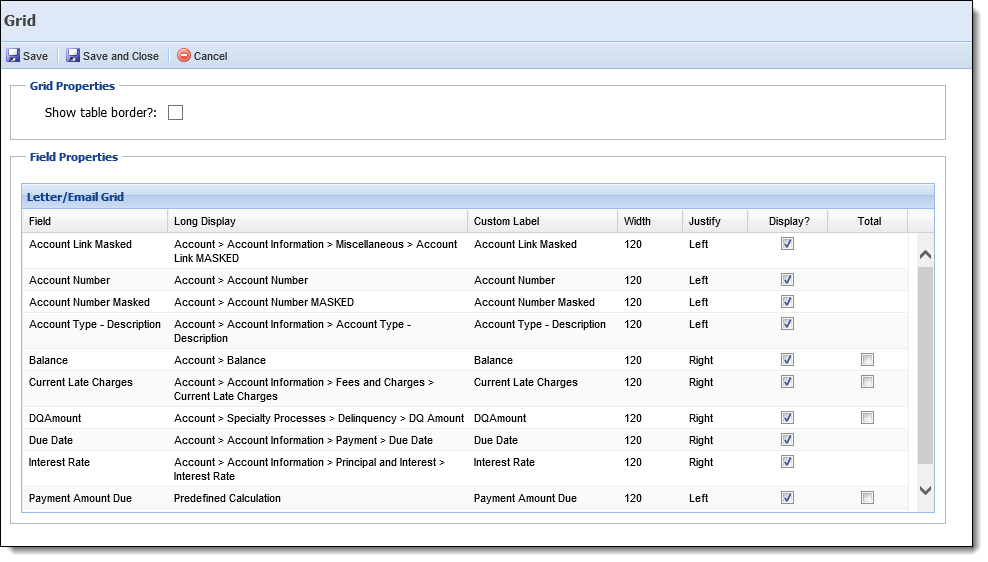 |
| Vehicle Fields |
This grid contains vehicle collateral information such as Make, Model, VIN, etc.
The Lifecycle Management Suite supports multiple pieces of Collateral. This allows the institution to place multiple collateral in an email within a grid. These fields are not available in the field tree. |
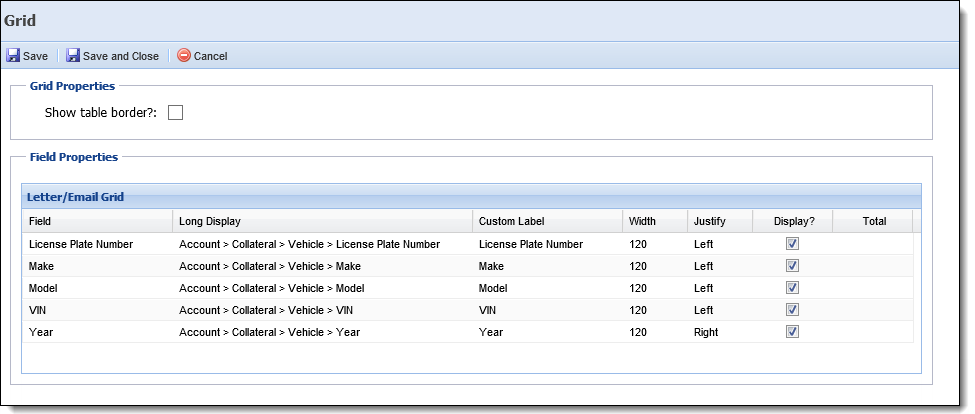 |
| Real Estate Fields | This grid contains real estate fields such as address, description, Parcel Number, and Property type description. These fields are not available in the field tree. | 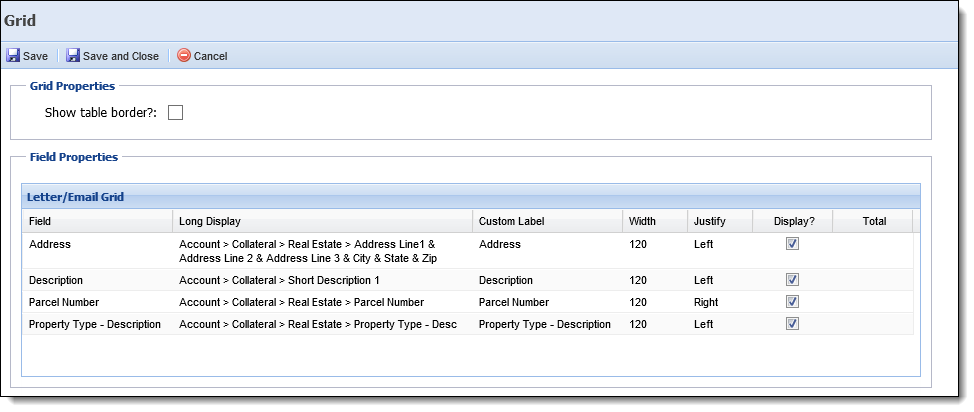 |
| Promise to Pay Fields | This grid provides pertinent information regarding an account holder's promise to pay information. | 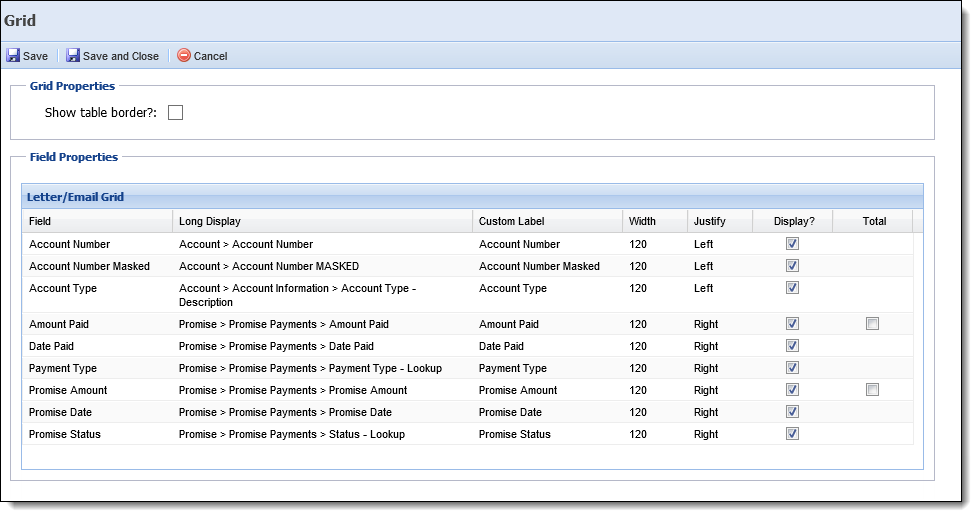 |
| Most Recent Credit Risk Factors | This grid displays any credit report risk factors associated to a person when a credit report is generated. | 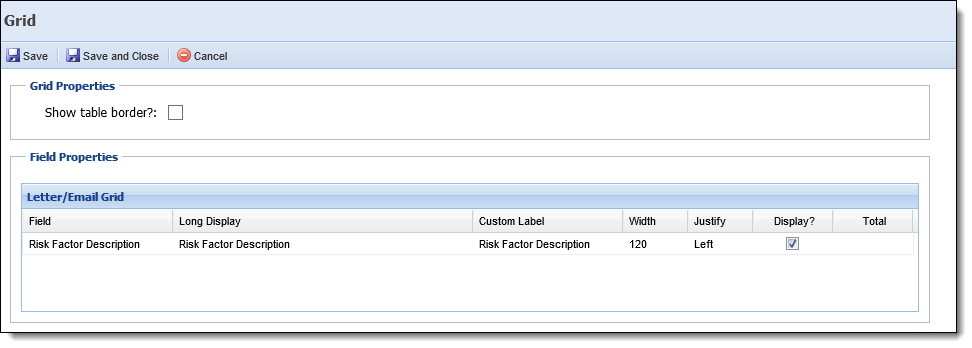 |
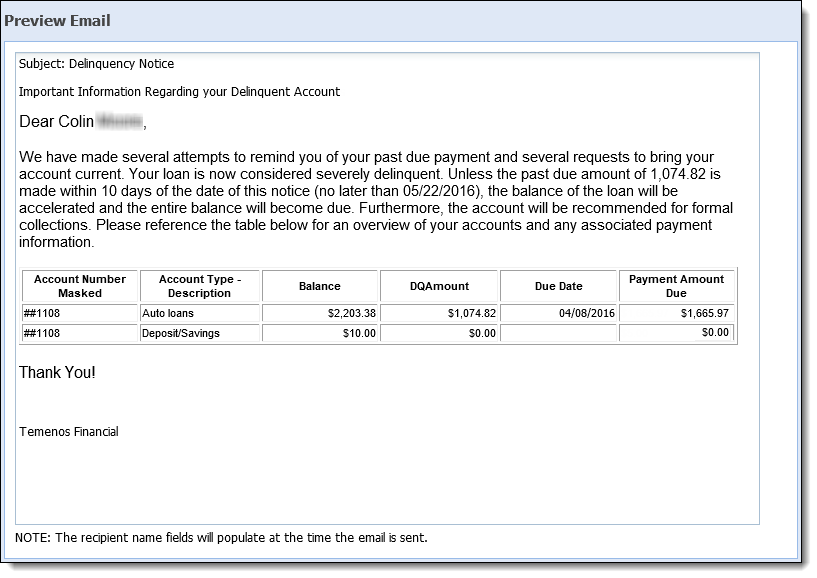
The Preview section enables the ability to review an email template before it is created. For emails with Account or Contact recipients, administrators are able to enter an account number, case number, or SSN/TIN to generate the email and automatically populate information specific to the account, case, or person.
|
For more information on this functionality, please see the Previewing an Email section in this topic. |
Within the Emails page, administrators are able to perform the following actions:
To create an email template, click  within the top of the Emails page.
Within the New Email window, complete the General Email attributes.
Once all General attributes are defined, if the email is for Account or Contact recipients, assign the roles to receive the email within the Roles tab.
After all roles have been assigned, navigate to the Design tab to customize the content of the email. Within the Design tab, enter the desired text in the Body section, leaving spaces for the fields and/or grids to be inserted from the left panel. Once the desired text has been entered, navigate to the left panel to perform the following actions:
To add fields from the Fields tab:
|
When configuring an email for account or contact recipients, use Person fields rather than Primary or Secondary fields to ensure the email is sent to every person related to the account. |
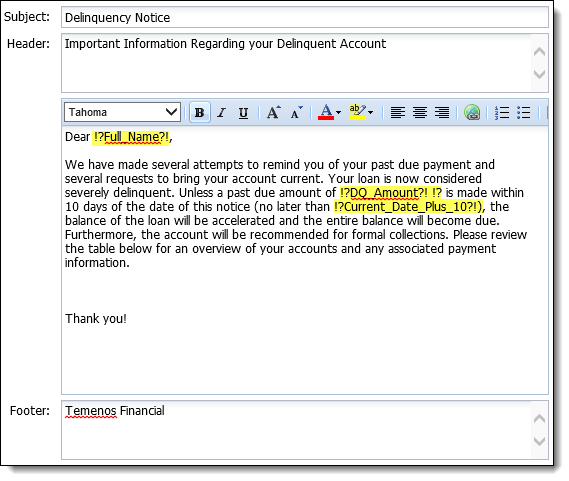
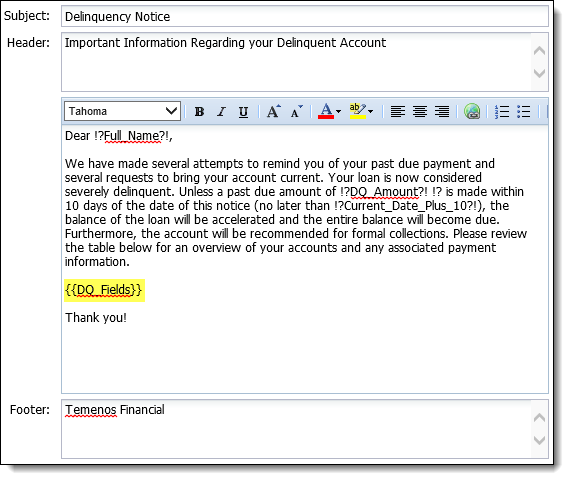
in the top toolbar to add the field to the email.When all fields have been added, insert a grid from the Grids tab or navigate to the Preview section to review the email template.
To add a grid:
.
|
While multiple grids can be added to an email, the same grid can only be configured to appear in an email once. |
|
The fields that appear in each window are determined by the grid selected. Some of the fields displayed in these grids are not available in the field tree. The following example is for the Promise Payment Fields grid. Please see Grids Tab within the Fields/Grids section in this topic for an overview of each grid and the default settings that appear within the configuration window. |
|
If monetary Amount fields are configured to appear within the email, the values are rounded using the standard rounding method and are displayed with two decimal places when the email is generated. |
 to return to the Design tab.
 |
Once a grid has been added, the field and grid properties can be modified by selecting the grid name within the Grids tab and clicking . |
After the email text has been defined and all desired fields/grids have been added, navigate to the Preview section to view how the email appears when generated.
Within this section, enter the following information to preview an email for account or cContact recipients:
| Field | Description |
| Account # | Enter an account number to generate the email and populate information for the account and any related account holder(s) into the applicable fields. |
| Case # | Enter a case number to generate the email and populate information for the case and any related person(s) into the applicable fields. |
| SSN/TIN | Enter a SSN/TIN to generate the email and populate information for the person and any related accounts or cases into the applicable fields. |
Once all Preview parameters have been defined, click  to generate the email.
Information populates within each field configured to appear in the email template as shown below:
After all desired information has been added to the template, click within the top of the New Email window to create the email template. The new email template populates within the Emails grid and is available to be added to a Send Email workflow step.
To copy an email template:
 . The Copy Email Template screen appears. to create the new template. The new email template populates within the Emails grid and is available to be added to a Send Email workflow step.
To edit an email template:
. to retain the modified template and return to the Emails page.To delete an email template:
 .
. 1 - Email Body