
Temenos Lifecycle Management Suite - Service Product Guide
Service Ticket Types
| Administrator Guide > Service Ticket Types |
Service Tickets streamline servicing by dynamically prompting users to complete appropriate tasks required to fulfill service requests. The Lifecycle Management Suite gives administrators the capability to customize service tickets based on the needs of their institution.
The following list contains service ticket attributes and configuration processes in which the attributes are defined:
By navigating to the System Management > Service > Service Ticket Types page, administrators manage and create ticket type configurations.
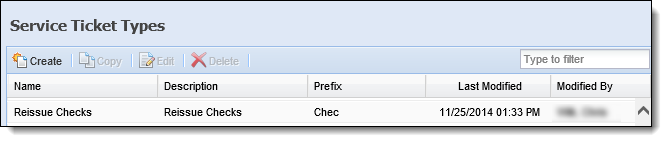
The Service Ticket Types page displays the below details about configured ticket types:
| Field | Description |
| Name |
The name of the service ticket. |
| Description | Details about the service ticket. |
| Prefix | The prefix of the service ticket. |
| Last Modified | Denotes when the last modification was made. |
| Modified By | Denotes who made the last modification. |
All ticket types share common attributes that are defined while creating, copying, or editing a ticket type.
All general attributes provide basic information about Ticket Types and are required.
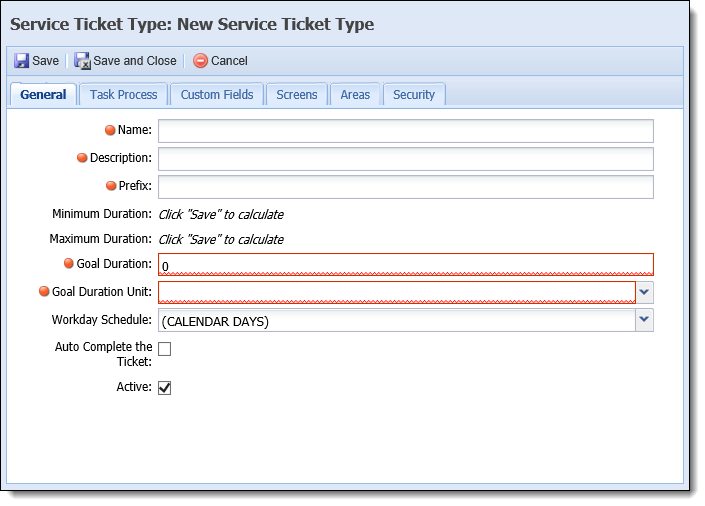
General attributes are located within the General Tab:
| Attribute | Description | ||
| Name |
Provide a unique name for the service ticket. When users search to create a new ticket in the workspace, the name and description are used to match ticket types.
|
||
| Description |
Provide details about the service ticket. When users search to create a new ticket in the workspace, the name and description are used to match ticket types.
|
||
| Prefix |
Provide a service ticket Prefix. When a ticket is created, the prefix precedes an auto-generated number to create the ticket number.
|
||
| Minimum Duration |
A read-only attribute that displays the minimum duration of the ticket in day(s), hour(s), and minute(s). The Lifecycle Management Suite calculates the minimum duration by determining the least amount of time a ticket can be open based on task delays and durations. The calculation occurs when a ticket is saved.
|
||
| Maximum Duration |
A read-only attribute that displays the maximum duration of the ticket in day(s), hour(s), and minute(s). The Lifecycle Management Suite calculates the maximum duration by determining the greatest amount of time a ticket can be open based on task delays and durations. The calculation occurs when a ticket is saved.
|
||
| Goal Duration |
Provide the goal amount of time that a ticket is expected to be open using whole numbers. This is a required field.
|
||
| Goal Duration Unit |
Select the unit of time for the goal duration from the drop-down:
|
||
| Workday Schedule |
The default workday schedule is calendar days. This can be overridden by selecting a workday schedule from the drop-down list. The workday schedule is used to calculate the duration values of the service ticket for SLA reporting.
|
||
| Auto Complete the Ticket | Select the Auto Complete the Ticket check box to automatically complete the ticket type in the workspace when the ticket has no tasks assigned or when all tasks are complete. | ||
| Active | Select the Active check box to make the ticket type available in the Left Navigation Panel of the workspace for users that have the correct security access for the chosen area. |
 Calculating Minimum and Maximum Duration
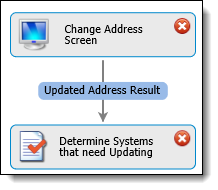
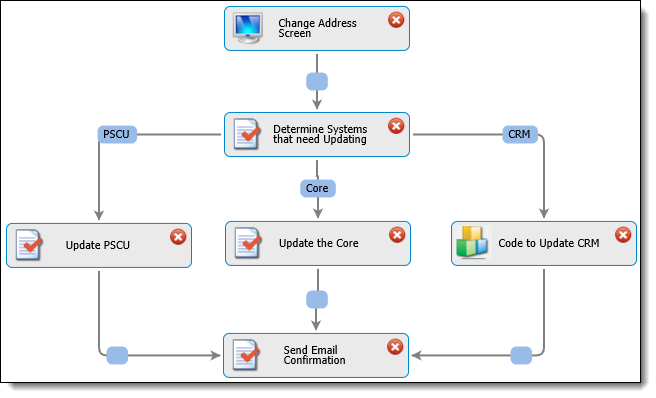
The Lifecycle Management Suite automatically calculates the minimum and maximum duration of a task process by evaluating the task delays and durations of all possible paths within a task process. The following image depicts an example of the min and max calculations of a Reissue Checks task process.
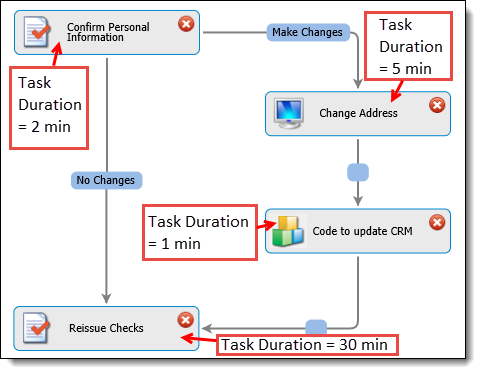
There are two possible paths a user can take to complete this Reissue Check task process. The Confirm Personal Information task is used in both paths and has a duration of 2 minutes.
If no changes are necessary as a result of the Confirm Personal Information task, the user completes the Reissue Checks task that has a duration of 30 minutes. This path is 2+30 = 32 minutes long.
If changes need to be made, the user has to follow the path to Change the Address (5 minute duration) and complete the automated task to run Code to update the CRM (1minute duration) before the Reissue Checks task (30 minute duration). This path is 2+5+1+30 = 38 minutes long.
Once all the possible paths are calculated, the Lifecycle Management Suite determines the minimum amount of time and maximum amount of time a ticket should take. The Reissue Checks task process has a minimum duration of 32 minutes and a maximum duration of 38 minutes.
 |
If a task has a delay, the length of the delay is added to the duration. If no delay exists, the duration is used for the calculation. |
A task process is a collection of tasks grouped together to fulfill a service request. Every ticket is comprised of exactly one task process.
The Task Process tab provides an interactive screen for administrators to create simple or complex custom processes.
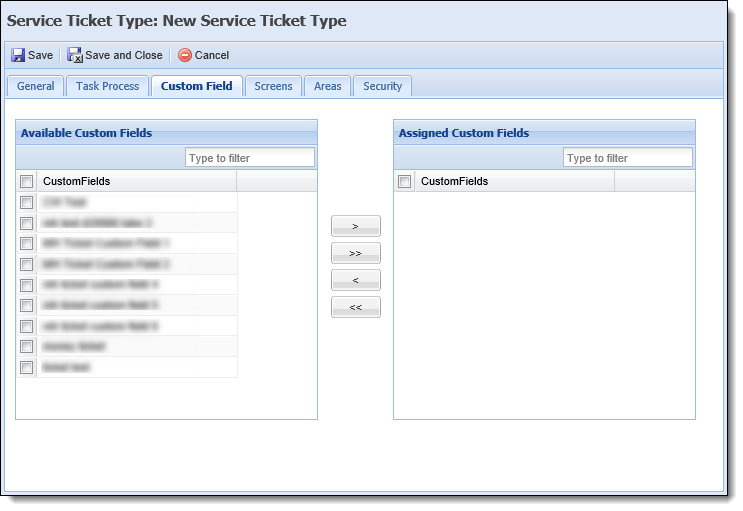
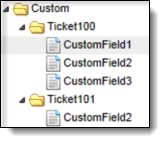
Custom fields extend the database by allowing institutions to create fields which capture information specific to their institution and are created in System Management > Custom Fields. In order to use a custom field that has been created within the Ticket category, the field must be mapped to a service ticket type.
The custom field attribute of a ticket allows administrators to map custom fields to be used by a ticket type.
 |
Once a custom field has been mapped to a service ticket type, it cannot be deleted. |
| Attribute | Description | ||
| Available |
Displays a list of the available custom fields. Select the desired custom field(s) from the list and use the arrows to move it to the Assigned Custom Fields box.
|
||
| Assigned | Displays a list of all the fields that have been assigned to the ticket type. Assigned custom fields appear in the field list throughout the Lifecycle Management Suite within the Custom > Service Ticket Type folder. Each service ticket type has a unique folder if it has been assigned custom fields. |
|
Assigned custom fields appear in the field list throughout the Lifecycle Management Suite within the Custom > Service Ticket Type folder. Each service ticket type has a unique folder if it has been assigned custom fields.
|
By default, tickets include a summary, tasks, history, and attachment screen. Additional screens may be assigned to display supplemental person, account, and ticket information within the ticket.
|
When a ticket is opened, the person and account information displayed on screen is related to the person in context. |
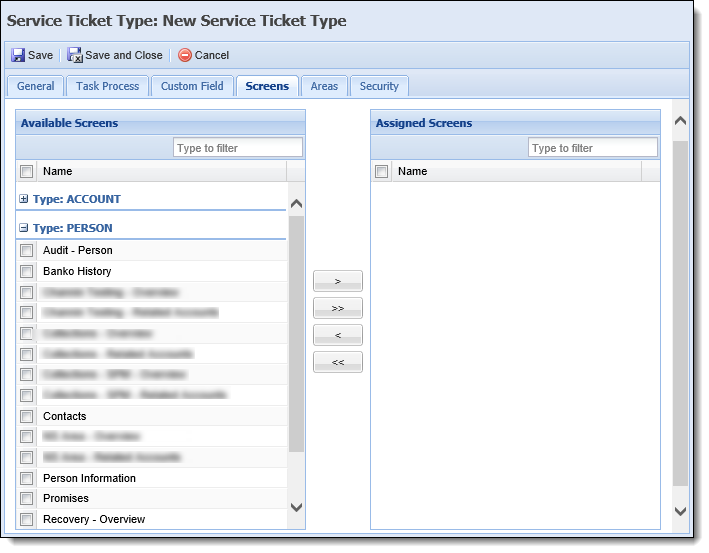
Within the Screens tab, additional screens may be assigned to the ticket:
| Attribute | Description | ||
| Available |
Displays a list of all available screens, organized by screen type, that can be assigned to a ticket. Select the desired screens from the list and use the arrow(s) to move it to the Assigned Screens box.
|
||
| Assigned | Displays a list of all the screens that have been assigned to a ticket type. |
For example, an institution wants users to be able to reference an account holder's Credit Card Detail and Delinquency Detail while reviewing a "Fraudulent Activity Dispute" ticket.

The area attribute determines the areas in which the service ticket is available.
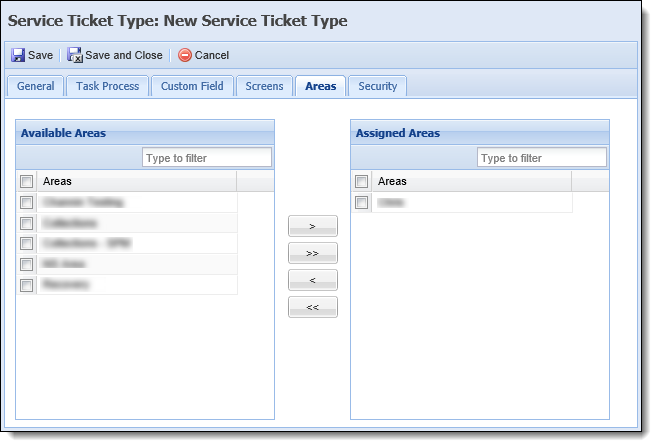
Areas are located within the area tab:
| Attribute | Description |
| Available | Displays a list of all areas configured in System Management > Areas. Assign service tickets access to the area by selecting the desired area(s) from the list and moving the name(s) to the Assigned Areas box using the arrows that display. |
| Assigned | Displays a list of all the areas that have been assigned to the service ticket type. In assigned areas, service ticket types are available to be created from the Left Navigation Panel's ticket tab. |
Security attributes allow administrators to control which users and groups can create a service ticket.
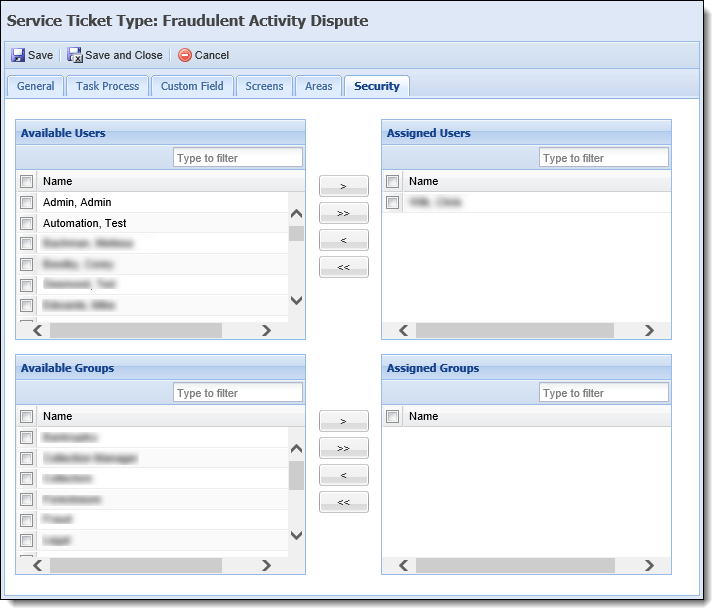
Security attributes are located within the Security Tab:
| Attribute | Description |
| Available | Displays a list of all Users configured in System Management > Users and all Security Groups created in System Management > Groups > Security Groups. Assign access to the ticket by selecting the desired user(s) and group(s) from the list and moving the name(s) to the Assigned Users/Groups boxes using the arrows that display. |
| Assigned | Displays a list of the Users and Groups assigned access to the ticket. Once the ticket is saved, it is accessible to the assigned Users and Groups within the left navigation panel of the workspace while working in the assigned areas. |
To create a new Service Ticket, click  .
.
The New Service Ticket screen appears. Navigate through the tabs to update attributes.
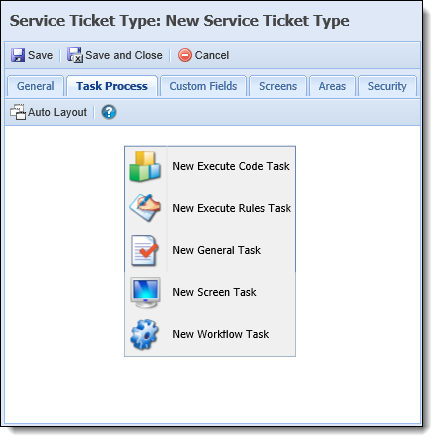
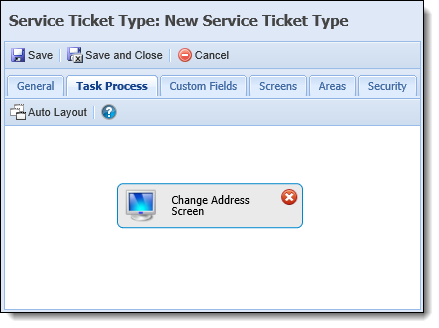
Custom task processes are built within a Service ticket on the Task Process tab. The task process tab provides the ability to make complex task processes fast and easy. Using the task process interface, administrators are able to add tasks, create dependencies, and define results.
Adding Tasks
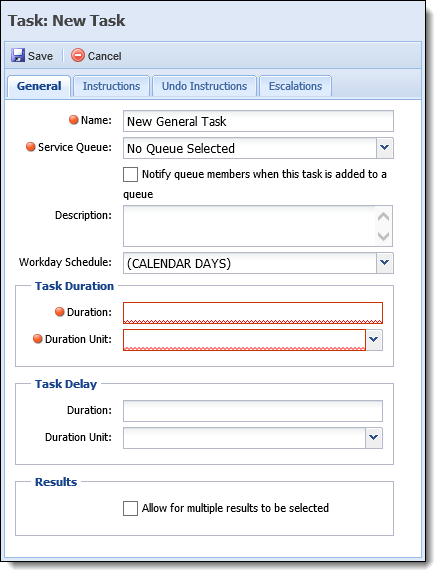
To build a task process, right-click anywhere within the tab to display a list of task types available to create and add to a Task Process. Select a task type from the list.
The Task Editor screen appears. Navigate through the tabs and assign attributes to the task.
|
For more information about tasks and their attributes, see the Task Types topic in this guide. |
When finished assigning attributes click  . The new task populates within the task process screen.
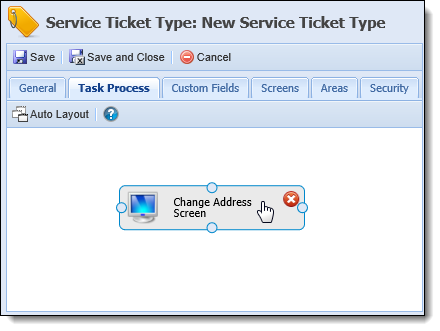
Once a task is added to a task process, the task may be moved by clicking the task and dragging it to the desired location in the screen.
|
Editing a Task
Deleting a Task
|
Creating Dependencies
When multiple tasks are included in the process, they can be linked to form a dependency.
To link the tasks:
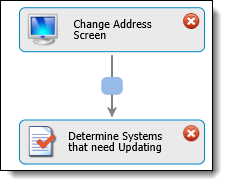
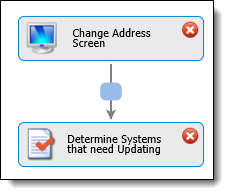
The Determine Systems that need Updating task is dependent on the Change Address Screen and cannot start until the Change Address task is completed.
|
A task can be dependent on multiple tasks. In this case, the task cannot start until all dependent tasks have been completed. |
Any task in a process that is not dependent on another task is a startup task, and is available within the Tasks tab when a ticket is opened. There is no limit as to how many start up tasks can be in a task process.
|
If a delay has been assigned to a startup task it displays as a Waiting to Start task. If there is no delay, the task displays as an In Progress task. For more information on task statuses, please see the Task Statuses topic in the End-User guide. |
Defining Results
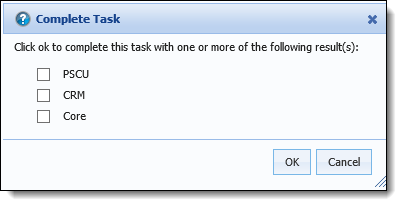
Once tasks are linked, a result can be defined by typing the result in the blue textbox on the link. The result creates a conditional dependency; therefore, a task is only eligible to work if a dependent task is completed with the result defined in the dependency.
|
The results in the blue textbox are results available to the user to select from when completing a task. When a result is selected, the task associated with it becomes In Progress in the ticket. |
Processes can be configured to allow a single task to have multiple resulting tasks based on different results. For example in a Change Address ticket, an institution may have multiple third party systems, but not all account holders use all the systems. After changing the address, the next step in the process may be configured to allow one or more systems to be updated depending on what type of accounts the customer has. In this situation, a task can link to multiple tasks with a different result defined for each dependency.
|
When configuring the task, an administrator has the option to allow for one or multiple results to be selected. This can drive the process down multiple paths.
|
Example
To illustrate how a task process is configured, please see the below example.
The following depicts the task process of a Change Address ticket type. The administrator must configure a task process to complete the below tasks:
The task process attribute of service ticket types simplifies building complex processes, such as the example above.
The first task is to capture the address change. Once the new address is captured, the next task is to determine which systems need to be updated.
This institution uses a core as well as PSCU and CRM. The Determine Systems that need updating task can have multiple links to each system.
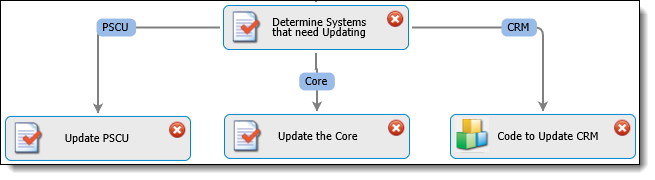
|
If the core an institution is on provides write-back capabilities, updating the core can be done through the Change Address screen task by using the Tickets panel with ticket property fields and the Change Address panel. In this instance, an Update the Core task is not necessary. |
The Determine Systems task has been configured to allow multiple results to be selected. When a user is completing the Determine Systems task, they have to select check boxes to determine which systems to update.
After the necessary systems have been updated, an email to the account holder is needed to confirm the update was successful. Because one or more of the systems could require updating, all three tasks have to link to a Send Email Confirmation task. The task process interface allows for multiple tasks to link to one result. This reduces the amount of tasks that need to be configured, and simplifies the overall process.
|
Useful tips to use while building a case process:
|
When finished entering all the information, click  to save the new service ticket and return to the Service Ticket page. The new service ticket populates in the grid and can be worked by users with allocated permissions.
Highlight the service ticket that is to be copied. Click  .
.
The Copy Service Ticket screen appears. Navigate through the tabs and make any necessary changes to the service ticket.
When finished entering all the information, click to save the new service ticket and return to the Service Ticket page. The new service ticket is now listed in the grid and available to be worked by users with appropriate permissions. Click Cancel to return without saving.
Highlight the service ticket that is to be edited. Click  . The Edit Service Ticket Type screen appears.
Navigate through the tabs and make any necessary changes to the service ticket.
When finished entering in all information, click to save the service ticket and return to the Service Ticket page. Click  to return without saving.
Highlight the Service Ticket Type that is to be deleted. Click  . A confirmation message appears.
Click Yes to delete the service ticket type. Click No to return to the Service Ticket Type page without deleting.
 to return to the Task Process.
 to disregard any changes and return to the Task Process.
 within the task tile in the case process. A confirmation message appears.
 optimizes the layout of the tasks within the Tasks tab.
 on the link. Click on