Temenos Lifecycle Management Suite - Account Origination Product Guide
Exports
| Administrator Guide > Exports |
Data can be sent to Third Parties using the export function and a fixed-width or delimited text file that is created outside of Temenos Infinity.
The Exports page in System Management > Exports provides system administrators with the ability to create and manage Application and Optical Exports in Temenos Infinity.

The grid within this page displays the following columns of information for each export:
| Column | Description |
| Name | Displays the name of the export. |
| Export Type | Displays the type of export selected within the Create drop-down. |
| Active | Displays a  if the export is active in Temenos Infinity. if the export is active in Temenos Infinity. |
| Last Modified | Denotes when the last modification was made. |
| Modified By | Denotes who made the last modification. |
| Last Run Date | Displays the date and time the export was last run. |
| Last Run Status | Displays the status of the last export (Success, Fail). |
From the top toolbar, administrators are provided with the ability to create, edit, copy, and delete an export, as well as perform the following actions:
| Button | Description | ||||||||
 |
Click to execute an "On Demand" export. Exports must be executed in this way if they are not set to run automatically on a schedule.
|
||||||||
 |
Select the drop-down, and click Letter Export Settings allow administrators to define the Connection Parameters required to export letter files for Third Parties to process. These settings are used when a letter is set to Outbound Export.
|
The Exports topic includes the following information to assist administrators with creating, copying, editing, and deleting an export:
The following export types are available within Temenos Infinity:
 |
The export types available for a financial institution depend on the modules that are active in their environment. |
Application Exports enable institutions to determine application fields to be exported.
Allows institutions to configure loan application fields and criteria to be exported.
The export file is deduped, so only one entry appears for each Application ID.
This export is used in conjunction with the Experian Application Export connector.
|
For more information, see the Experian Application Export connector guide. |
Application Optical Exports enable financial institutions to export an index file including the documents attached to applications in Temenos Infinity directly to the optical imaging system used by their institution.
All Exports share common attributes that are defined when creating, copying, or editing an export.

The following General attributes are defined within the General tab:
| Attribute | Description | ||
| Name |
Enter a unique name for the export.
|
||
| Description | Enter a description for the export. | ||
| Active | Select the check box to activate the export. If the export is active, and the scheduled process is run, the export is executed. |
|
When configuring an optical export, the File Detail tab does not appear within the Export configuration window as the file parameters associated with an optical export are defined within the Optical Export Detail tab. Please see the Optical Export Detail section in this topic for more information. |
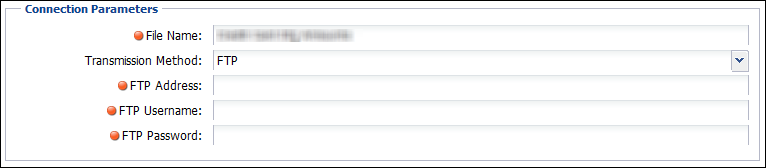
File Detail attributes enable the administrator to manage the file parameters associated with the export. The required attributes within this tab varies according to the Transport Type. In the example below, the following parameters display when FTP is the selected Transport Type:
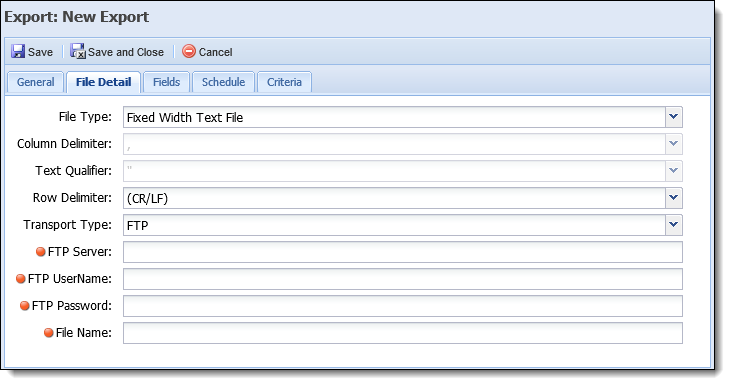
The following File Detail attributes are defined within the File Detail tab:
| Attribute | Description | ||||
| File Type |
Select Delimited Text File or Fixed Width Text File from the drop-down list. Once the file type is chosen, only the fields associated with that file type are enabled. |
||||
| Column Delimiter |
Select a column delimiter from the drop-down list to identify how columns within the file are separated in the export.
|
||||
| Text Qualifier |
Select a Text Qualifier to identify how text displays in the file. For example, if “ is inserted as the text qualifier, the fields in the export appear as follows: “Field 1,” Field 2,” etc.
|
||||
| Row Delimiter |
Select a Row Delimiter to identify how to distinguish rows of data in the file. |
||||
| Transport Type |
Select how the file is to be transported, from the drop-down list. The available choices are:
|
||||
| Folder Path | If Folder is the selected Transport Type, enter the folder path for the location where the export file is to be placed on the server. | ||||
| FTP Server | If FTP is the selected Transport Type, enter the FTP Server name. | ||||
| FTP UserName | If FTP is the selected Transport Type, enter the FTP UserName. | ||||
| FTP Password | If FTP is the selected Transport Type, enter the FTP Password. | ||||
| File Name | Enter the naming convention of the file, including the file extension, with no spaces. | ||||
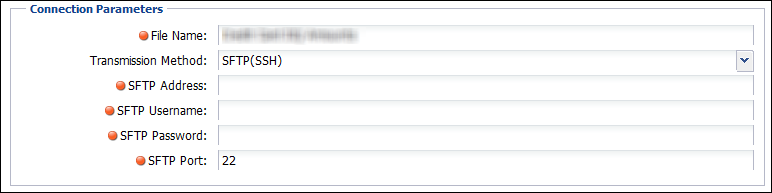
| SFTP Server |
If SFTP is the selected Transport Type, enter the SFTP Server name.
|
||||
| SFTP UserName |
If SFTP is the selected Transport Type, enter the SFTP UserName.
|
||||
| SFTP Password |
If SFTP is the selected Transport Type, enter the SFTP Password.
|
||||
| SFTP Port |
If SFTP is the selected Transport Type, enter the SFTP Port.
|
||||
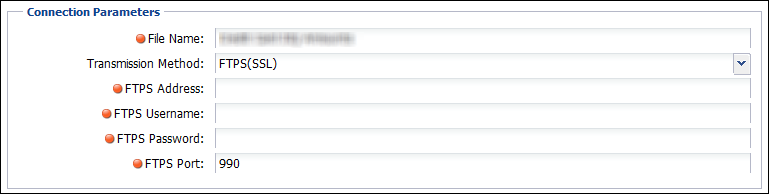
| FTPS Server |
If FTPS is the selected Transport Type, enter the FTPS Server name.
|
||||
| FTPS UserName |
If FTPS is the selected Transport Type, enter the FTPS UserName.
|
||||
| FTPS Password |
If FTPS is the selected Transport Type, enter the FTPS Password.
|
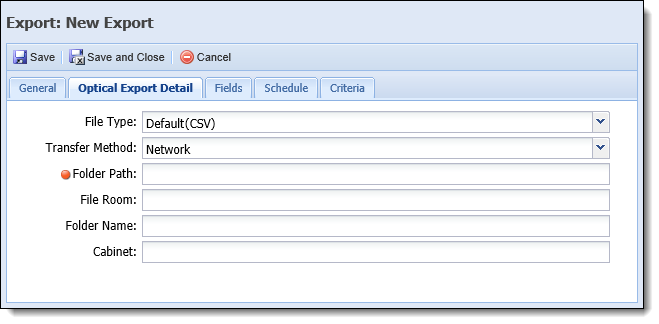
Optical Export Detail attributes enable the administrator to manage the file parameters associated with an optical export. The attributes required within this tab vary depending on the Transfer Method defined for the export.
In the following example, the Transfer Method is set to Network:
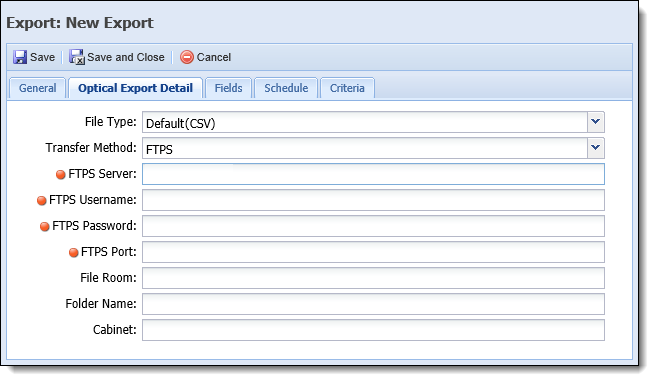
When the Transfer Method is set to FTPS, the Optical Export Detail tab appears as shown below:
The following attributes are defined within the Optical Export Detail tab:
| Attribute | Description | ||
| File Type |
Select one of the following options to identify the type of file to be created:
|
||
| Transfer Method |
Select one of the following options to identify how the file is to be transmitted to the optical imaging system:
|
||
| Folder Path | If Network is the selected Transfer Method, enter the folder path location where the export file is to be placed. This is a required field that only displays when the Transfer Method is set to Network. | ||
| FTPS Server | If files are being transferred to a FTPS site, enter the FTPS Server Name. This is a required field that only displays when the Transfer Method is set to FTPS. | ||
| FTPS Username | Enter the username required to connect to the FTPS site. This is a required field that only displays when the Transfer Method is set to FTPS. | ||
| FTPS Password | Enter the password used to connect to the FTPS site. This is a required field that only displays when the Transfer Method is set to FTPS. | ||
| FTPS Port | Enter the Port number used to transmit the index file via FTPS. This is a required field that only displays when the Transfer Method is set to FTPS. | ||
| File Room |
Enter text that identifies the file room in the optical system where all documents in the batch are added when the file is exported.
|
||
| Folder Name |
Enter the name of the folder in the optical system that is to receive the documents.
|
||
| Cabinet | Enter the name of the Cabinet in the optical system where the folder to receive the document(s) is located. |
Field attributes allow administrators to select the fields to include in the export.
|
At least one field must be included in every export. |
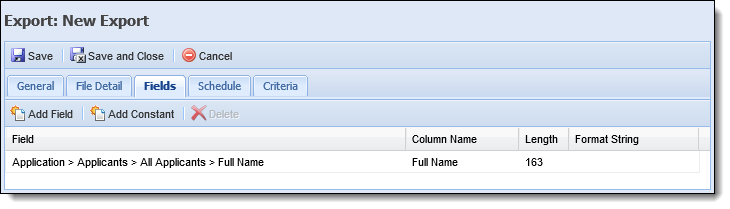
The grid within this tab displays the following information about each field included in the export:
| Column | Description |
| Field | Displays the location of the field in Temenos Infinity. |
| Column Name | Displays the field name that appears in the export. This column pre-populates with the field name in the database, but can be modified by clicking within the column. |
| Length | Displays the length of the field in the export file. This column pre-populates with the field length in the database, but can be modified by clicking within the column. |
| Format String |
Enables the ability to define the format in which date fields display in the export. When a date field is added to the export, this column becomes editable and provides the ability to select one of the following options from a drop-down:
|
From this tab, administrators are able perform the following actions:
| Button | Description | ||||||||
 |
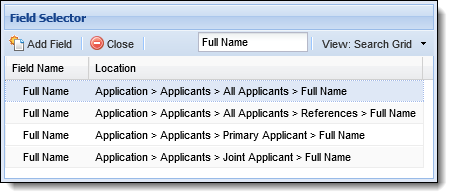
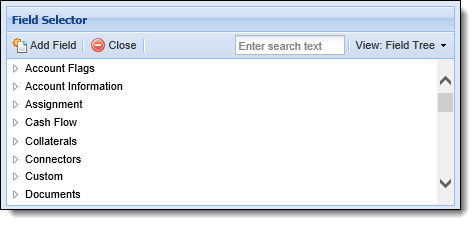
Provides the ability to add fields to the Export. Clicking this button opens the Field List for the selected export type. The fields displayed in the list depend on the type of export being created.
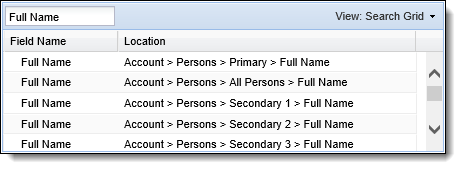
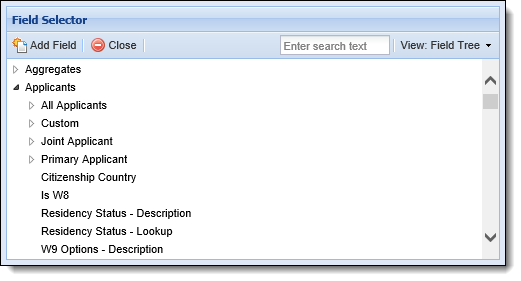
The field list is a feature used throughout Temenos Infinity to define the fields to display on reports, views, and exports. It is also used in criteria building for reports, views, exports, and searches. The field list is a feature used in criteria building for searches. Each field selector window looks the same regardless of how it is accessed. In the below example, the field selector has been accessed through the Fields tab when creating a new report. By default, the field selector opens in a tree format with expandable folders and sub-folders.
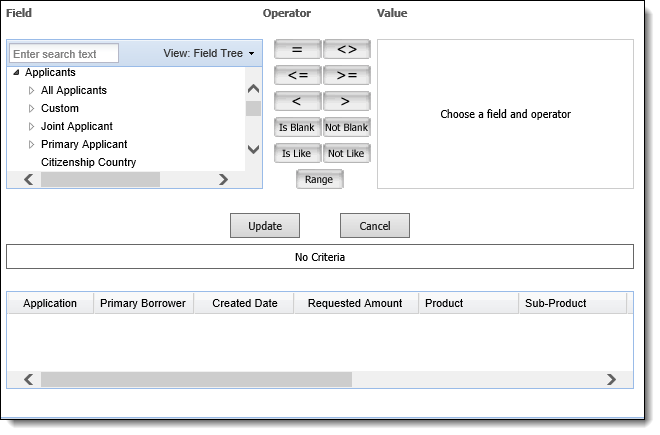
Field TreeWhen using the Field Tree format, click the arrow next to the field name to expand or collapse the list of available fields. Expand each section until the desired field is found, or search for the field by entering text into the search text box, and hitting Enter on the keyboard. Once the desired field is located, highlight the field, and then double-click the field, or select Once the desired field is located, highlight the field, and then select an operator, define the value, and click Update. Search GridTo change the view of the field selector from a tree to a search grid format, click the View drop-down in the top of the field selector window, and select Search Grid. Using the Search functionality, locate the desired field by entering text into the text box, and hitting Enter on the keyboard. A list of results displays including the field name and location in Temenos Infinity.
Once the desired field is located, highlight the field, and then double-click the field, or select Once the desired field is located, highlight the field, and then select an operator, define the value, and click Update. |
||||||||
 |
Provides the ability to add a column to the export file and specify a value for each record in the column.
|
||||||||
 |
Highlight a row within the grid and click to remove the field from the export. |
Schedules can be added to an export to run the export automatically or on demand. When using a set schedule, exports can be run on a daily, weekly, or monthly basis. When On Demand is selected, the export only runs when  is clicked within the toolbar on the Exports page.

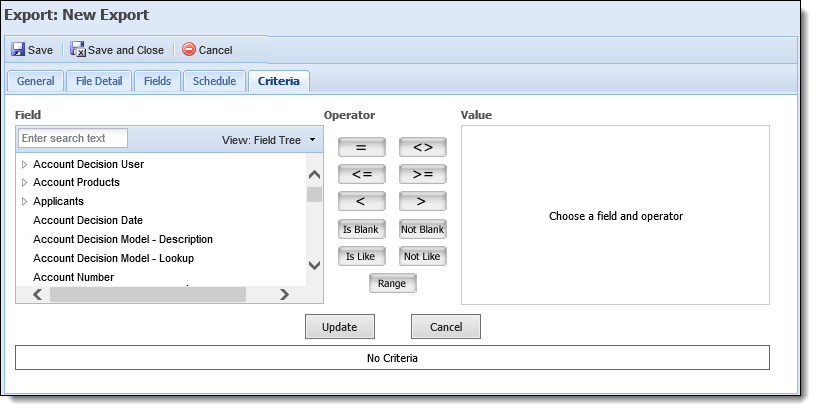
Within the Criteria tab, define the criteria an application must meet in order to be included in the export using the criteria builder.
The criteria that can be set is dependent on the export type:
|
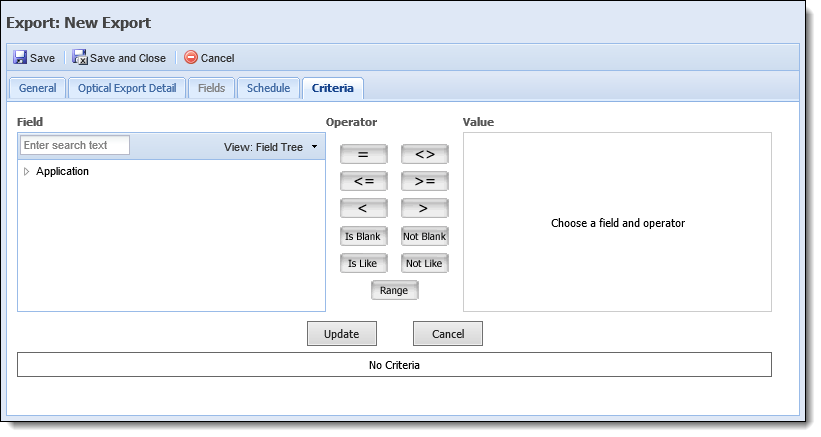
If configuring an optical export, this tab determines the criteria that an application must meet in order for the documents attached to the application to be added to the file.
|
To create a new Export, click  , and select an export type.

Within the New Export screen, define the General Export attributes.
After all General attributes are defined, if configuring an application export, navigate to the File Detail tab to enter the file parameters associated with the export.
If configuring an optical export, navigate to the Optical Export Detail tab to define the file parameters for the export.
Upon completion of the file detail parameters, navigate to the Fields tab to add or remove the fields included in the export.
If desired, after all fields have been added, click within the Column Name and/or Length column(s) to make any necessary modifications. If a date field has been added, click within the Format String column to select a date format.
To change the order of the fields, drag and drop the field(s) into the desired position in the grid.
Once all fields have been configured, set the export schedule within the Schedule tab.
After the export schedule has been set, navigate to the Criteria tab to define the data to be included in the export.
Upon completion of all export attributes, click  to create the new export and return to the Exports page. The new export populates within the Exports grid.
To initiate an export that is configured to run on demand, select the export within the Exports grid and click .
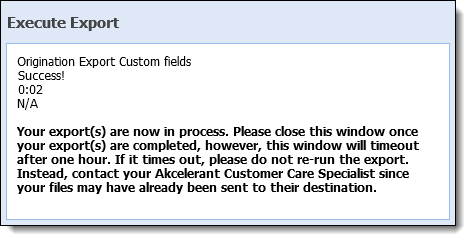
A pop-up window appears stating that the export is executing. When finished executing, the pop-up window automatically updates to indicate the success or failure of the export, along with the time it took to execute, the location it was sent to and instructions to follow.
|
If there are no documents to include in an Optical Export, a status message is received to inform that the export process ended successfully with 0 documents exported. For more information on this process, please see the Optical Export Process section in this topic. |
When finished reviewing the export status and instructions, close the pop-up window.
Each time an Optical Export is run, the Optical Export Process executes to create an index file including the documents associated with each application that meet the export criteria. This process looks for all attachments that have not yet been exported, as well as application documents where the following are true:
|
If there is not a signed version of the document, the process sends the original document. |
|
If there are multiple documents associated with an application, and some were already exported, only the documents not included in the previous export are added to the index file; a success message is received to inform that the export completed successfully, and the exported documents are able to be viewed in the index file. |
When added to the index file, documents are separated by Classification Type (FILENAME), and are listed with the following naming convention: <FILENAME>.<RUNDATE>.<RUNTIME>.<Extension>. For example, DRIVERSLICENSE.10212016.1015.csv.
 |
If two documents with the same name are included in the file, a numeric counter is added to the format of the naming convention. For example, DRIVERSLICENSE.10212016.1015.pdf and DRIVERSLICENSE.10212016.1015.1.pdf. |
The format and extension of the file is dependent upon the File Type assigned to the export within the Optical Export Details tab.
When the File Type is set to Default, the file is exported in .CSV format. If the File Type is set to Synergy, the file is exported in an .XML format. Reference the following sections for an overview of the file mapping for each format:
The following table provides an overview of the mapping for each field included in a Default .CSV index file:
| Field | Temenos Value | Required/Optional | Description | ||
| Batch Number | Required | Indicates the start of a batch. The Sequence Number attribute is required. (Ex. “1”) | |||
| File Room | OPTICAL_EXPORT_FILEROOM parameter in the Optical Export Detail tab. | Optional | Identifies the file room in the optical system where all documents in the batch are added when the file is exported. | ||
| Delete Files | N/A |
Identifies if files are to be deleted after they are imported to the optical imaging system. This field is hard coded to True. |
|||
| Document Sequence Number | Required |
Identifies the start of a document. There can be multiple numbers of documents per batch, but there must be at least one document to create an index file.
|
|||
| Document Name | This field populates the document name displayed in the Name column of the Application Documents window: <document name><file extension>. | Required |
Identifies the name of the document. |
||
| Cabinet | OPTICAL_EXPORT_CABINET parameter in the Optical Export Detail tab. | Optional | Identifies the name of the Cabinet in the optical system where the folder to receive the document(s) is located. | ||
| Document Type | This field populates the value identified within the Document Classification column of the Application Documents window. This is the value selected from the DOCUMENT_CLASSIFICATION lookup when a document is attached to an application. | Required | Identifies the type of document. |
The following table provides an overview of the default mapping for each field included in a Synergy .XML index file:
|
In addition to the fields below, the .XML index file also includes any fields that are added to the Optical Export within the Fields tab of the Export configuration window. |
| XML Element | Temenos Value | Required/Optional | Description | ||
| <?xml version="1.0" ?> | Required | The first line the XML file. This line identifies the file as an XML file adhering to the XML specification version 1.0. | |||
| <FilingJob> | Required | Identifies the beginning of the information for processing. One filing job exists for each XML file. | |||
| <Batch SeqNum=”value”> | Required |
Identifies the start of a batch.
|
|||
| <FileRoom>value</FileRoom> | OPTICAL_EXPORT_FILEROOM parameter in the Optical Export Detail tab. | Required |
Identifies the File Room in the Synergy™ system where all documents in the batch are added when the file is exported. |
||
| <DeleteFiles>value</DeleteFiles> | N/A | Identifies if files are to be deleted after they are imported to the optical imaging system. This field is hard coded to True. | |||
| <Document SeqNum=”value”NumPages=”value”> | Required |
Identifies the start of a document. Each batch can include multiple documents per batch, but there must be at least one document in the batch. This tag includes the following attributes:
|
|||
| <DocName>value</DocName> | When a document is attached to an application, the Name column in the Attached Documents window displays the name of the document in the following format: <document name><file extension>. The value in this field reflects the <document name> provided for the document. | Required | Identifies the document name. | ||
| <Cabinet>value</Cabinet> | OPTICAL_EXPORT_CABINET parameter in the Optical Export Detail tab. | Required | Identifies the name of the Cabinet in the optical system where the folder to receive the document(s) is located. | ||
| <Type>value</Type> | This field populates the value identified within the Document Classification column of the Application Documents window. This is the value selected from the DOCUMENT_CLASSIFICATION lookup when a document is attached to an application. | Required | Identifies the type of document. | ||
| <FolderName>value</FolderName> | OPTICAL_EXPORT_FOLDERNAME parameter in the Optical Export Detail tab. | Optional | Identifies the folder within the optical system that is targeted to receive the selected documents. | ||
| <Indexes> | Required | Identifies the start of the list of indexes for the document. Only one index list is allowed per document. | |||
| <Index Name=”value”Formatted=”value” SmartIndexLookup=”value”> value</Index> |
Column Name of the field added to the index file from the Fields tab. |
Required | Identifies an index value. Each document must include at least one index value; however, documents can include as many indexes as Synergy allows per document. Formatted values are optional. | ||
| <Pages> | Required | Identifies the beginning of the file list that represents the pages of the document. Only one page list is allowed per document. | |||
| <Page SeqNum=”value”>value</Page> | Required |
Identifies the fully qualified file name of the file to be used as a page for the document. There must be at least one page per document.
|
Once the Optical Export process completes successfully, the documents and the index file are transferred to the location defined for the export, and the the Sent To Optical field is set for each document included in the export file.
|
If the Optical Export process fails, the documents and the index file are not exported to the Network or FTPS location defined for the export. |
|
After documents are exported, they remain available to view within the Temenos application. |
 . to retain the modified export settings and return to the Exports page.
 . to create the new export and return to the Exports page..
 to define the Connection Parameters required to export letter files to a Third Party.
 Letter Export Settings

 at the top of the field selector window, to add it to the field list.