
Temenos Lifecycle Management Suite - Origination Product Guide
Loan Terms
| End-User Guide > Application Processing > Origination > Loan Terms |
During the application process, users are able to input the terms of the loan. These terms are used to determine the loan calculations and payback information. Users are also able to input information used by the institution such as loan tracking and HMDA information.
Depending on the configuration of screens and workflow models, this process can vary. Institutions may employ multiple application screens to capture loan terms for each loan sub-product. A screen that captures basic loan term information may be assigned to the Workflow, while a more thorough screen may be assigned to the Screens section.
The screen used to capture loan terms is a user-defined Application screen that enables users to collect loan term information. The following list encompasses the panels or logical field groupings that may be configured at an institution:
The fields that pertain to the above loan terms can be collected in various application panels. These panels can be assigned to one or across multiple user-defined screens. Refer to the Screens section of the Administrator Guide for more information on configuring loan terms screens and panels.
 |
Based upon the loan terms screen’s configuration, actual screen content and names may vary. The images and processes listed below may not reflect your institution’s loan terms screen. Refer to the following processes for example purposes only. |
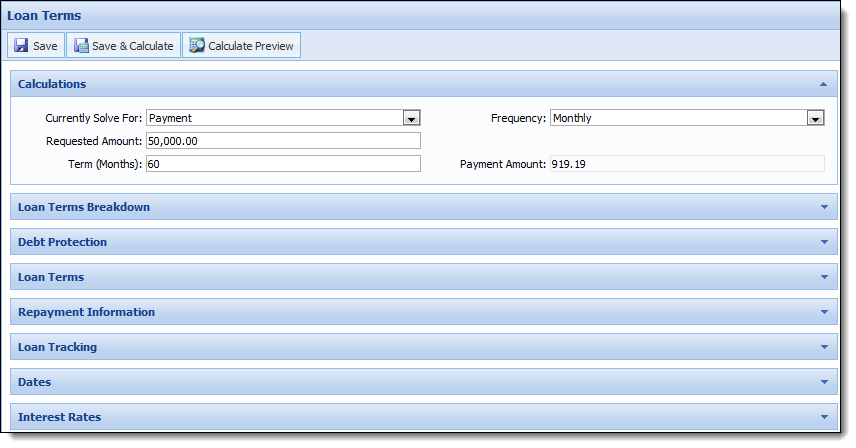
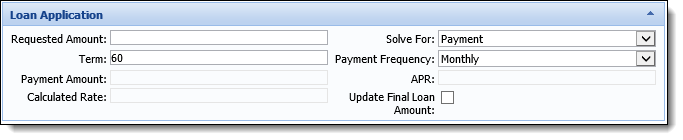
Depending on the configuration of the loan terms screen, a user-defined general calculations panel may be configured to capture the basic loan calculation information.
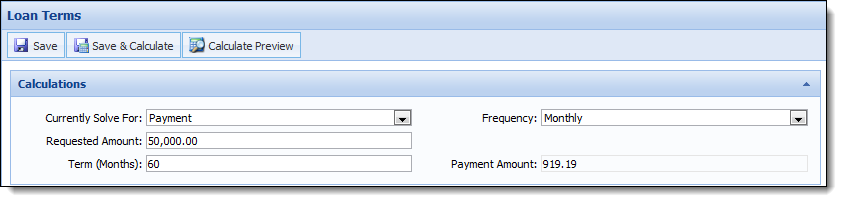
Basic loan term fields, such as Requested Amount, Term, Payment Frequency, and Payment Amount, allow users to input the desired loan terms or build scenarios. To assist users in building loan term scenarios, the Solve For field is configurable to the loan term screen. If configured, the Solve For field enables users to input the desired loan terms and solve for the Payment, Term, and Requested Amount. This enables users to input known values and solve for desired customer terms.
Also included in basic calculations is the ability to indicate Loan Type and Payment Type. Other configurable loan term fields that may affect loan calculations are Doc Stamp Program, Doc Stamp Rate, and Doc Stamp Amount.
|
Reference the list below for information on different fields that are set within the Loan Terms:
|
 |
To learn more about calculating the Draw Period and Repayment Period Terms for a loan, please see the Calculating Draw and Repayment Period section in this topic. |
When performing Solve For calculations, Payment Types limit Solve For calculations in the following way:
| If Payment Type is: | Can Solve For: |
| Level Pay | Payment, Term, and Requested Amount |
| Interest Only | Payment |
| Interest Only with Periodic Principal Payments | Payment |
| Principal and Interest | Payment and Term |
| Balloon |
If Open-End loan and Real Estate Type is Home Equity:
Else
Else
|
| Billing Percentage | Payment |
|
Based upon the Solve For selected, certain field are disabled based upon the selection. However, if the Calculate Amortization field is set to false, all fields become available for editing, regardless of the Solve For that was selected. |
When performing Repayment Solve For calculations, Repayment Payment Types limit Solve For calculations in the following way:
| If Repayment Type is: | Can Solve For: |
| Level Pay | Payment |
| Interest Only | Payment |
| Principal & Interest | Payment and Term |
| Balloon | Balloon Amount and Payment & Balloon Amount |
Additionally, the Loan Terms/Application screen is able to be configured with buttons such as:
If configured to the application screen, the Save & Calculate button enables users to update the calculated values for an application, as well as quote and re-quote loan figures to applicants without leaving the application workspace.
|
The Save & Calculate label is editable, so the title of the button may vary from institution to institution. |
In addition to calculating screen values, clicking the Save & Calculate button performs a save and refreshes the screen.
When Save & Calculate is clicked, numerous fields may be set by the calculator; however, not all fields are set each time the calculation is executed. Some fields are only set based upon the attributes of the loan application (IsIntroRate, IsHELOC, etc.).
|
Clicking Save & Calculate performs calculations using data on the screen that has not been saved during the Calculate process. |
The following is a list of fields that may be input into or set by the calculator:
|
When the Update Final Loan Amount field is set to true, reverse calculations are performed in an application to set the Base Loan Amount in a decisioned application, or the Requested Amount in an application that has not been decisioned. The Update Final Loan Amount field also determines whether or not the following fields are active or inactive in the Loan Terms screen:
For more information, please see the Update Final Loan Amount section in this topic. |
|
If the Application > Requested Term field is configured to appear in an Application screen, users can set the application term to a custom value determined by the institution, which is then populated in the Application > Term, or Application > Balloon Term field. For example, 6 months. For more information, please see the Requested Term section in this topic. |
In addition to the aforementioned fields, Aggregates and Ratios as well as the Loan Terms Breakdown and Debt Protection panels update when the application is calculated.
 |
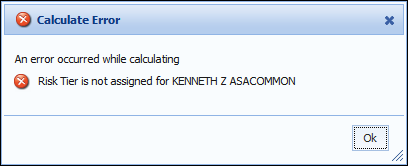
Failure to assign a Risk Tier may result in a validation error that prevents users from processing a successful calculation. If this error is encountered verify that Risk Rules, Tiers, and Models have been configured properly.
|
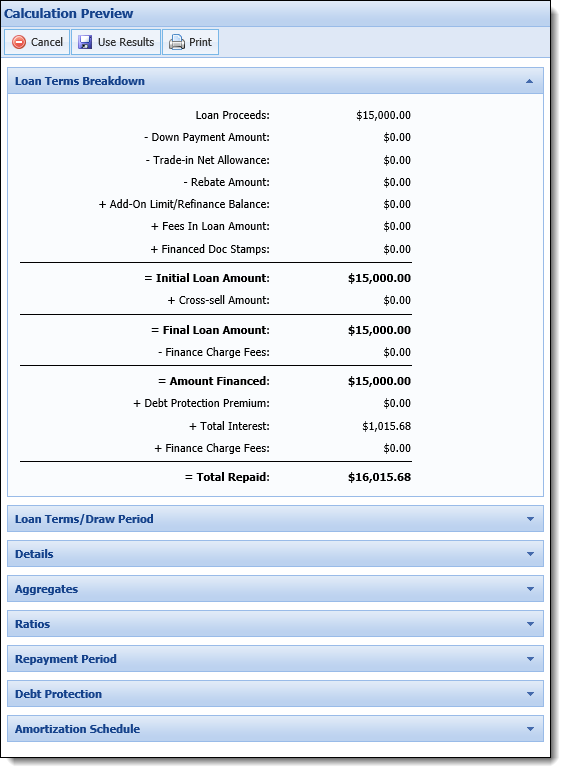
The Calculate Preview button enables users to view the Loan Terms Breakdown, Loan Terms/Draw Period, Details, Repayment Period, Debt Protection Summary, and Amortization Schedule based on the current loan term values.
|
The Calculate Preview label is editable, so the title of the button may vary from institution to institution. |
The Calculate Preview screen contains a toolbar that allows users to perform the following functions:
| Icon | Description | ||
 |
Closes the Calculate Preview screen. | ||
 |
Allows a user to select the result displayed in the Calculate Preview screen for the loan terms.
|
||
 |
Allows a user to print the Calculate Preview to a local or network printer. |
Within this screen, users are able to view information within the following panels:
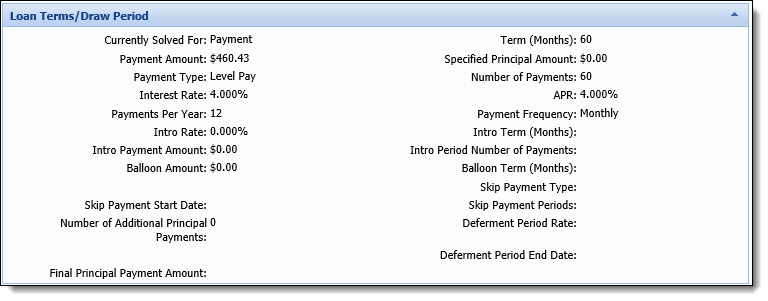
The Loan Terms/Draw Period panel displays a summary of the Loan Terms with information, such as Solve For information and APR.
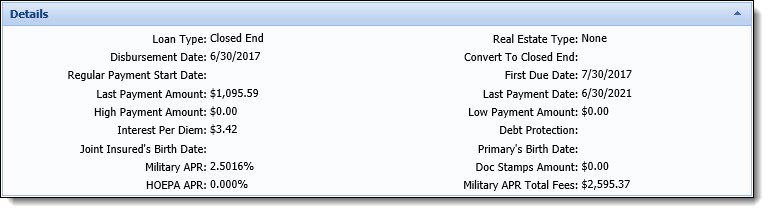
The Details panel displays a summary of loan details, such as Loan Type, Payment Amounts, Dates, and Debt Protection.
|
This panel also displays the HOEPA APR for a Home Equity product, as well as the Military APR (MAPR) and total amount of fees included in the MAPR for a closed-end loan. |
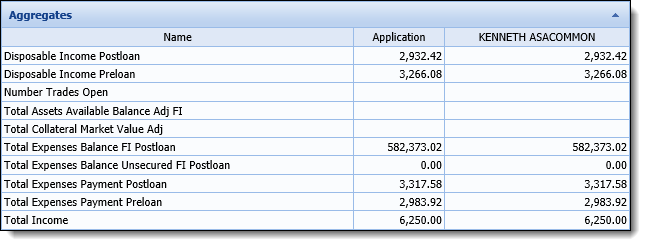
The Aggregates panel displays the calculated aggregate amounts for the application and each applicant.
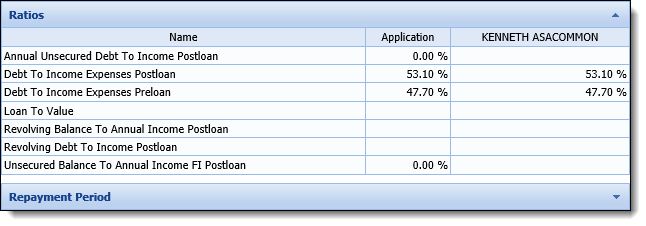
The Ratios panel displays calculated ratio amounts for the application and each applicant.
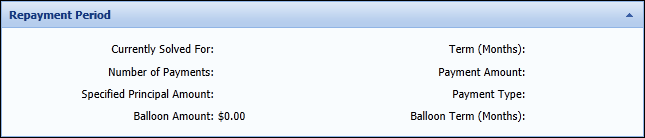
The Repayment Period panel displays a summary of the repayment details, such as Number of Payments, Term, Payment Amount, and Balloon information.
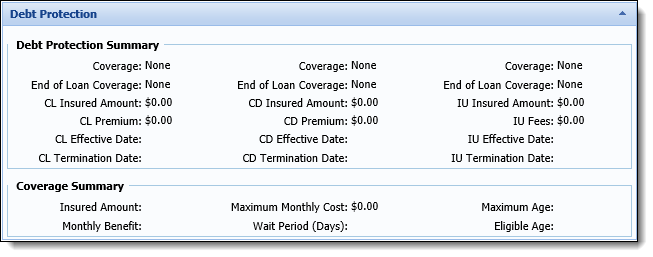
The Debt Protection panel displays a Debt Protection and Coverage summary.
|
By default, the Debt Protection panel displays fields for Credit Life (CL), Credit Disability (CD), and Involuntary Unemployment (IU) Insurance. If a plan with Debt Cancellation (DC) is selected, the fields in the preview for IU are replaced by the values for DC as shown below:
|
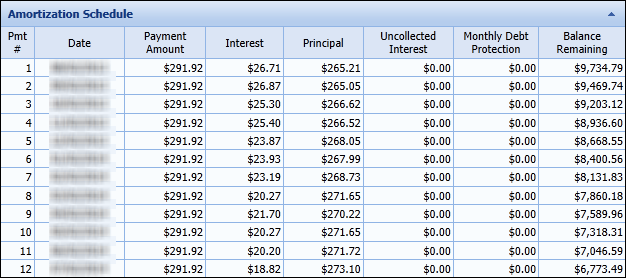
The Amortization Schedule displays an amortization schedule within a grid based upon the loan terms entered. This table displays information such as Payment Number, Payment Date, and Remaining Balance.
|
If the Calculate Amortization field is set to false, an amortization schedule does not generate and the following message appears.
|
|
In some situations, institutions may need to disable all or certain calculations from the application process. For more information on this these processes, see the Calculation Overrides topic. |
Depending on the configuration of the application screen, users may be able to view the loan term breakdown within the application workspace. This panel displays the calculations and values that factor into the loan amounts.
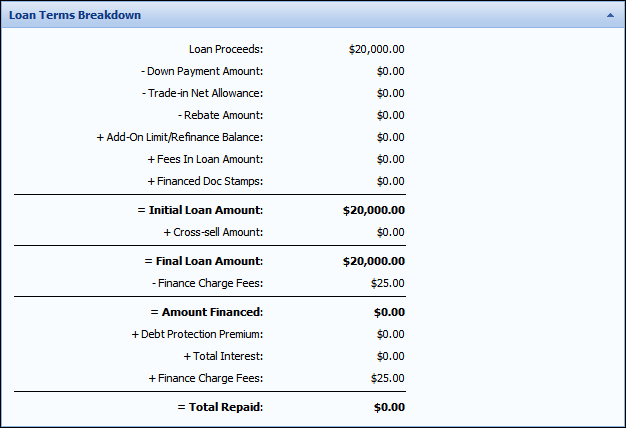
Loan Terms Breakdown is a read-only panel that displays an itemized breakdown of the Total Repaid loan amount that includes the following values:
|
Module Field |
Associated CUDL Field |
Associated DealerTrack Field |
Associated RouteOne Field |
Operator |
Description |
||
| Loan Proceeds | Sales Price | Cash Price | Cash Selling Price |
N/A |
The beginning loan amount, prior to any deductions or additions. | ||
| Down Payment Amount | Cash Down | Cash Down | Cash Down |
- |
The amount that the loan applicant provided towards the purchase price of the item being financed via the loan. | ||
| Trade-in Net Allowance | Trade Allowance | Net difference between: Trade Allowance and Trade Owed |
Net Trade |
- |
This amount represents the amount that the loan applicant received for trading in a vehicle, less any remaining balance owed on the vehicle. | ||
| Rebate Amount | Rebate | Rebate | Rebate |
- |
This amount represents the total incentive provided by the vendors towards the purchase. |
||
| Add-On Limit/Refinance Balance | Not Mapped | Not Mapped | Not Mapped |
+ |
In the case of a refinanced loan, this amount represents the amount of the existing loan that is being refinanced and bundled into the new loan being created. In the case of an Add-On Limit, this amount represents the existing credit limit of the liability selected for increase. | ||
| Fees In Loan Amount | • Credit Disability • GAP • Credit Life • Service Contract • Theft Deterrent • Additional Items • Sales Tax • Environmental Package |
• Taxes • Doc Fees • Title License Reg Fees • GAP • Service Contract • Credit Life • Disability • Other |
• Sales Tax • T&L Estimate • Front-end Fees • Accident/Health Ins • Credit Life Ins • GAP • Warranty • Back-end Fees |
+ |
Fees in Loan Amount represents any costs to the loan applicant that are being included in the financing of the loan and are not being indicated as a finance charge.
|
||
| Doc Stamps | Not Mapped | Not Mapped | Not Mapped |
+ |
In the state of Florida, there is a tax associated with the transfer of real estate or the execution of documents, such as loan notes. This tax can be financed in a loan, if the applicant chooses.
|
||
| Initial Loan Amount | Amount Requested | Financed Amount | Estimated Amount Financed |
= |
This amount represents the initial loan amount, after all down payments, rebates and trade in amounts have been deducted and all fees, taxes, and refinance amounts have been added. | ||
| Cross-sell Amount | Not Mapped | Not Mapped | Not Mapped |
+ |
The total amount of any additional non-loan products that were presented to and accepted by the loan applicant on the Cross-Sells screen. Examples are GAP or MBD Protection.
|
||
| Adjusted Loan Proceeds | Not Mapped | Not Mapped | Not Mapped |
= |
This amount represents the loan amount after all down payments, rebates and total trade-in new allowances have been deducted and all cross-sells with the following properties have been added:
|
||
| Final Loan Amount | Amount Requested | Financed Amount | Estimated Amount Financed |
= |
This amount represents the initial loan amount, along with any cross sell amounts and debt protection premiums. It is the actual amount of the loan that is being borrowed by the loan applicant. | ||
| Finance Charge Fees | Not Mapped | Not Mapped | Not Mapped |
- |
This amount represents any prepaid finance charge fees. | ||
| Amount Financed | Amount Requested | Financed Amount | Estimated Amount Financed |
= |
This number represents the total amount financed by the loan applicant. This amount is the total amount that interest is calculated and charged on. | ||
| Debt Protection Premium | Not Mapped | Not Mapped | Not Mapped |
+ |
This number represents the cost to the loan applicant for insurance that ensures that payments are made for a specific period of time against the loan in the case that an unforeseen circumstance occurs to the applicant and they are unable to make the payments. | ||
| Total Interest | Not Mapped (calculated by module) | Not Mapped (calculated by module) | Not Mapped (calculated by module) |
+ |
This number represents the cost to the loan applicant for insurance that ensures that payments are made for a specific period of time against the loan in the case that an unforeseen circumstance occurs to the applicant and they are unable to make the payments. | ||
| Finance Charge Fees | Not Mapped | Not Mapped | Not Mapped |
+ |
This amount represents any prepaid finance charge fees. | ||
| Total Repaid | Not Mapped (calculated by module) | Not Mapped (calculated by module) | Not Mapped (calculated by module) |
= |
The Total Interest represents the total cost of the loan. |
As changes are made to the loan application, the corresponding values are updated by clicking Calculate or Save & Calculate.
|
The fields that correspond with Loan Terms Breakdown values may be added to a user-defined panel. This enables users to edit indirect loan term values, post decision. |
Depending on the configuration of the application screen, users may be able to collect repayment information while processing loan terms.
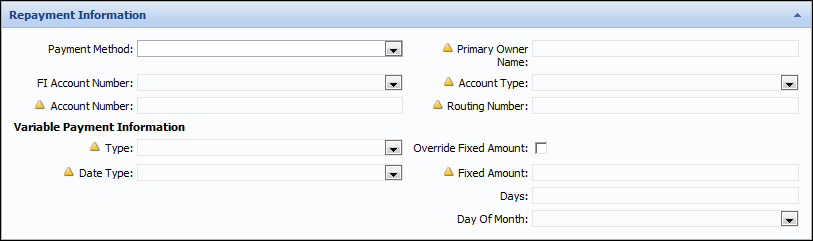
Collecting repayment information allows users to record Payment Methods and the corresponding fields such as Account Number, Account Type, Routing Number, and Primary Owner Name. If ACH or Automatic Transfer is selected, the Loan or Account Origination modules configure these selections in the core.
|
ACH fields are disabled or enabled based on the Payment Method selected for the application. |
|
Skip Payment fields may appear on this screen; however, Skip Payment functionality is not available for all Cores. If these fields are completed, but the functionality is not available for the institution, an error message is received at time of disbursement. |
Additionally, Variable Payment information may be collected. These fields allow users to work with applicants and establish payment preferences for Variable payment loan products.
The variable payment fields have additional editability checks beyond a field editability check. In addition to editability, the following validations occur:
| Field Name | Editability Check |
| Variable Payment Date Type | Can only be edited if the Payment Method is ACH or Auto Transfer. |
| Variable Payment Days | Can only be edited if Variable Payment Date Type is Past Cycle or Prior Due Date. |
| Variable Payment Type | Can only be edited if the Payment Method is ACH or Auto Transfer. |
| Variable Payment Day of Month | Can only be set if Variable Payment Date Type is specific day. |
| Is Override Fixed Amount | Can only be set if Variable Payment Type is Fixed Amount. |
| Variable Payment Fixed Amount | Can only be set if Is Override Fixed Amount is set to true. |
When inputting repayment information, the following field validations are required for disbursement:
| Payment Method | Validation Check |
| Auto Transfer | FI Account Number is required. |
| ACH | ACH Routing Number is required. |
| ACH | ACH Account Number is required. |
| ACH | ACH Primary Owner Name is required. |
| ACH | ACH Account Type ID is required. |
| Auto Transfer or ACH | Variable Payment Date Type Id is required. |
| Auto Transfer or ACH and Variable Payment Type Id is FIXED_AMT | Variable Payment Fixed Amount is required. |
| If Payment Method is Auto Transfer or ACH and Variable Payment Type Id is FIXED_AMT | Variable Payment Fixed Amount must be >= Payment Amount. |
| If Payment Method is Auto Transfer or ACH and Variable Payment Type Id is DAYS_PAST_CYCLE or DAYS_PRIOR_DUE_DATE | Variable Payment Days is required. |
| If Payment Method is Auto Transfer or ACH and Variable Payment Type Id is SPECIFIC_DAY | Variable Payment Day Of Month is required. |
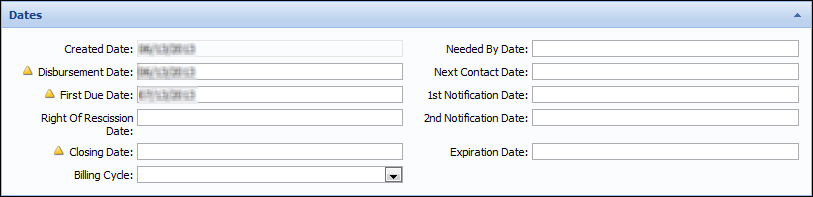
Depending on the configuration of the application screen, users may be able to collect dates associated with the loan application while processing loan terms.
|
The default values for Disbursement Date and First Due Date can be set in Loan Product Definitions for each Sub-Product; however, the field entries may be overridden as editability rights permit.
Other dates such as First Notification Date, Second Notification Date, and Expiration Date can be set via rules. |
Collecting dates allows users to indicate important loan dates such as Disbursed Date, First Due Date, Right of Rescission Date, Closing Date, and Billing Cycle.
Dates such as First Notification Date, Second Notification Date, and Expiration Date are used by the Automatic Withdraw process, which allow the Loan or Account Origination modules to withdraw applications which have not been Disbursed or Withdrawn. These fields indicate the dates when the module sends warning emails to the applicants and automatically withdraws applications. For more information on Automatic Withdraw, refer to the Automatic Withdraw topic.
|
If the Disbursement Date is updated, but the First Due Date field is not located on the screen, the First Due Date calculation does not occur. The First Due Date needs to be manually updated. |
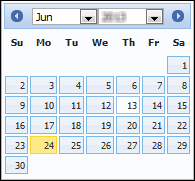
When inputting dates, users are able to click anywhere in the field to prompt a calendar. Use the calendar to select the desired date. Once a date is selected, the calendar closes and the date populates in the field.
In addition to selecting the date from the calendar, users are able to input dates by entering the shortcuts such as:
| Details | Format | Examples |
| Plus or Minus Days Plus Beginning of Month | +/- D + BOM |
+5D+BOM
-7D+BOM |
|
Plus or Minus Months Plus Beginning of Month |
+/-M + BOM |
+1M+BOM
-2M+BOM |
| Plus or Minus Years Plus Beginning of Month | +/-Y + BOM |
+1Y+BOM
-2Y+BOM |
| Details | Format | Examples |
| Plus or Minus Days Plus End of Month | +/- D + EOM |
+5D+EOM
-7D+EOM |
| Plus or Minus Months Plus End of Month | +/-M + EOM |
+1M+EOM
-2M+EOM |
| Plus or Minus Years Plus End of Month | +/-Y + EOM |
+1Y+EOM
-2Y+EOM |
When inputting dates, the Loan or Account Origination modules are hard-coded with the following field validations that are required for disbursement:
While entering an application's loan terms, users may be able to determine if the application is an Add-On or Refinance loan.
The image below displays an example of the Add On/Refinance panel when the Host supports Real Time parameter is set to Yes by the system administrator in the System tab of the Origination page in System Management.
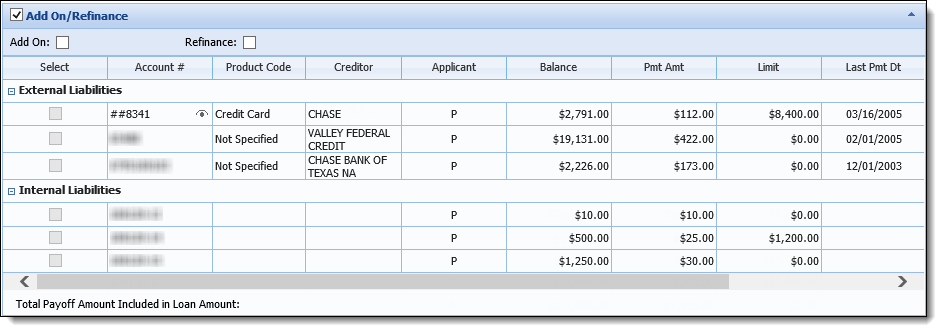
Within the top of the Add On/Refinance panel, users can select one of the following options to determine whether a liability is being added onto or refinanced:
| Loan Type | Description | ||||
| Add-On |
Allows the limit of an existing core liability to be increased. Add-on loans update the existing liability, and do not create a new loan record.
|
||||
| Refinance |
Creates a new core liability to pay off an existing liability.
|
The grid in the panel displays liability data within the following columns:
|
The Add On/Refinance panel and the Liabilities panel contain the same data. If the screen that contains the Add On/Refinance panel also contains the Liabilities panel, data updated on the most-recent panel added to the screen by a system administrator is saved, and overwrites the data updated on the other panel. |
| Column/Field | Description | ||||
| Account # |
Indicates a liability's account number.
|
||||
| Product Code | Indicates the category of an external liability. | ||||
| Creditor |
Indicates the creditor holding an external liability. |
||||
| Applicant | Indicates which applicant is the owner of the liability according to the Equal Credit Opportunity Act code indicated on the credit report. | ||||
| Balance | Indicates a liability's remaining balance. | ||||
| Payment | Indicates a liability's payment amount. | ||||
| Limit | Indicates the limit of a liability if open-ended. | ||||
| Last Payment Date | Indicates the date the last payment was processed. | ||||
| Maturity Date | Indicates the maturity date of a closed-end liability. | ||||
| Payoff Amount | Indicates a liability's payoff amount. | ||||
| Collateral Description |
Provides a brief description of the collateral used to secure the loan for internal/core liabilities.
|
The liabilities that populate within the Add On/Refinance panel are sorted into two collapsible headings:
To process an add-on or refinance application:
|
Only one liability may be selected for an Add-On application; however, multiple internal and external liabilities may be selected for refinance applications. |
|
Reference the list below for an overview of behavior that occurs in an application when certain liabilities are selected as an add-on or refinance:
|
Depending on the configuration of the application screen, users may be able to view rate information, such as the calculated Interest Rate and APR while processing loan terms.

Interest rate fields are populated by Pricing, which runs during the Calculate and Decision processes.
|
Interest Rates are calculated by Risk Models, Pricing Models, and configurations made in Loan Product Definitions for each Sub-Product; however, the field entries may be overridden if granted by editability and permission. Additionally, Rules may be written to apply discounts. |
Depending on the configuration of the application screen, users may be able to view or input introductory rate information associated with the loan application while processing loan terms.

|
The default values for Introductory Rates can be set in Loan Product Definitions for each Sub-Product; however, the field entries may be overridden as editability rights permit. |
Introductory rate information allows users to indicate important discounted rate information such as Introductory Rate, Number of Payments for introductory term, Payment Amount during introductory term, Regular Payment Start Date, and Introductory Term.
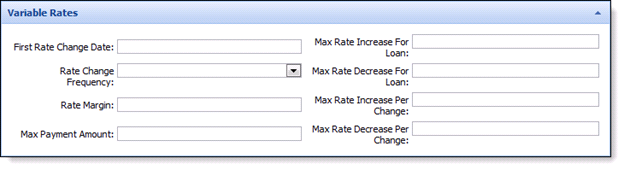
Depending on the configuration of the application screen, users may be able to view or input variable rate information associated with the loan application while processing loan terms.
|
The default values for Variable Rates can be set in Loan Product Definitions for each Sub-Product; however, the field entries may be overridden as editability rights permit. |
Introductory rate information allows users to indicate important rate change information such as First Rate Change Date, Maximum Increase/Decrease for Loan, Maximum Rate Increase/Decrease per Change, Rate Change Frequency, Rate Margin, and Maximum Payment Amount.
|
Maximum Payment Amount is determined by adding the max rate increase for loan to the current actual interest rate and calculating a payment amount based on the loan terms. The exception to this statement is Billing Percentage, which is used for Open End loans and requires a billing percentage rate and minimum payment amount entered on the loan sub-product. Each payment is the outstanding balance multiplied by a percent or the minimum payment. |
Debt Protection Plans can be generated for Debt Cancellation (DC), or a combination of Credit Life (CL), Credit Disability (CD), and Involuntary Unemployment (IU) insurance on a loan.
The Debt Protection panel enables users to quote debt protection coverage while processing loan terms.
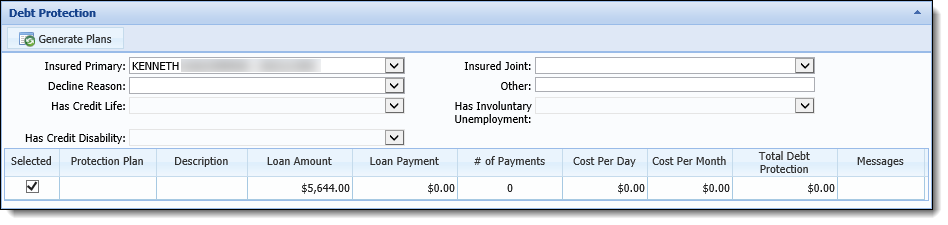
The Debt Protection panel contains the following fields, which are conditionally required:
| Field | Description | ||
| Insured Primary | Indicates the individual who is primary on the debt protection plan. This drop-down Use the drop-down list to select the primary applicant, in order to generate debt protection plans. | ||
| Insured Joint | Indicates the individual who is joint on the debt protection plan. Use the drop-down list to select the joint applicant who is to be added to debt protection plans. | ||
| Decline Reason | Use the drop-down list to select the decline reason if debt protection is being declined. | ||
| Other | If "other" is selected as a decline reason, users must enter the reason debt protection is being declined. | ||
| Has Credit Life |
If an application is an Open-End Add-On, users are required to indicate if the existing liability has Credit Life protection.
|
||
| Has Credit Disability |
If an application is an Open-End Add-On, users are required to indicate if the existing liability has Credit Disability protection.
|
||
| Has Involuntary Unemployment |
If an application is an Open-End Add-On, users are required to indicate if the existing liability has Credit Disability protection.
|
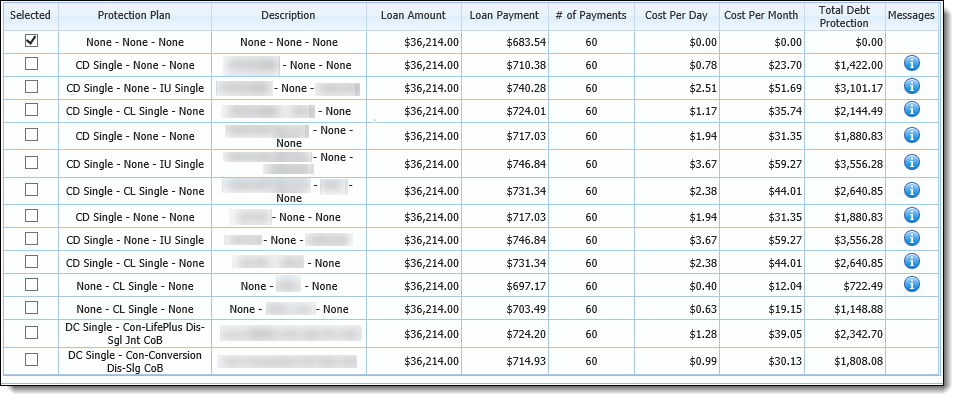
Beneath the aforementioned fields, the protection plan response grid displays a row for each protection plan generated.
|
If an applicant exceeds the age limit for a protection plan, it is not returned to the Protection Plans grid. If an applicant exceeds the age limit for all plans, the Protection Plans grid only displays a "None" option.
|
The associated plan costs populate within the columns. If any pertinent plan-related information exists, the Messages column populates with an information icon. Click the icon to display the plan messages. The message displayed is informational, and only applies when solving for term or when solving using a billing percentage loan.
|
Regulation Z prohibits debt protection fees and credit insurance premiums from being financed if the application is closed-ended and secured by a dwelling, or open-ended and secured by a principal dwelling. A system defined rule titled CalculateDebtProtectionFinancedFlag always sets the Is Debt Protection Financed field to true during the calculate process, to indicate that the payment protection premium is included in the loan payment. A second system defined rule, titled Set_ChargeInterestOnPremiumFlag, then sets the IsChargeInterestOnPremium flag according to the loan type. The debt protection premium appears above the Final Loan Amount of the Loan Terms Breakdown. |
|
The Effective Date of a Debt Protection Plan is determined by the Disbursed Date for a loan application. If a Disbursed Date does not exist, the system uses the Current Date as the Effective Date for a Debt Protection Plan. |
When generating debt protection quotes, the debt protection panel is initially empty.
To generate plans:
|
Failure to select a value results in a calculation error while saving the screen. |
 to generate debt protection quotes.
 is clicked, the Debt Protection grid populates with the available debt protection plans, and their costs. Select the check box that corresponds with the desired plan.
|
If any data changes on the application that impacts the Debt Protection Plans and their associated costs, such as Loan Term or Applicant Date of Birth, clicking updates the plans appropriately. |
|
If the Calculate Amortization field is set to false, debt protection plans are not presented to users, and the following message appears:
|
If the applicant does not desire debt protection coverage:
If an applicant desires to change their debt protection selection:
If the Fees panel, or Recurring Fees panel, is configured to appear on the Application screen, users are able to add and remove associated fees while processing loan terms.
|
For more information, please see the Fees Panel or Recurring Fees Panel topic in this guide. |
Depending on the configuration of the application screen, users may be able to collect loan tracking information while processing loan terms.

Collecting loan tracking information allows users to record information for tracking purposes in the corresponding fields such as Originating Branch, Closing Branch, and Purpose Code.
|
When inputting loan tracking information, the Loan or Account Origination modules are hard-coded to require a Closing Branch for disbursement. |
Depending on the configuration of the application screen, users may be able to collect information for Home Mortgages Disclosure Act (HMDA) compliance while processing loan terms. Collecting loan tracking information allows users to record information for HMDA tracking purposes in the corresponding fields, such as Applicant/Joint Ethnicity, Applicant/Joint Gender, Applicant/Joint Race, Loan Purpose, Loan Type, and Denial Reason.

Depending on the configuration of the application screen, users may be able to collect credit card information while processing loan terms.

Credit card information able to be captured includes: Credit Card Number, Issue Date, Type, Overdraft Fee Option, Over Credit Limit Option, and Promotion Type.
When inputting credit card information, certain fields such as Credit Card Number, Export Date, and Issue Date are populated by the credit card processor.
|
To be in compliance with the PCI regulations that require credit card numbers to be masked, and not displayed in clear text on a screen, all but the last four digits of the credit card number are masked once a user clicks outside of the Credit Card Number field. While this functionality cannot be disabled, the
|
There are several important fields that are required for credit card applications, such as Credit Card Type and Card Design Type. Click the Credit Card Type field and choose the desired credit card type from the drop-down. Click the Card Design Type field and choose the desired credit card design from the drop-down.
Field values such as UDAP Overdraft Fee, Over Credit Maximum Fee, and Credit Card Promotion Type may also be required. If required, use the corresponding field drop down lists to select the appropriate values.
|
The default values for these fields may be assigned to the selected credit card sub-product; however, users can manually select these values if default values exist. |
By default, only the primary applicant receives a credit card. If joint applicants exist on the application, select the Joint Receives Credit Card check box to indicate that the joint applicants are to receive cards.
Calculations are performed based on the Terms entered within a given application. They also take into consideration any financed Debt Protection, Fees, Cross-sell amounts, etc. that are included.
Calculations run synchronously during the processing of an application, and are triggered by the following events within Temenos Infinity:
|
When the calculate process is run as a result of the Execute Calculate Application action, the application must be refreshed to see the updated values. It is highly recommended that areas such as Fees, Aggregates, and Ratios are reviewed after the application is calculated to ensure that none of the values were duplicated during the calculation process.
|
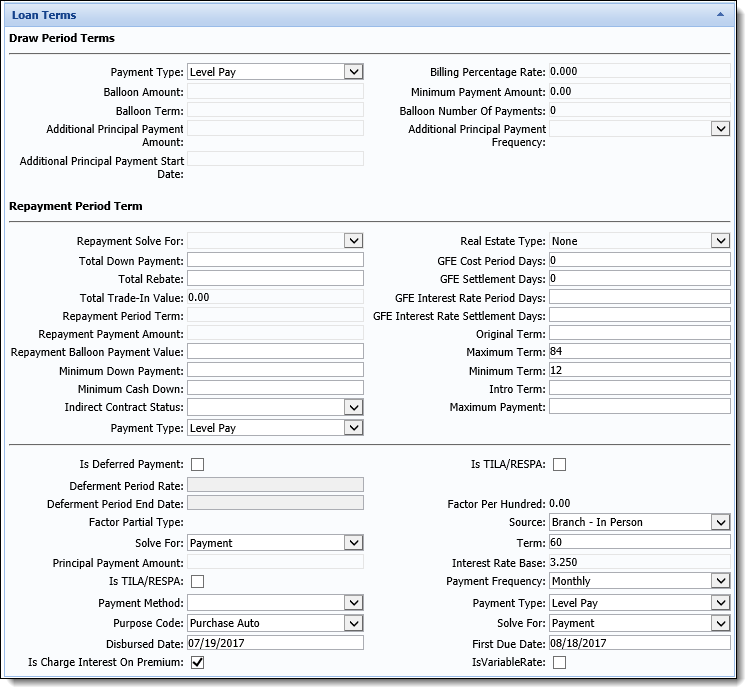
When entering loan terms, the ability to enter information for Draw Period Terms and Repayment Period Terms is dependent on the value of the Loan Type, Real Estate Type, and Convert to Closed End set for the loan.
|
These fields are set by the system administrator when configuring a loan sub-product in System Management > Origination > Loan > Loan Application Types. For more information, please see the Loan Application Types - Sub-Products topic in the Administrator Guide. |
Draw Period and Repayment Period terms cannot be entered for a closed-end loan, or an open-end loan where Real Estate Type is set to None, and Convert to Closed End is set to No.
When the Loan Type for an application is Open End, the following fields are editable in the Loan Terms screen if the Real Estate Type for the loan is Home Equity, or Real Estate Type = None and Convert to Closed End = Yes for the application type:
|
Though located under the Loan Real Estate folder, the above Repayment fields are used to calculate Home Equity applications, as well as Non Real Estate applications when Convert to Closed End is set to Yes. |
When performing calculations, the system validates the term of the loan entered against the payment frequency. If the term entered for the loan application compared to the payment frequency is not a whole number, the module rounds the term and displays a warning message to the output that the Term was changed. For example, a loan officer enters the Term as 14 and Payment Frequency as annual. With a Payment Frequency of annual, the term should be a full year, which means that the term must be 12, 24, 36 and so on.
When a closed-end loan is calculated, fields such as Amount, Pre-Paid Finance Charge, and Is Military APR are set based on the calculated values of the fees, finance charges, and/or non-loan cross-sell products on the application.
The table below provides an overview of the Amount to Other calculator fields that are set in an application for a closed-end loan:
| If Fee/Finance Charge | Then Set Amount to Other Calculator Fields |
| If Total Finance Charge Fees In Loan Amount > 0 |
Then set the following Amount to Other calculator fields:
|
| If Total NonFinance Charge Fees In Loan Amount > 0 and there are one or more fees where Include In Loan Amount = False and IsMilitaryAPR = True |
Then set the following Amount to Other calculator fields:
|
| If Total NonFinance Charge Fees In Loan Amount > 0, and there are one or more fees where Include In Loan Amount = False and Is Military APR = False |
Then set the following Amount to Other calculator fields:
|
| If there are one or more Cross-Sells where Is Military APR = True, Include in Loan Amount = True and Response = Yes |
Then set the following Amount to Other calculator fields:
|
Once the above calculations are performed, the value for the Military APR and Military APR Total Fees fields are also updated in the application.
|
For an overview of the configurations that need to be made to capture and display MAPR information during the application process, please see the How To guide titled Military Lending Act Configurations. |
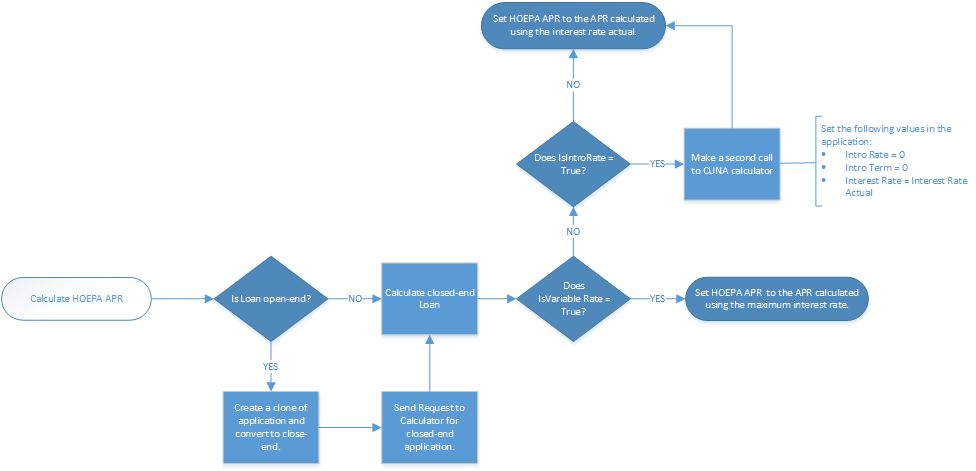
The HOEPA APR is used to determine if a transaction is a high-cost mortgage. During the calculation process, the Amortization process calculates the HOEPA APR in both open and closed-end Home Equity applications, and displays the value within the Details panel in the Calculation Preview screen.
|
The value also populates within the HOEPA APR field configured to appear in any Application screens, reports or views. |
Reference the flowchart below for an overview of how the HOEPA APR is calculated in a Home Equity application:
The Application > Requested Term provides the ability to define a custom term value (in months) for the loan, which can then be set in an application, and automatically populated into the Application > Term, or Application > Balloon Term field.
This field includes all values configured for the REQUESTED_TERM lookup by the system administrator in System Management > Origination > Field Configurations.
If the Payment Type for a loan is Balloon, the value set within the Requested Term field automatically populates within the Application > Balloon Term field. If the Payment Type is not Balloon, the value set for Requested Term populates within the Application > Term field.
|
The value for Requested Term automatically populates within the Application > Balloon Term or Application > Term field as soon as the value is entered within the field, unless the fields are on separate screens. If the Requested Term field is on a different screen than Balloon Term or Term, the value populates as part of the save process. |
|
The Requested Term field should only be captured during the Origination stage of the application. After an application is calculated, the value returned for term may not be a value defined for the Requested Term field, which could cause significant issues with the calculation process. The Application > Term or Application > Balloon Term fields should be used to capture the value of the term after an application is calculated. |
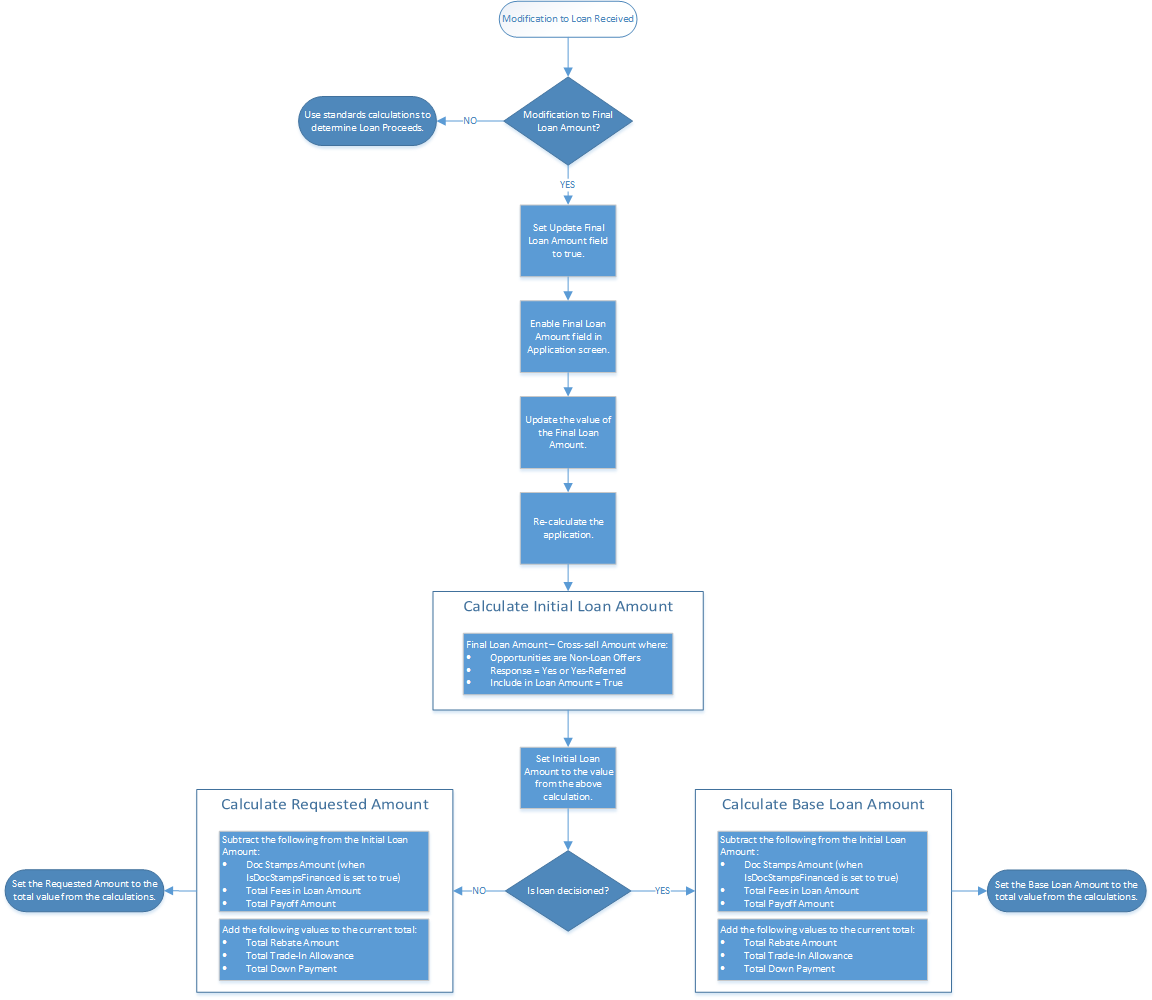
Using the Update Final Loan Amount field, institutions are able to automatically perform a reverse calculation of fees, cross-sell offers, down payments, etc. to determine the base loan amount or requested loan amount when the final loan amount is updated in an application.
|
In order to use this functionality, the Update FInal Loan Amount field must be configured to appear in a panel on the Loan Terms screen by the system administrator in System Management > Origination > Screens.
|
For example, a dealer submits an application to Temenos Infinity, and it is automatically approved. While the paperwork is being completed at the dealer, the applicant is able to negotiate a lower price and fees. The dealer updates the contract and re-submits the application with the modified loan amount to the financial institution. The financial institution sets the Update Final Loan Amount field to true, and enters the new final loan amount provided by the dealer in the Temenos application. When the loan is re-calculated, the system automatically performs the calculations in reverse order to set the Loan Proceeds based on the updated Final Loan Amount.
The Update Final Loan Amount field automatically performs reverse calculations of an application's loan terms when the Final Loan Amount is modified, but also determines the editability of the Base Loan Amount, Final Loan Amount, and Requested Loan Amount fields in the Loan Terms screen.
The table below provides an overview of the logic used to enable or disable the Base Loan Amount, Final Loan Amount, and Requested Loan Amount fields based on the value set for Update Final Loan Amount in the application:
| Update Final Loan Amount | Field Behavior | ||||||
| Base Loan Amount | Final Loan Amount | Requested Amount | |||||
| Set to False | Active | Disabled | Active when the loan is not decisioned, and disabled after a decision is rendered. | ||||
| Set to True | Disabled |
Active
|
Disabled | ||||
When the Update Final Loan Amount field is set to true, and the Final Loan Amount is modified, the system performs the following reverse calculations of the Loan Terms to set the Base Loan Amount in a decisioned application, or the Requested Amount in an application that has not been decisioned:
|
The Loan Proceeds in the Loan Terms Breakdown is set to the value of the Base Loan Amount in a decisioned application, and the value of the Requested Amount in an application that has not been decisioned. |
 Loan Terms Breakdown
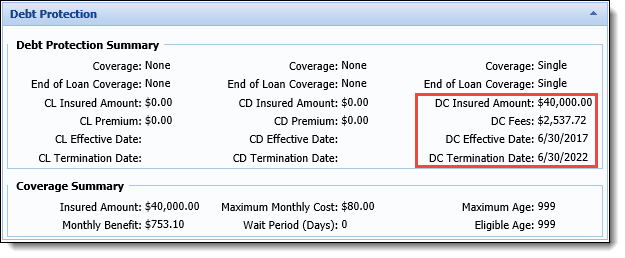

 icon that appears in the Account # field does provide the ability to temporarily unmask the value of the credit card number by hovering over the icon. Navigating away from the icon once again masks the credit card account number.
 to enable the ability to delete the entire credit card number. Once a number is re-entered and the user clicks outside of the Credit Card Number field, the new number appears masked and the