Temenos Lifecycle Management Suite - Origination Product Guide
Promotions
| End-User Guide > Desktop and Ribbon Bar > Promotions |
Promotions provides end-users with viable sales opportunities right at their fingertips. With promotions functionality, administrators are able to create and manage promotion campaigns in Temenos Infinity that include pre-approved offers uploaded directly to each promotion.
 |
The following topic provides an overview of how to work a promotion and create an application from an offer in Temenos Infinity; however, institutions are also provided with the ability to display promotional offers in Virtual Capture. For more information, please see the Promotions in Virtual Capture topic in the Administrator Guide. |
The configured promotions and all available offers for each promotion are accessible from the  icon in the Ribbon Bar to allow opportunities to be easily turned into applications.
The Promotions topic includes the following information to assist users with working a Promotions queue, as well as creating an application from a promotional offer:
Clicking opens the Promotions queue displaying a list of all active promotions configured by the system administrator in System Management > Origination> Promotions.
 |
A promotion must be active and include at least one offer in order to appear within the Promotions queue. When all offers under a promotion are either accepted or declined, the promotion is removed from the Promotions queue. |
By default, promotions are displayed alphabetically in ascending order within the grid, but the grid can be reorganized into descending order by clicking within the Name column and selecting the  that appears.

Next to each promotion, selecting  populates a list of the offers for each promotion. Upon clicking
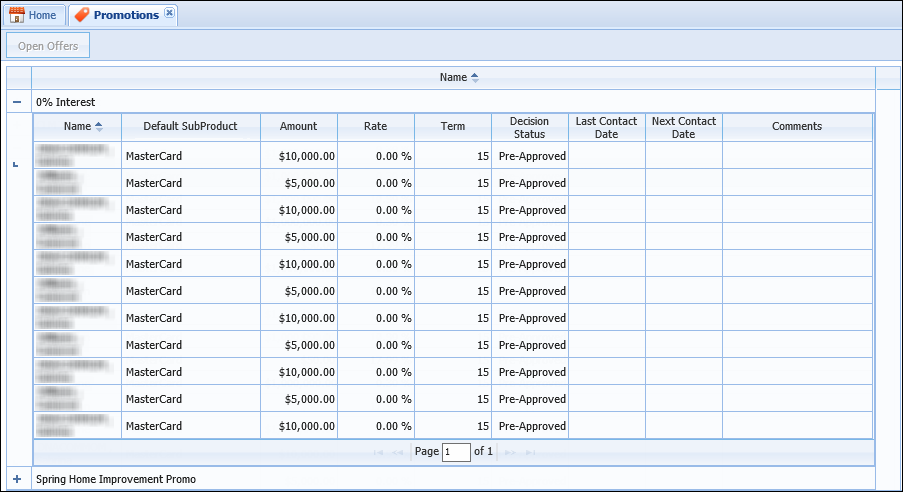
  , the first 100 offers are displayed in the order they appeared in the Promotional Offers file. This list can be reorganized into ascending or descending order by clicking within the desired column and selecting the that appears, as shown in the Name column in the below example.
When a file includes more than 100 offers, the Page text box at the bottom of the screen can be used to navigate between multiple pages of offers.
Each offer displays within a grid containing the following columns of information about the offer:
| Field | Description | ||
| Name | Displays the name of the customer eligible to apply for the offer. | ||
| Default SubProduct | Displays the default sub-product assigned to the promotion. | ||
| Amount | Displays the offer amount for which the customer is eligible to apply. | ||
| Rate | Displays the percentage rate associated with the promotion. | ||
| Term |
If applicable, displays the term associated with the promotion.
|
||
| Decision Status | Displays the decision status associated with the promotion. | ||
| Last Contact Date | Displays the date that the customer was last contacted regarding the offer. The value that appears within this field is the Last Contact Date entered within the Promotional Offer Details window. | ||
| Next Contact Date | Displays the date that the customer is to be contacted next about the offer. The value that appears within this field is the Next Contact Date entered within the Promotional Offer Details window. | ||
| Comments | Displays the comments recorded for the offer within the Promotional Offer Details window. |
Above the offers grid, a filter box provides users the ability to narrow the prequalification offers that display within the grid. This filter attempts to match the text entered to the values in Name and SubProduct columns. Upon entering text in the filter, the system automatically refreshes the grid.
Double-click an offer, or highlight an offer within the grid and click Open Offers, to open the Promotional Offer Details window.
|
The Open Offers button is not enabled until an offer is highlighted within the grid. |
The Promotional Offer Details window includes the specific details about the offer. From this window, users are able to update the contact details for the offer and/or accept or decline the offer.
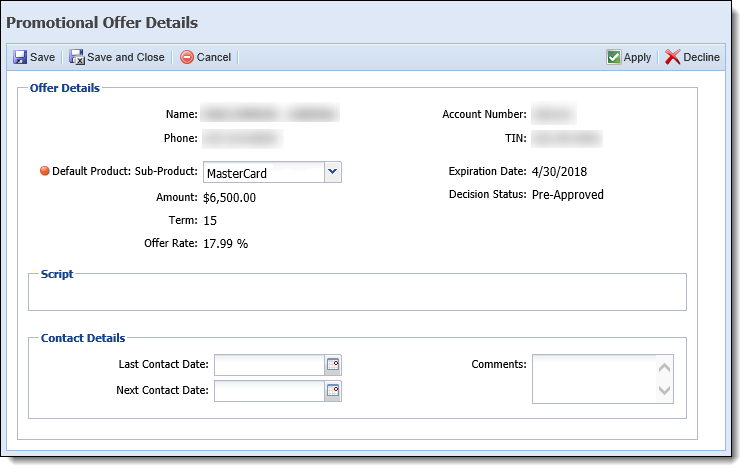
The Promotional Offer Details window includes the following three sections:
The Offer Details section includes the specific details for the promotional offer, such as the customer information imported from the promotional offers file, and details related to the promotion properties configured by the system administrator when the promotion was created.
The following offer details are included in this section:
| Field | Description | ||||
| Customer Information | |||||
| Name | Displays the name of the customer eligible to apply for the offer. | ||||
| Phone | Displays the phone number related to the offer. | ||||
| Account Number |
If applicable, displays the account number associated with the offer TIN.
|
||||
| TIN | Displays the TIN related to the offer. | ||||
| Promotion Information | |||||
| Sub-Product |
Displays the sub-product to which the promotion is assigned. This field defaults to the Default Sub-Product assigned to the promotion, but can be changed by selecting a value from the drop-down list.
|
||||
| Amount | Displays the offer amount for which the customer is eligible to apply. | ||||
| Term | If applicable, displays the term of the promotion. | ||||
| Expiration Date | Displays the expiration date for the promotion. | ||||
| Decision Status | Displays the decision status of the offer. This value determines the stage of the application initiated when an application is created from an offer as well as how risk is processed. For more information, see the Creating an Application from an Offer section within this topic. | ||||
| Offer Rate | Displays the percentage rate for the offer. | ||||
The Contact Details section provides users with the ability to track contact attempts for an offer. Within this section, users are provided with the ability to complete the following information in order to record the contact made about an offer:
| Field | Description |
| Last Contact Date | Enter a date in MM/DD/YY format or click  and select a date from the calendar to identify when the customer was last contacted about the offer. and select a date from the calendar to identify when the customer was last contacted about the offer. |
| Next Contact Date | Enter a date in MM/DD/YY format or click and select a date from the calendar to identify when the customer is to be contacted next about the offer. |
| Comments | Enter comments related to the contact attempt to provide information about the outcome and/or include helpful information for the next contact attempt. |
Once all contact information is entered, click  to retain the information and return to the Promotions queue. The contact details recorded populate within the Offers grid.
When contact is made with a customer regarding a promotional offer, the Promotional Offer Details window enables users to accept or decline the offer using the following functions in the top toolbar:


Clicking provides the ability to accept an offer and create an application directly from the offer. Clicking this button initiates the application process according to the promotion's decision status. Once an offer is accepted, the offer is removed from the list of active offers in the Promotions queue and no longer appears for the applicant within the Active Offers grid in the Review Active Applications and/or Promotional Offers screen.
For more information, please see the Creating an Application from an Offer section within this topic.

 |
Once a promotional offer is declined, it is no longer available for the customer. |
Clicking provides the ability to reject an offer. When an offer is declined, the offer is removed from the list of active offers in the Promotions queue and no longer appears for the applicant within the Active Offers grid in the Review Active Applications and/or Promotional Offers screen.
Users are provided with the ability to create an application from an offer by clicking within the Promotional Offer Details screen. Clicking automatically initiates the application process, creating an application using the TIN associated with the offer and pre-populating all available information from the offer, such as applicant details, rate, and term, within the application.
|
If the TIN supplied in the offer is not found in the core, and there is no account number associated with the TIN, the application cannot be created from the Promotional Offer Details window and an error message is received upon clicking
For more information on creating an application for a non-account holder, please see the Create topic within this guide. |
|
When an application is created from a promotional offer, the Application > Channel field is set to a value of PROMOTION to identify the origin of the application.
Additionally, the availability of the Change Product button is determined by the number of application types assigned to the promotion by the system administrator.
|
|
The following process walks through the behavior that occurs when a standard application is created from a promotional offer. For information on the process that occurs to create an indirect application from a promotional offer, please see the applicable third party connector guide on the Temenos Client Portal. Please see the Indirect Processing Overview topic in the Administrator Guide for information on the configurations required to link a promotional offer to an indirect application during the decision process. |
Depending on the Decision Status configured for the offer when the promotion is created, the application workspace automatically opens to the applicable stage in the workflow. For example, if the Decision Status for a promotion is Approved, when an offer is accepted, the application opens in the Approval stage of the workflow.
|
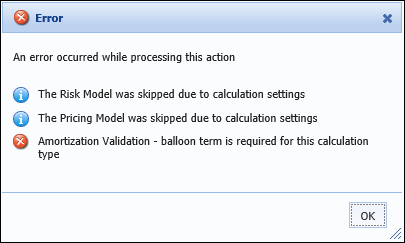
When a promotion's Decision Status is configured as Approved, but the Loan Terms are not fulfilled, an error message including the necessary information is received during application initialization and the application opens in the Origination stage. For example, when the decision status for a Home Equity promotion is configured as Approved, the following error message is received to inform that balloon term is required:
|
When the decision status is Pre-approved, the application workspace opens in the Origination stage and users are able to proceed through each stage to complete the application process.
The Decision Status for a promotion also controls the Risk process. The Risk process proceeds as follows for each decision status:
| Decision Status | Risk Process |
| Approved | When a decision status is set to Approved, credit is NOT pulled for the applicant and the application process proceeds through the Approval stage of the application. |
| Pre-Approved | When a decision status is set to Pre-Approved, credit is pulled for the applicant and the application proceeds through each stage of the application. |
For more information on creating an application from an offer, please see the Active Offers section of the Create topic in this guide.