
Temenos Lifecycle Management Suite - Origination Product Guide
Queues
| Administrator Guide > Desktop and Ribbon Bar Overview > Queues |
The Queues functionality allows the administrator to create queues that provide a way to manage applications throughout the application process. Queues group applications together based on criteria set by the institution, via rules, to best fit their processing needs. End-Users only have access to the queues that they have been given permission to view/work when the queue is created.
The Queues page can be accessed from System Management > Origination > Queues. This page displays a list of all Application Queues in Temenos Infinity and provides administrators with the ability to create, copy, edit, and delete queues, as well as schedule Batch Queue Processing.
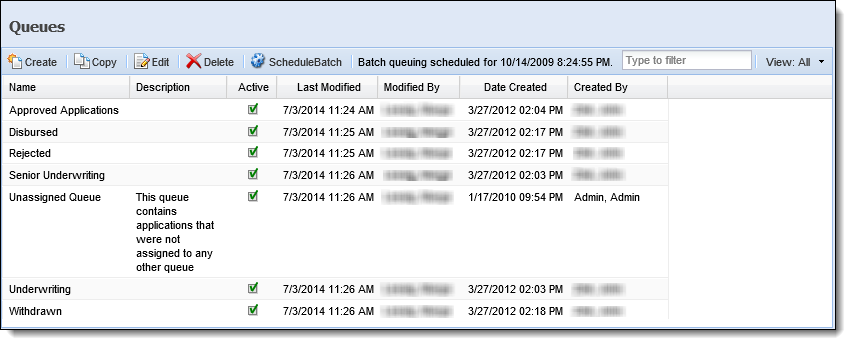
The grid that appears within the Queues page displays information about each queue within the following columns:
| Column Name | Description |
| Name | Displays the name of the queue. |
| Description | If provided, displays a description of the queue. |
| Active | Displays a  if the queue is active. if the queue is active. |
| Last Modified | Denotes when the last modification was made. |
| Modified By | Denotes who made the last modification. |
| Date Created | Denotes when the queue was created. |
| Created By | Denotes who created the queue. |
All Application Queues share common attributes that are defined when creating, copying, and editing a queue.
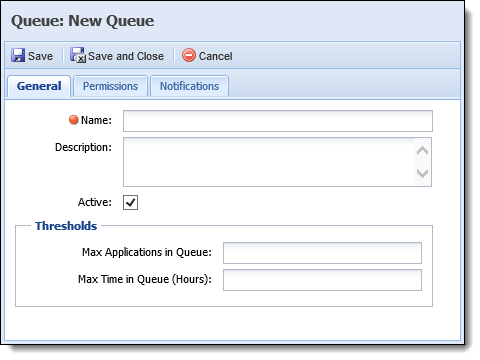
General attributes include basic information pertaining to the queue.
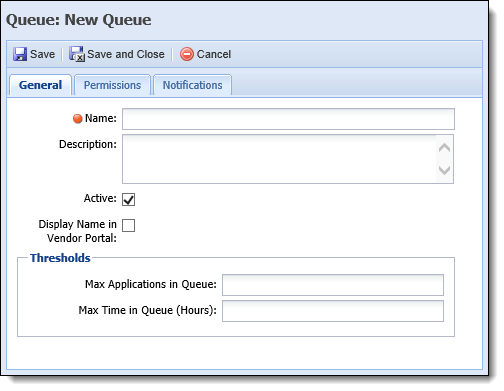
If one or more vendor instances have been configured to show application queues names in System Management > Origination > Virtual Capture > Virtual Capture Settings, the General tab appears as shown below:
The following General attributes are defined in the General tab:
| Attribute | Description | ||
| Name | Enter a unique name for the queue. | ||
| Description | Enter a description that identifies the purpose of the queue. | ||
| Active |
Select the check box to activate the queue. |
||
| Display Name in Vendor Portal |
Select the check box to to display the queue name within the Application Listing page in Virtual Capture for any applications assigned to the queue. This field is set to false by default. When set to true, and the vendor instance has been configured to show application queue names in Virtual Capture, the name of the queue displays within the Queue Name column of the Application Listing page.
|
||
| Thresholds | |||
| Max Applications in Queue | Set the maximum number of applications that can be in the queue at one time. This drives the ‘escalation on thresholds’ notifications and the queue is highlighted on the Queue Summary page of the workspace. | ||
| Max Time in Queue (Hours) | Set the maximum amount of time an application should remain in the queue. This drives the ‘escalation on thresholds’ notifications and the queue is highlighted on the Queue Summary page of the workspace. The application is also highlighted in the Queue Contents page of the workspace. | ||
Permission attributes enable administrators to assign Users and/or Security Groups access to the queue.
 |
In addition to being assigned to the queue within this tab, the user or security group must also be granted View or Change access to the Origination Workspace permission in order for applications to be opened from the queue in the Ribbon Bar. This permission is set under the Application Processing category of the Permissions tab in System Management > Users or System Management > Groups > Security Groups. For more information, please see the Users or Security Groups topic in this guide. |
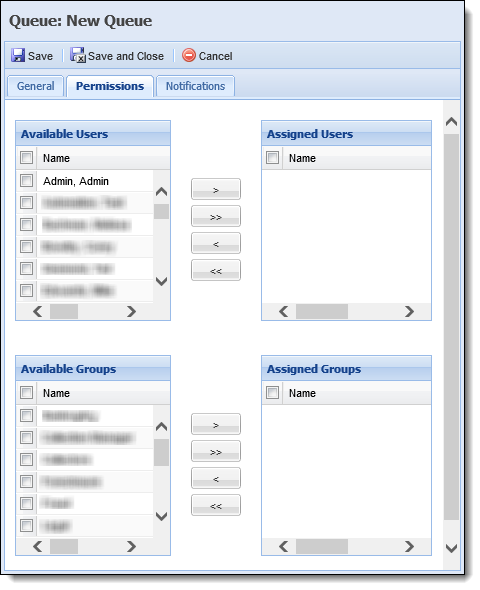
The following Permission attributes are assigned within the Permissions tab:
| Attribute | Description |
| Available | Displays a list of all Users configured in System Management > Users and all Security Groups created in System Management > Groups > Security Groups. Assign access to the queue by selecting the desired user(s) and group(s) from the list and moving the name(s) to the Assigned Users/Groups boxes using the arrows that display. |
| Assigned | Displays a list of the Users and Groups assigned access to the queue. Once the queue is saved, it is accessible to the assigned Users and Groups. |
 |
It is recommended that a queue for disbursed applications is not assigned to any users or security groups. |
For more information on User/Security Group permissions, please see the Users or Security Group topics within this guide.
The Notifications tab enables emails to be sent when an application is assigned to a queue, when the status of an application within a queue changes, or when an application has exceeded the queue's thresholds.
|
In order for notifications to be received, the Queue Changed Event/Action pair must be active in System Management > Origination > Event Processing. |
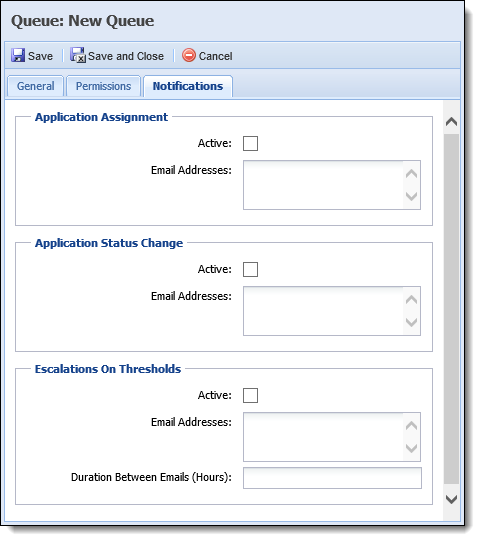
The following Notification attributes are assigned within the Notifications tab:
|
The email addresses entered in each section can be separated by a comma, semicolon, or a line space (Enter). |
| Heading/Attribute | Description |
| Application Assignment | Sends email notifications when an application is assigned to a Queue. Check the Active box to activate the notification. Enter the email addresses for those that should receive the notification. |
| Application Status Change | Sends email notifications when there is a status change for an application in the queue. Check the Active box to activate the notification. Enter in the email addresses for those that should receive the notification. |
| Escalation On Thresholds | Sends email notifications when the thresholds for the queue are exceeded. Check the Active box to activate the notification. Enter the email addresses for those that should receive the notification. |
| Duration Between Email (Hours) | Allows the user to set the amount of time to wait before sending the next email notification if the queue thresholds continue to exceed. |
 .
.
Within the Queue configuration window, define the General queue attributes.
Once all General attributes are defined, assign Users and Security Groups access to the queue within the Permission tab.
After permissions to the queue have been assigned, navigate to the Notifications tab to set up email notifications for the queue.
Once all queue attributes have been defined, click  to create the queue.
The newly created queue now appears within the grid on the Queues page and is available to manage applications throughout the application process.
The Copy function enables administrators to duplicate the logic and structure of an existing queue. The existing queue can be used as the base for creating a new queue.
 . to retain all changes and finalize the creation of the new queue.
The Edit function enables administrators to revisit an existing queue and modify the logic to enhance usability.
 . to finalize the queue modifications.
 .
.After all Application queues are created, queue criteria can be defined though the configuration of Queuing rules in System Management > Origination > Rules Management.
|
It is recommended to select  within the Application Toolbar in Rules Manager before authoring a new rule in order to ensure the newly created Queue is available within the Rules Management Application. within the Application Toolbar in Rules Manager before authoring a new rule in order to ensure the newly created Queue is available within the Rules Management Application. |
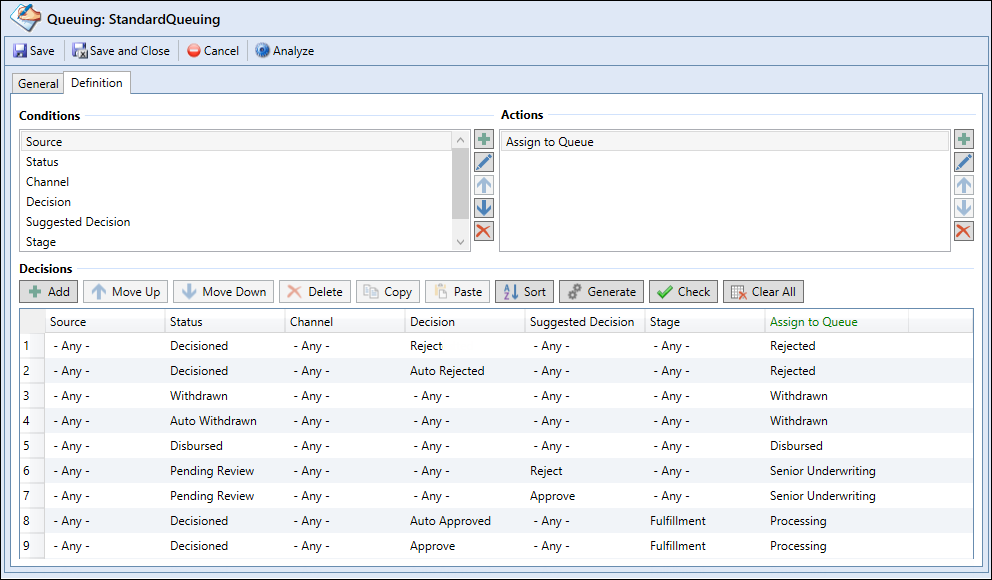
Queuing rules automatically execute when a new application is created or when an application is closed in the workspace if the application is not pinned to its current queue. These rules provide administrators with the ability to assign applications to a queue based on various conditions.
The screenshot below provides an example of a Queuing rule configured to assign applications to a queue based on Source, Status, Channel, Decision, Suggested Decision, and Stage conditions.
|
For more information on Rule configuration, please see the Rules Management topic within this guide. |
Batch Queuing provides the ability to execute queuing based on a schedule rather than when an application is closed in the workspace.
 |
Batch Queuing is a process scheduled and activated in the database. Please contact a Temenos Customer Care Representative for assistance in setting up this process. |
By selecting  within the Queues page, institutions have the ability to run batch queuing rules ad-hoc and bypass the schedule set in the database. Upon selecting
  , a confirmation message appears. Selecting Yes schedules Batch Queuing rules to run in fifteen minutes.
|
Running the Batch Queuing process during business hours may impact performance in Temenos Infinity. |
If Batch Queuing is being used, a notification populates within the top of the Queues page that alerts users when the Batch Queuing Process is scheduled to run next and if Batch Queuing is in Process.
 Create a Queue