Temenos Lifecycle Management Suite - Origination Product Guide
Rules Management
| Administrator Guide > Rules Management > Rules Management |
The Rules Management topic includes the following information to assist administrators with creating, copying, editing, and deleting rules within Rules Manager:
Business Rules use business language to link the following:
| Rule Language | Description |
| Conditions | Logical circumstances, such as Fields, Field Values, or Functions, which are met in order for an Action to be assigned. |
| Actions | Activities that are performed as a result of Conditions being met. |
Rules can be used to create a logical statement such as, If [condition is true]…..then [perform this action]. If that condition is not met, then the logic can continue into an Else statement. Additional If [condition is true]…..then [perform this action] statements can then be nested.
Below are some guidelines to follow in preparation for authoring Business Rules:
The overall steps to writing a Business Rule are as follows:
Rule Sessions allow multiple users to work in the rule application simultaneously. Reference the table below for an overview of the session types that are supported in Rules Management:
| Session Type | Description | ||
| Exclusive |
Occurs when the entire rule application is locked by a single user, such as when the installer is run, or a Configuration Manager import is in progress. Only one user can have an exclusive lock on the rule application at a time. When a user has an exclusive lock on the rule application, other users can access Rules Management, but only in read-only mode, and no edits can be performed.
|
||
| Editing |
Occurs when a user opens the rule application. Multiple users can have an editing session in the rule application simultaneously; however, each rule can only be edited by one user at a time. A lock is placed on a rule when a user opens the Edit Rule window to create, copy, or edit the rule. |
||
| Saving |
Occurs when a user saves the rule application, or performs a Sync Lookups or Sync Custom Fields. Only one user can have a saving session at a time.
|
The following behavior occurs in the rule application to ensure that more than one user is not able to edit the same rule at the same time, each user is working with the most up to date rule logic, and updated rule logic is able to be saved successfully:
 |
A lock is not released on a rule until the rule application is saved, or the user exits Rules Manager. If a rule is opened, and no changes are made within the Edit Rule window, the rule remains checked out for editing until the logic is saved. |
|
The above message is also received If a user tries to obtain an exclusive lock on the rule application while other rule sessions are in progress. |
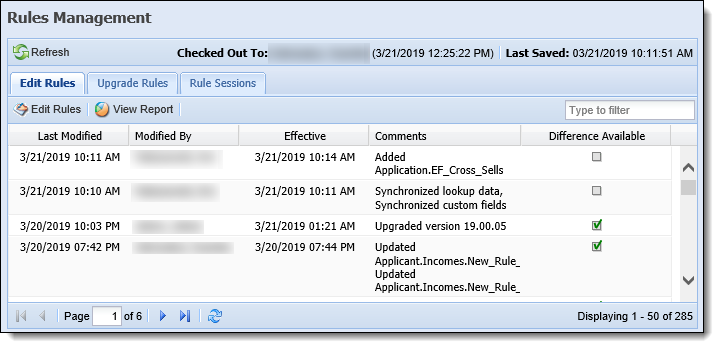
The active sessions in the rule application can be viewed within the Rule Sessions tab on the Rules Management home page.
 |
Saving the rule application does not end a rule session. A rule session is ended by performing one of the following actions:
|
|
For more information, please see the Rules Management - Rule Sessions topic in this guide. |
To begin writing rules, click  within the top of the Rules Management home page.
Upon clicking , Rules Manager opens.
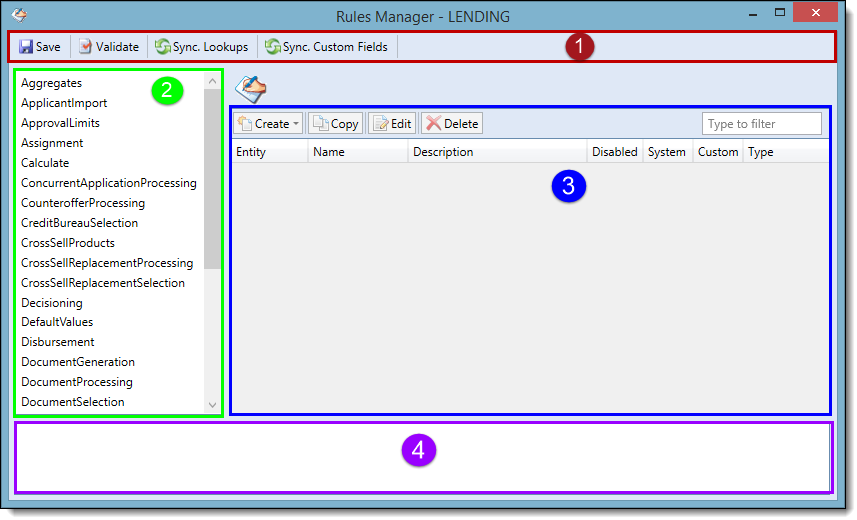
The Rule Application is comprised of four sections: the Application Toolbar, Left Navigation Pane, Main Window, and Message Window.
The Rules Manager Toolbar contains the following five buttons:
| Function | Description | ||||
 |
Click to retain all changes made within the Rule application.
|
||||
 |
Click to check for errors in the rule logic without saving the Rule Application. After editing or authoring a rule, it is advised to perform this function. | ||||
 |
Click to import all of the most current information populated in Temenos Infinity, such as any new queues, and incorporate them into the Rules application. Prior to writing new rule logic, it is advised to perform this function.
|
||||
 |
Click to import all of the most current custom fields populated in Temenos Infinity. It is recommended to perform this function prior to writing new rule logic if new custom fields were recently created.
|
The Rules Management Application displays a left navigation pane containing Rule Categories. Selecting a category from the left navigation pane determines the type of rules that populate within the main window.
|
A category must be selected before a rule can be created or edited. |
For more information on the available rule categories, please see the Rules Management - Rule Categories topic in this guide.
When a category is selected in the left navigation pane, the rules associated with that category populate within the Rules grid in the main window.
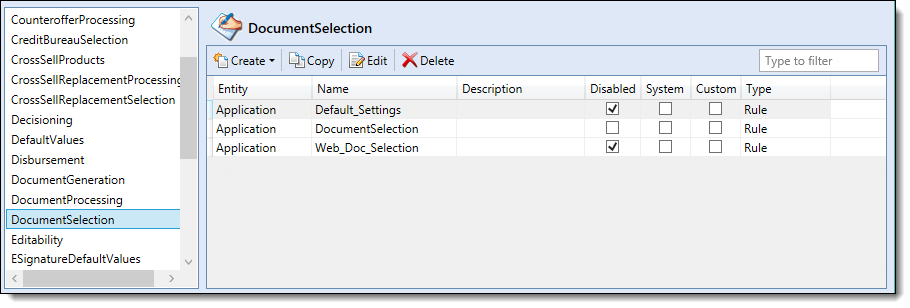
The Rules grid consists of the following columns to display information related to each rule:
From the Main Window, administrators have the ability to create new business rules or decision tables, copy existing rules, edit existing rules, and delete existing rules by clicking the appropriate button along the top of the window. Type to filter through the list of rules that populate within the Rules grid.

The Message Window displays messages for the Rule Application, including time of save or validation and whether or not the save or validation was successful.
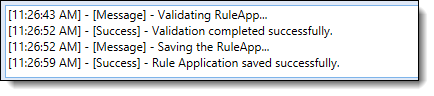
If an error occurs during Rule Validation, it displays within this window. Double-click on the error to navigate to the item that caused the error to occur.
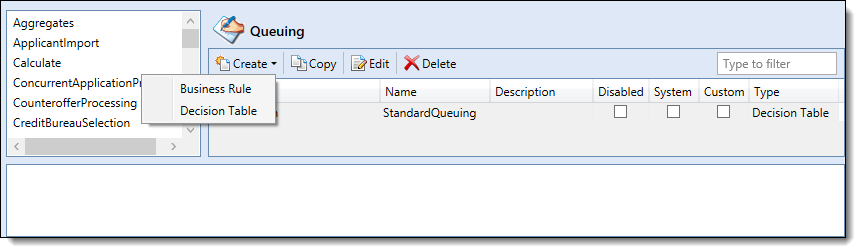
To create a rule within Rules Manager, select the appropriate rule category from the left navigation pane. Click  and select one of the following rule options:
| Rule | Description |
| Business Rule | Business Rules are based upon condition(s) and associated action(s) expressed in business language. Rule logic is typically expressed in the form of "If...Then..." statements. |
| Decision Table | Decision Tables are helpful to use in order to maintain complex business situations in a simple manner. They are a powerful way to represent a set of related business rules in a table format, in order to avoid repeating rule logic in several “If” statements. The resulting decision table evaluates the conditions and assigned actions starting at the top and going down until it finds a path where all conditions resolve to True. |
Select the appropriate entity where the rule is applied and click  .
.
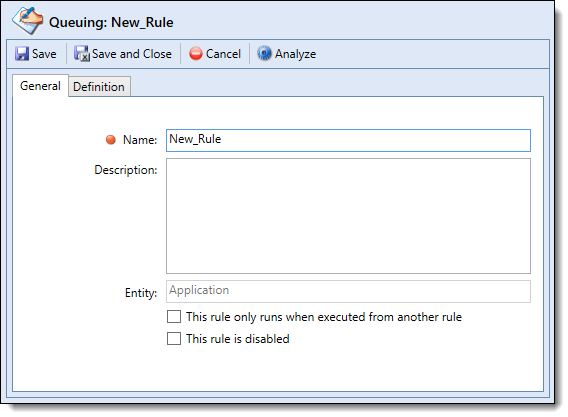
The new rule window appears displaying two tabs: General and Definition.
|
The General tab is the same for both Business Rules and Decision tables. |
Within the General tab, define the following General rule attributes:
| Field | Description | ||||
| Name |
Enter a Rule Name. This field cannot contain spaces or special characters.
|
||||
| Description | Enter a Description. This field is not required, but is recommended in order to provide administrators with an understanding of the rule. | ||||
| Entity | Displays the name of the entity. This field is not editable. | ||||
| This rule only runs when executed from another rule |
This check box can be used to control the order of execution for rules in a group. If checked, the rule is not executed as part of a rule category and is only executed if explicitly called from another rule. Users are able to call a different rule through action execute rule set and select the rule that is to be executed.
|
||||
| This rule is disabled |
If checked, the rule is disabled and not executed. This check box can be used for creating rules to be activated at a later date.
|
Once all General rule attributes have been defined, navigate to the Definition Tab.
The Definition tab contains the rule logic and is where administrators can modify and build a rule. The Definition tab appears differently depending on which of the following rule types is being created:
Business Rules use business language, such as If... Then... statements, to link Conditions to Actions.
To begin building a business rule, click Create Rule. Select a rule template and/or action from the drop-down list that appears. Reference the following table for an overview of the business rule languages available for each conditional template:
| Business Rule Language | Definition |
| Action Set | Take the following actions. |
| If...Then... | If the conditions are met, Then execute this action. |
| If...Then...Else | If the conditions are met, execute the Then action. If the conditions are not met, execute the Else action. |
| Select Case | Set up conditions within a case. If the case conditions are met, execute the Then action. The first case condition that is met gets executed. |
| Select Case...Else | Set up conditions within a case. If the case conditions are met, execute the Then action. The first case condition that is met gets executed. If no case conditions are met, then execute the Else action. |
| While...Do... | While a condition is being met in an application, Do the following action(s). |
|
There multiple ways to author a rule. The following demonstration uses an If... Then... rule to build a Queuing Rule and should be used for EXAMPLE ONLY. |
After a Rule or Action is selected, the rule template displays:
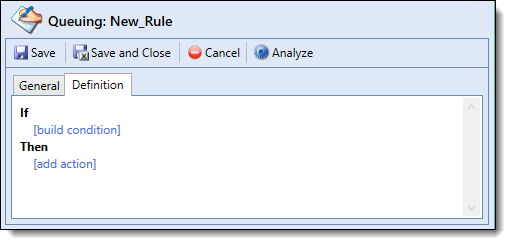
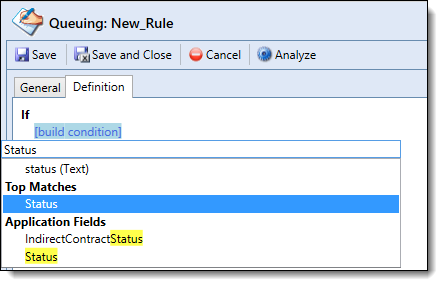
To begin building the rule condition, click [build condition]. A list of available fields and functions displays. Search for the desired field or type the field name into the search box to refine options.
|
The fields that display within this list are determined by the Entity chosen. For example, since the Application Entity was chosen for this demonstration, a list of Application Fields is displayed. For more information on the fields available for rules, please see the Data Dictionary. |
Based on this selection, a blue link, such as … shown below, populates within the template in order to build a complete expression.
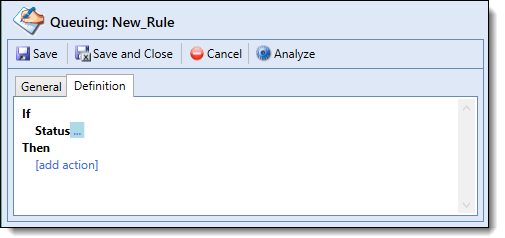
The blue links contain placeholders and special characters to alert to the following:
| Name | Prompt | Description |
| Open Placeholder |  |
Indicates that another template selection is required in order to complete the expression. |
| Named Placeholder |  |
Indicates that a value, field or additional template selection is required in order to complete the expression. |
| Chevron Extender | Indicates that the rule template can be extended by selecting a condition of “and” or “or.” | |
| Caret Extender | The ^ extender is used to append logic to the previous field, value or entire template, such as adding date or text functions. |
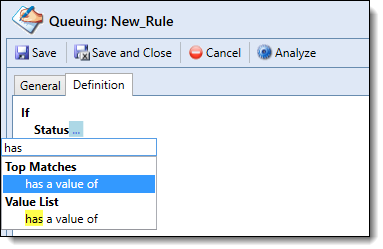
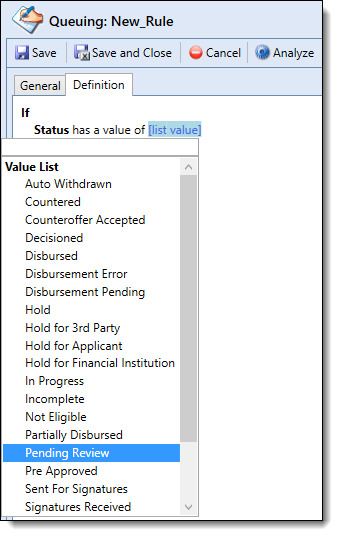
In the screenshot below, clicking on the … (three dots after Status) populates a list of values and compare functions. Adding a function from the list populates a [list value] link to define a value for the condition. For example, selecting has a value of provides the ability to select from a lookup list in Temenos Infinity.
Clicking [list value] populates the list of statuses configured for the Application Status lookup. From this list, select the application status which must be met in order for the application to be assigned to the queue (example: Pending Review).
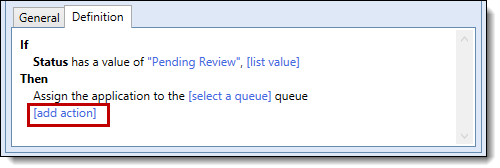
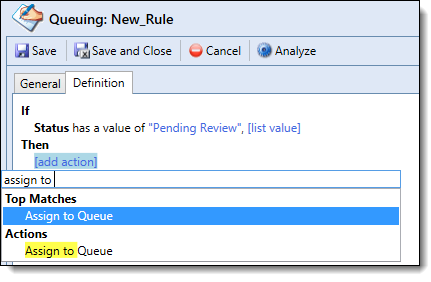
When all conditions are set, define the actions to occur as a result of those conditions. Under Then, click [add action] and select an action template, such as the Assign to Queue template shown in the below example:
|
Please see the Rules Management - Available Templates topic for an overview of the actions available when building a rule and the recommended categories for which the action can be used. |
|
Once one action is selected, an additional [add action] link populates to allow for multiple actions to be defined.
|
As previously mentioned, based on the template selected, a blue link populates in order to build a complete expression. For example, clicking [select a queue] enables the ability to select from a list of the queues configured in Temenos Infinity to assign an application with a Pending Review status.
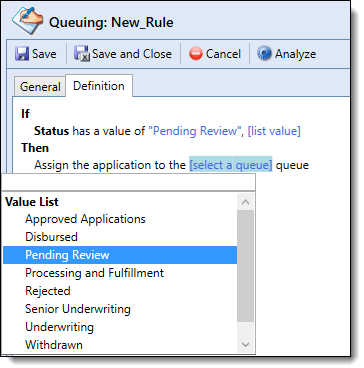
Upon the completion of this rule, the user has the following logical statement: If the status of an application is Pending Review, assign the application to the Pending Review queue.
Once all rule logic is complete, click  to retain the new rule logic.
|
Please see Finalizing a Rule for more information on the save process. |
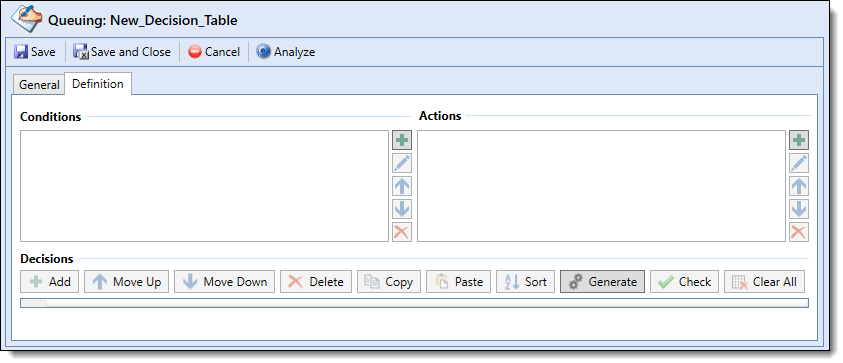
Administrators can modify and build a decision table using the Conditions, Actions, and Decisions boxes that display within the Definition tab.
This section provides an overview of the following information to assist administrators with configuring a Decision Table:
In a Decision Table, multiple conditions can be built to compare individual field values or ranges of values. The Decision Table evaluates from top to bottom until it finds a result where all conditions resolve to True.
The Conditions box contains the following buttons:
| Button | Function |
 |
Add Condition |
 |
Edit an existing condition. |
  |
Move the order that conditions appear in the columns of the Decision Table. |
 |
Delete an existing condition. |
To add a condition, click to build rule criteria. The Add Decision Table Condition window appears.
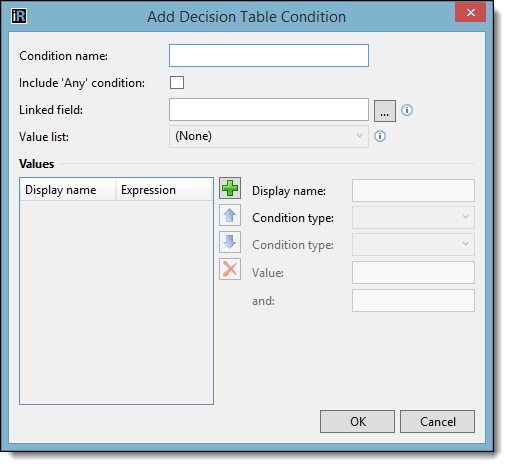
Using the table below, complete the applicable Add Decision Table Condition fields.
| Condition Field | Description | ||
| Condition name |
Specifies the name of the condition that appears in the Decision Table column header.
|
||
| Include 'Any' condition | Adds the ‘Any’ option to the list of conditions. Selecting ‘Any,’ in the table triggers the condition to be True under any circumstances. | ||
| Linked Field |
Specifies if the condition relates to a specific field in the application. Enter the field name in the box or click … to display a list of available fields. |
||
| Value List |
If linked to a field, select a value list from the drop-down. This drop-down contains the lookup lists available from System Management > Origination > Field Configurations. When a Value List is selected, the field values associated with the list automatically populate within the Values grid.
|
||
| Values Grid |
Specifies the Display name and Expression for each field value. When a Value List is selected, this grid pre-populates with the field values associated with the selected value list.
|
||
| Display Name | Specifies the name that displays in the drop-down for the condition column of the Decision Table. | ||
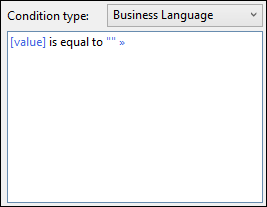
| Condition type |
Specifies if the condition set relates to a field or is defined using an expression or business language.
|
||
| Condition type |
Specifies the compare function used to define the condition criteria.
|
||
| Value | Specifies the ID Value in the database for the selected field value. |
Once all fields for the condition are configured, click OK to save the condition.
Since multiple conditions can be created within a decision table, create all conditions following the above steps before defining actions for the decision table.
Back to Decision Table configurations ^
In a Decision Table, the end result of the logic path is determined by the defined actions. Multiple action sets can be created and associated with various conditions.
The Actions box contains the following buttons:
| Button | Function |
|
Add action. |
|
Edit an existing action. |
| |
Move the order that actions appear in the columns of the Decision Table. |
|
Delete an existing action. |
To add an Action, click to select the desired action template.
The Add Decision Table Action window appears:
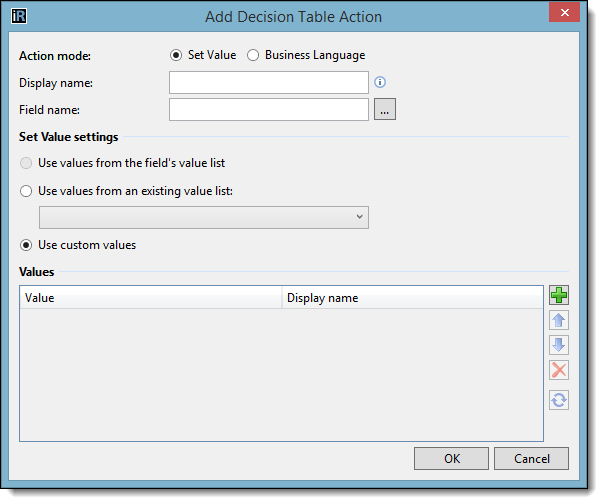
Select one of the following action modes:
Select Set Value to link the action to a specificTemenos field.
Using the table below, complete the applicable Add Decision Table Action fields when Set Value is selected:
| Action Field | Description | ||
| Display Name |
Specifies the name that displays in place of the field name in the decision table column header.
|
||
| Field Name |
Specifies the name of the action that appears in the drop-down for the action column of the Decision Table. Enter a field name or click the
|
||
| Set Value Settings |
Select Use values from the field’s value list to add lookup values for the field defined within Field Name. This setting is disabled if a lookup value is not defined within Field Name.
|
||
| Values Grid |
Specifies the Value and Display Name for each field value.
|
Select Business Language to define actions for the decision table using a rule template.
When the Business Language action mode is selected, The Add Decision Table Action window appears as follows:
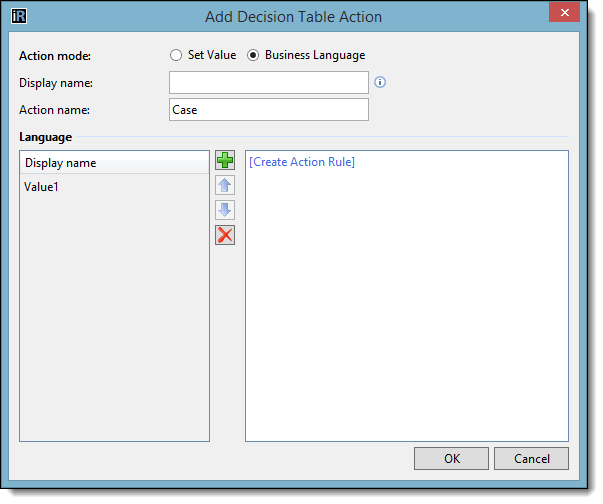
Using the table below, complete the applicable Add Decision Table Action fields when Business Language is selected:
| Action Field | Description | ||
| Display Name |
Specifies the name that displays in place of the field name in the decision table column header.
|
||
| Action Name |
Specifies the name of the action that appears in the drop-down for the action column of the Decision Table.
|
||
| Language |
Specifies the Display name for the action and provides a window to create an Action Rule.
|
Repeat the steps for the selected action mode until all options for the action are defined. Click OK to save the action.
Once all actions are created, navigate to the Decisions box to complete the Decision Table.
Back to Decision Table configurations ^
The Decisions Table is ready to populate once all Conditions and Actions have been defined.
Within the Decisions Box, the following buttons display to configure the Decision Table:
| Button | Function |
 |
Add new row to the Decision Table. |
 |
Move selected row up. |
 |
Move selected row down. |
 |
Delete selected row. |
 |
Copy selected row. |
 |
Paste the copy of a row. |
 |
Select the sort order of the Decision Table. |
 |
Generate an exhaustive list of all possible options for the table. |
 |
Check Decision Table for any duplicated or missing options. |
| Delete all rows of the Decision Table. |
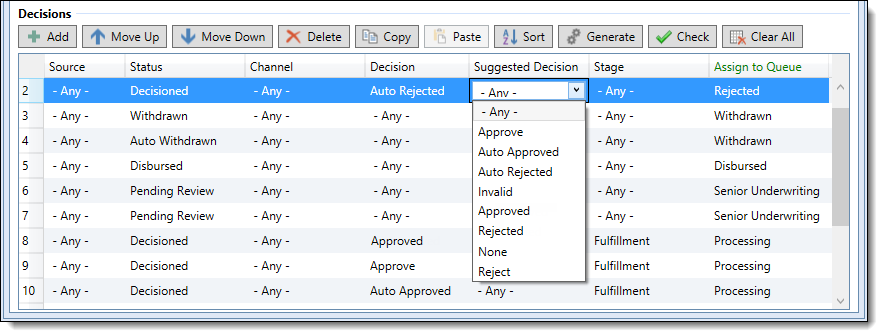
Manually add rows to the Decision Table by clicking or select to create an exhaustive list of all possible combinations for the table.
Using the associated drop-downs within an Action column, assign Conditions to Actions until all desired outcomes have been accounted for within the Decision Table.
|
It is recommended to click the button to check the Decision Table for any duplicated or missing options before saving. |
Once all rule logic is complete, click to retain the new rule logic.
|
Please see Finalizing a Rule for more information on the save process. |
Back to Decision Table configurations ^
Upon completion of all rule logic, click within the Edit Rule window to retain the new rule logic and return to the Rules Management screen. Once saved, the new rule populates within the Rules grid. Click  within the Rules Management screen to save the new rule logic to the Rule Application.
 |
Clicking or within an individual rule does not save the new rule logic to the Rule Application. Once all changes to the rule logic have been made, and/or lookup syncs are complete, click within the Rules Management screen to save the new rule logic to the Rule Application. |
Clicking within the Rules Management toolbar initiates the compilation process where the rule application is updated to include the new rule logic. Once the process is complete, the updated rule logic is available for execution.
|
When a new rule is created, additional users in the rule application may not see the new rule until they leave the rule category and navigate back. |
When the rule application is saved, a compilation process is initiated to update the current rule application and apply all new and modified rule logic in the system.
|
The compilation process occurs prior to the new or modified rule being executed to improve performance in the system during rule execution. |
Each time the rule application is saved, this process is automatically performed behind the scenes, resulting in a delay between the time that the rule application is saved and the time that the modified rule logic is applied in the system.
|
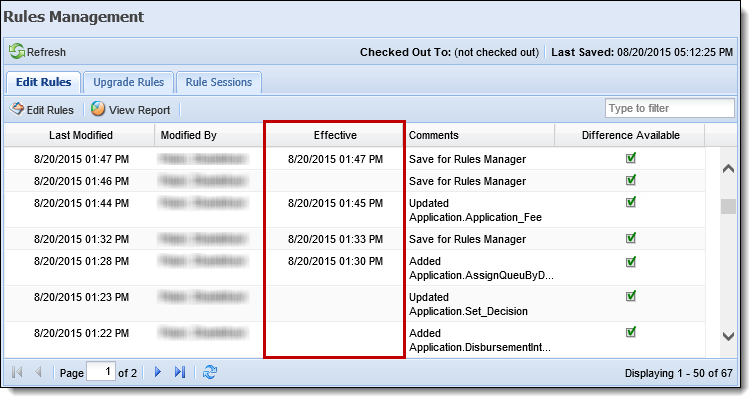
The amount of time delay that occurs can be viewed within the grid that appears on the Rules Management Home page. The Last Modified date displays the date and time that the rule application was saved and the Effective Date displays the date and time that the compiled rule application was put to use in Temenos Infinity. |
While the rule application is compiling, the logic within the previous rule application continues to be applied throughout the system. Once the compilation process is complete, the logic within the existing rule application is automatically discarded and the updated logic within the compiled rule application is seamlessly put to use in the system. The date and time that the compiled rule application became current populates within the Effective Date column in the grid on the Rules Management Home page.
|
The time that it takes to compile the rule application varies and depends on the size of the rule application as well as the complexity and availability of server resources for the institution. |
|
Before copying a rule, it is recommended to review the Creating a Rule section of this topic for an overview of the information defined within each tab, and to develop an understanding for how to configure rule logic. |
|
If another user is editing a rule, the rule can still be copied. |
 . to retain the new rule logic and return to the Rules Management screen. to save the new rule logic to the rule application.
 |
Before editing a rule, it is recommended to review the Creating a Rule section of this topic for an overview of the information defined within each tab, and to develop an understanding for how to configure rule logic. |
|
Once a rule is open by a user, a lock is placed on the rule in the rule application. If another user attempts to edit the rule while the lock is in place, the Edit Rule window opens in read-only mode, and the Save buttons are disabled within the window. A message also appears in the corner of the window to identify the username of the user who has the rule checked out for editing. For more information, please see the Understanding Rule Sessions section of this topic. |
 . to retain the updated rule logic, and return to the Rules Management screen. to commit the changes to the rule application.
 |
Clicking  permanently removes the rule logic from the Rules Management Application. It is recommended to disable a rule from the Edit Rule window, rather than permanently delete it in order to save the rule logic. For more information on how to disable a rule, please see the Creating a Rule section of this topic. permanently removes the rule logic from the Rules Management Application. It is recommended to disable a rule from the Edit Rule window, rather than permanently delete it in order to save the rule logic. For more information on how to disable a rule, please see the Creating a Rule section of this topic. |
|
If a rule is being edited by another user, the rule cannot be deleted from the rule application, and an error message is received upon clicking Yes to confirm that the rule should be deleted. |
 ., a confirmation message displays to confirm that the rule should be deleted
 1 - Application Toolbar