Elements contains over 30 predefined reports that are included with an install of the system. These reports contain information regarding a majority of the functions in Elements such as the download and promises made on accounts.
Reporting is integrated with Microsoft SQL Server Reporting Services, which allows users to format reports and select various output formats.
All reports are accessed from the Reports tab on the Elements Home Dashboard.
 |
Access to individual reports is controlled through administrator-defined Security Profiles. |
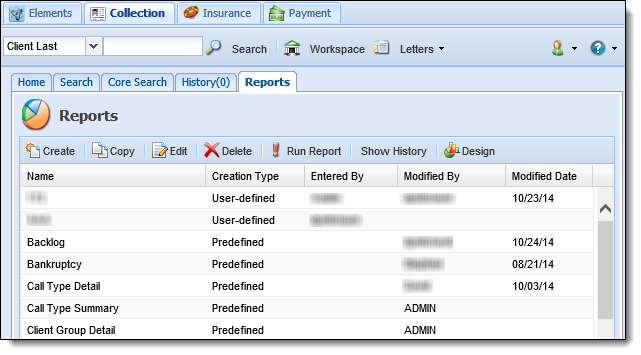
The Reports tab displays the following information.
| Column | Description |
| Name | Displays the name of the report. |
| Creation Type |
Displays the type of report.
|
| Entered By | If the report is user-defined or custom, displays who created the report. |
| Modified By | Displays who last modified the report. |
| Modified Date | Displays the date the report was last modified. |
The following predefined reports are available in Elements.
| Report | Description |
| Backlog | This report displays any client with a delinquent or locked loan that has a follow-up date in the past. |
| Bankruptcy | This report displays all active bankruptcies. |
| Call Type Detail | This report provides a detailed list, by user, of the Call Types used within a date range. This report includes the name and number of the client for which the Call Type was used. |
| Call Type Summary | This report provides a list, by user, of the Call Types used within a date range. This report includes whether the Call Type is considered effective and how many times it was used by the specific user. |
| Client Group Detail | This report displays the clients linked to specific Client Groups. |
| Client Group Summary | This report provides an overview of loan information linked to specific Client Groups. |
| Download Detail | |
| Download Summary | |
| Flags | |
| GL Export | |
| Loan Group Detail | |
| Loan Group Summary | |
| Manual Assignment | |
| PAP Batch Detail | |
| PAP Batch Summary | |
| Past Due Detail | |
| Past Due Summary | |
| Past Due Custom Summary | |
| Promise Detail | |
| Promise Summary | |
| Repossession | |
| Schedule | |
| Score Detail | |
| Score Summary | |
| Transaction Detail | |
| Transaction Summary | |
| User Activity Detail | |
| User Activity Summary | |
| Users Collection Detail | |
| Users Detail | |
| Worklist Changes Detail | |
| Worklist Changes Summary | |
| Worklist Detail | |
| Worklist Summary | |
| Worklist Load |
Running a Report
- To run a report, click to highlight the desired report and click
 . The report is generated in a new window. At the top of the report window are filters that can be used to further define the results that display. The filters vary depending on the report that is generated. If desired, use the filter text boxes, calendar icons and drop-downs to re-define report results and click View Report to regenerate the report.
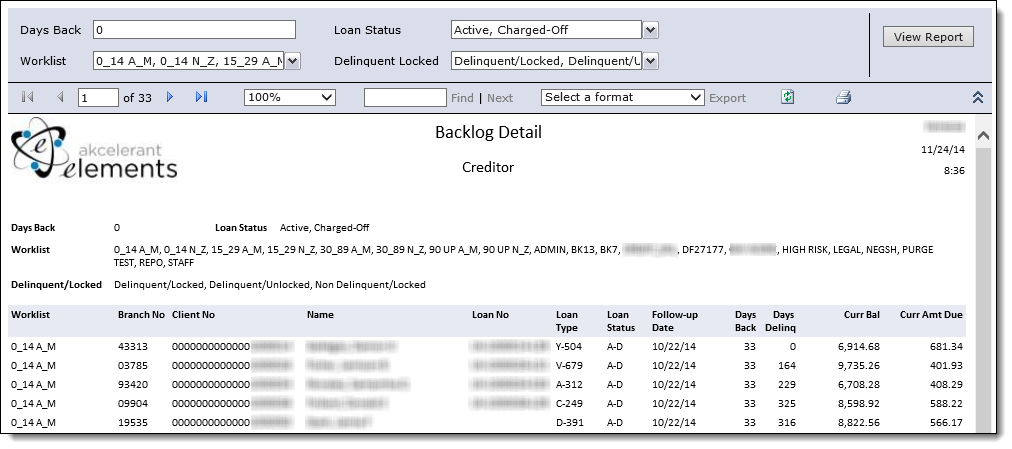
- When generated, each report also contains a toolbar that allows additional pages of the report to be viewed, the export format to be selected and the report to be printed. Use the buttons and fields defined below to work with the report.
Button/Field Description Click this button to return to the first page of the report. Click this button to return to the previous page of the report. Enter a page number in the textbox and hit Enter on the keyboard to navigate directly to a certain page of the report. Click this button to navigate to the next page of the report. Click this button to navigate to the last page of the report. Select a percentage from this drop-down to change the zoom level of the report. The zoom level is how small or large the report text appears. Enter any text into this textbox and click Find to search for a specific report result. If multiple results are found, click Next to view the next result. Select an export format from this drop-down and click Export to regenerate the report in the selected format. Options include:
Format Description XML file with report data Sends the report to an XML code webpage. CSV (comma delimited) Sends the report to Excel with each value in each record displaying in a separate cell.
By default, the Client Number and Branch Number fields have leading zeroes. When a report containing these fields is exported to CSV, these leading zeroes are removed.
To preserve the leading zeroes:
- Save the file with the extension .txt (not .csv).
- Open Excel.
- Open the file. The Text Import Wizard opens automatically.
- Specify that the file type is comma delimited.
- Specify that the Client Number and Branch Number columns should be imported as text.
- Complete the Wizard.
Sends the report to Adobe PDF Reader. MHTML (web archive) Sends the report to a webpage. Excel Sends the report to Excel without the records and values appearing in separate cells. TIFF file Sends the report to a TIFF image file. Word Sends the report to Microsoft Word. Click this button to refresh the report. The first page of the report is displayed. Click this button to print the report. 
Click these buttons to collapse and expand the report filters.


Report History
Each time a scheduled report is generated, a copy is saved for access and regeneration at a later time. This can serve as a snapshot of what the system looked like at a certain time, as this is not otherwise recorded.
- To access a scheduled report's history, click to highlight the report and click
 on the Reports tab.
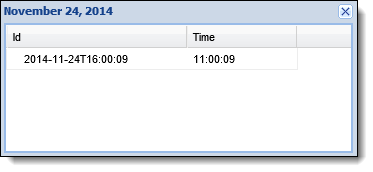
 - A calendar appears with
 displaying on days scheduled reports were generated.
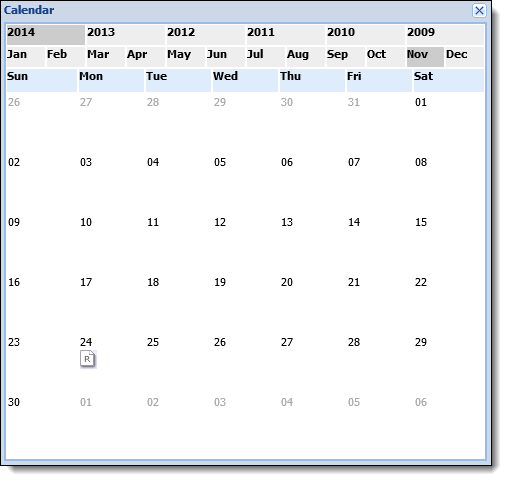
- Click the date to display a list of reports that were generated on that day. Double-click on the desired report to regenerate the report in a new window.