
Temenos Lifecycle Management Suite - Collection Product Guide
Create
| End-User Guide > Desktop and Ribbon Bar > Create |
The Create section of the Ribbon Bar contains functionality that allows users to create new accounts, create new persons if enabled in System Management, or run a non-person workflow. This topic explains how to use these features.
To create a new account in Temenos Infinity, click  in the Ribbon Bar, and select Create Account.
The Create Account window opens with the Set-up page displayed. Click Search to locate the person for which the new account is to be created using the Search functionality.
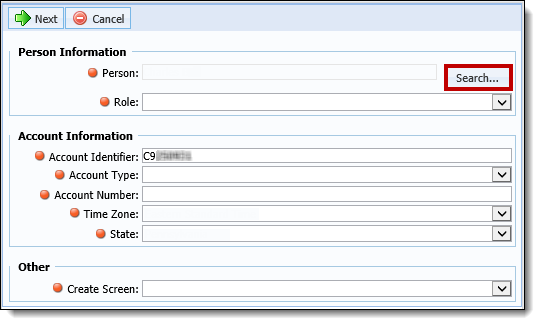
Upon selecting Search, a Basic Search window opens. Enter the search criteria, and click the Search icon in the results area.
 |
When creating an account, only a Person Search may be performed. Therefore, the Accounts and Cases radio buttons do not appear. |
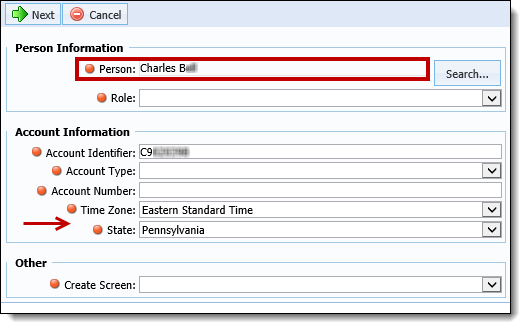
Double-click on a Search result to select the person for this account.
 |
For more information about Search functionality, please see the Search topic in this guide. |
|
When  is clicked and person information is entered within the search criteria, the system looks for all persons regardless of whether or not they are related to an account. is clicked and person information is entered within the search criteria, the system looks for all persons regardless of whether or not they are related to an account. |
After an existing person is selected, the Person field populates with the person’s full name and the field becomes read-only.
|
The Time Zone and State fields within the Account Information section also populate with information using the postal code from the person’s default address. |
Identify the person’s role on the account using the Role drop-down.
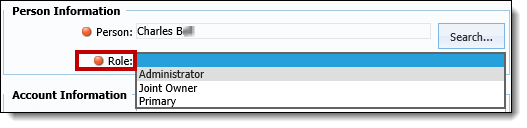
This drop-down contains the Primary roles configured by the system administrator in System Management > Role Types.
|
Roles with a defined Primary Priority can be viewed on the Primary tab of the Role Mappings page. To access this page, click |
The Account Identifier pre-populates with an auto-generated value, but is editable. If a value other than the one pre-populated is desired, enter a new value for the Account Identifier within this field.

|
Upon clicking Next, the value of the Account Identifier is validated against existing accounts to ensure it is unique. If the Account Identifier already exists in Temenos Infinity, an error is received. |
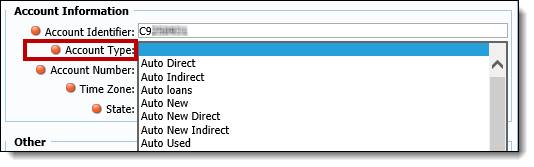
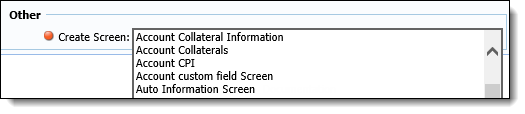
Identify the type of account being created in the Account Type drop-down. This drop-down contains the account types configured by system administrators in System Management > Account Types.
|
The screen identified in the Create Screen drop-down corresponds with the account type selected within this drop-down. |
The Account Number is an editable field and defaults to a blank value. Enter a number for the account in this field.

Identify the Time Zone and State in which the person on the account is located. As previously mentioned, these fields pre-populate with information using the postal code from the person’s default home address when the person is located through a Search. The Time Zone and State fields can be modified, however, using the drop-downs that display.
|
The Contact start/end times for the account are determined using the Time Zone and State values defined within these drop-downs. |

Select a screen from the Create Screen drop-down to enter information for the new account. This drop-down contains all user-defined Account screens mapped to the account type selected within the Account Information section. These screens are created by system administrator in System Management > Screens.
|
The screens available within this drop-down refresh as a new account type is selected. |
Once all fields are complete, click Next to enter the account information within the screen selected for this account.
Upon clicking Next, the Create screen opens:
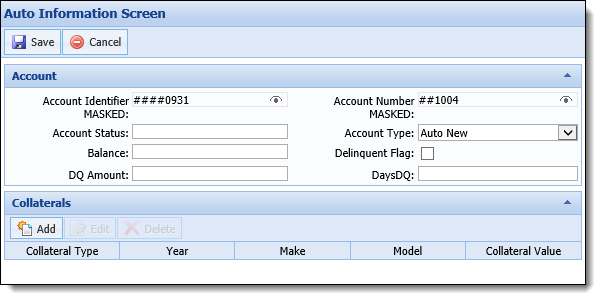
Enter information for the account within the fields that display.
|
When creating an account, the selected screen does not honor screen field restrictions. If a field is marked as read-only when the screen is created, it remains editable within the create screen despite that restriction. |
The fields configured to appear on this screen are defined when the screen is created by system administrators. If any of the fields from the Set-up page appear on the screen, the values defined on that page pre-populate when the create screen opens. For example, in the screenshot above, the selected screen includes the Account Type, Account Number, and Account Identifier fields; therefore, the value defined within the those fields on the Set-up page are automatically displayed.
|
If the selected screen contains a grid panel, like the Collaterals panel in the screenshot above, then account information, such as collateral, cannot be added until the account is created. Clicking Add to open the Edit Screen for the panel displays a message identifying that the screen must be saved before creating a new item. |
Once all fields are complete, click Save to save the new account.
Upon clicking Save, a unique value for the Account Identifier is verified. As previously mentioned, if the Account Identifier does not contain a unique value, an error message is received. If the Save is successful, the new account is created and a success message displays.
Click OK to close the success message and open the person workspace with the new account in context.
The Create Person functionality allows users to create a person who does not already exist within Temenos Infinity. For example, in the event that a financial institution needs to track an account for a person for whom the institution does not wish to keep a record in their Core, the institution is able to create a new person within Temenos Infinity.
To create a new person, click  within the Ribbon Bar, and select Create Person.
|
In order to access this screen, the Create Person permission must be set to Change for the User and/or Security Group. This permission appears in the Desktop category of the Permissions tab in System Management > Users and System Management > Groups > Security Groups. |
The Create Person screen opens. From here, the user is able to enter detailed information about the person being created. The Create Person screen is divided into four different field sets:
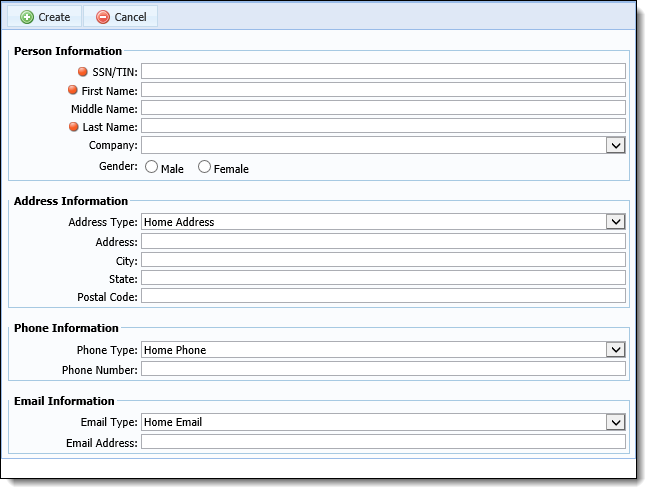
The Person Information section provides the ability to define the new person's identifying information. Within this section, the following fields are available:
 |
The SSN/TIN, First Name, and Last Name fields must be populated in order for the person to be created. |
| Field | Description | ||
| SSN/TIN |
Enter the person's Social Security Number or Taxpayer Identification Number. This is a required field.
|
||
| First Name | Enter the person's first name. This is a required field. | ||
| Middle Name | Enter the person's middle name, if applicable. | ||
| Last Name | Enter the person's last name. This is a required field. | ||
| Company | If desired, select the company to which the person is related. This is an optional field, which lists all companies configured in the Address Book (System Management > Address Book > Companies). | ||
| Gender | If desired, select a radio button to identify the person's gender. |
The Address Information section provides the ability to define the new person's primary location information. Within this section, the following fields are available:
| Field | Description | ||
| Address Type |
Select an option from the drop-down list to identify the address type for the new person. This drop-down populates with a list of relevant address types defined in the ADDRESS_TYPES lookup value in System Management > Field Configurations. This field includes the following values:
|
||
| Address | Enter the person's street address, including, if applicable, apartment or suite number. | ||
| City | Enter the person's city. | ||
| State | Enter the person's state. | ||
| Postal Code | Enter the person's five-digit postal code. |
The Phone Information section provides the ability to define the new person's primary contact information. Within this section, the following fields are available:
| Field | Description | ||
| Phone Type |
Select an option from the drop-down list to identify the phone type for the new person. This drop-down populates with a list of relevant phone types defined in the PHONE_TYPES lookup value in System Management > Field Configurations. This field includes the following values:
|
||
| Phone Number | Enter the person's ten-digit phone number, including the area code. |
The Email Information section provides the ability to define the new person's email information. Within this section, the following fields are available:
| Field | Description | ||
| Email Type |
Select an option from the drop-down list to identify the email type for the new person. This drop-down populates with a list of relevant email types defined in the EMAIL_TYPES lookup value in System Management > Field Configurations. This field includes the following values:
|
||
| Email Address | Enter the person's email address. |
Once all applicable information is added, click  . Once clicked, the system validates the information entered to ensure that the person being added does not already exist within the system.
If the person does not exist, the person will be created. If the person already exists, a message displays confirming the action. Clicking No cancels the action and returns the user to the previous screen. Clicking Yes creates the person. Creating a person with the same SSN/TIN as an existing person creates two separate person master records: one linked to applicable accounts in the Core, and one that only exists within Temenos Infinity, unlinked to any accounts in the system.
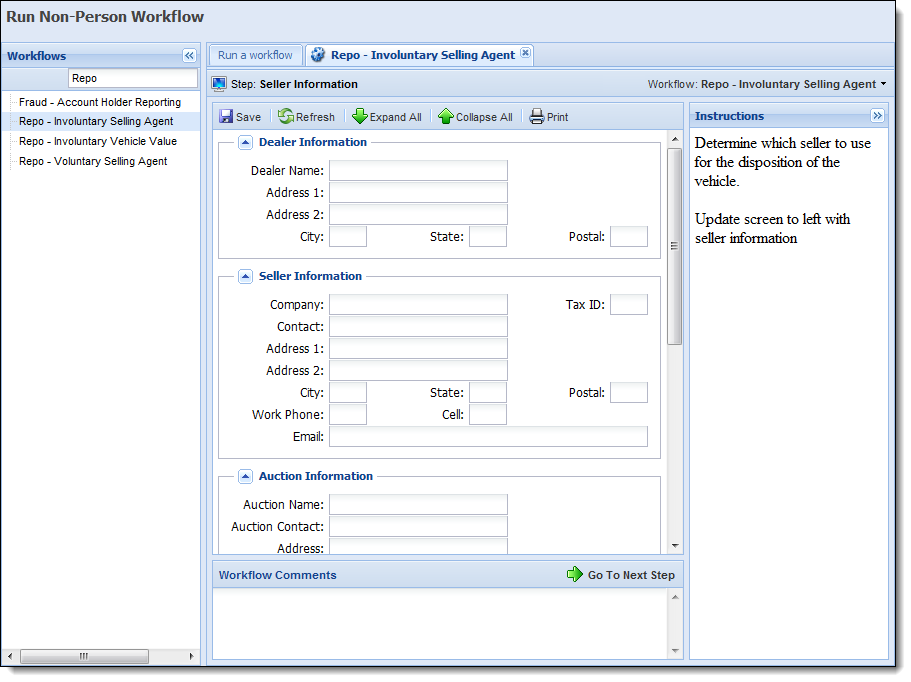
The Run Non-Person workflow feature allows users to run workflows in Temenos Infinity outside of an account. For example, institutions can build a non-person workflow that can be used for people who aren't yet account holders. It can be designed to include a screen that captures all of their information and then is sent to another department as a referral.
Click within the Ribbon Bar, and select Run Non-Person Workflow. The Run Non-Person Workflow screen appears.
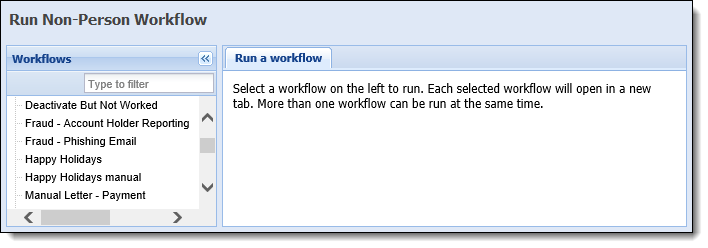
Select a workflow on the left side to run. Each selected workflow opens in a new tab. More than one workflow can be run at the same time.
|
Active non-person workflows cannot be re-opened, nor can they be cancelled from the front end of the system once they are exited. For assistance, please contact a Temenos Customer Care Representative. |
 on the Role Types Management screen. For more information on Role Types, please see the Role Types topic in the Administrator guide.