Temenos Lifecycle Management Suite - Collection Product Guide
Send Email Workflow Step
| End-User Guide > Workflows > Workflow Steps > Send Email Workflow Step |
The Send Email workflow step is used to send an email with account or case information to one or more persons that have roles on the account(s) associated with the workflow.
The Send Email workflow step can be configured as an automated or manual step by the system administrator in System Management > Workflows > Workflows. If configured as an automated step, an email is automatically sent when the workflow including the Send Email step executes in the workspace.
If the Send Email workflow step is configured as a manual step, when the step executes in the workflow, users are able to select from a defined list of email templates and identify the To, From, and CC recipients of the email, as well as upload any applicable attachments directly to the email.
Upon execution of the Send Email step, the following screen appears in the workspace to identify the template, recipient, and attachment details for the email:
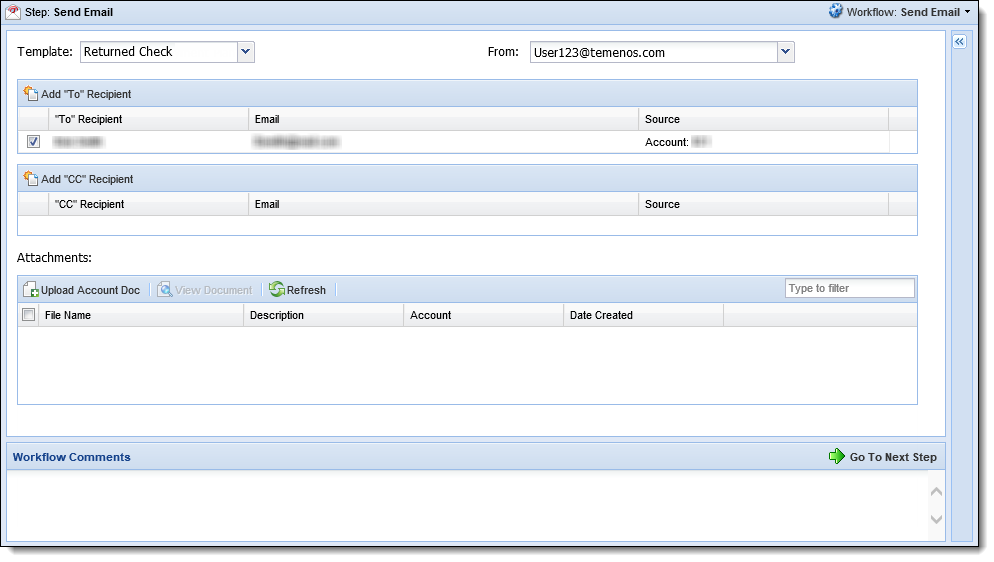
This screen includes the following sections:
The Template and From drop-downs provide the ability to select the email template to be used to generate the email as well as identify the email address from which the email is being sent.
The following information populates in each drop-down:
| Field | Description | ||
| Template |
Includes a list of the email templates assigned to the workflow step by the system administrator in System Management > Workflow > Workflows.
|
||
| From |
Includes the email addresses added to the system Email Settings by the system administrator.
|
The Add "To" Recipient section provides the ability to identify the recipient(s) who are to receive the email. When a template for Account Roles is selected, this section populates with the account holders who are related to account(s) selected for the workflow and hold a "To" role assigned to the template.
For example, if the email is configured for Account roles, and the Primary and Secondary role types are assigned to the template, the name of both the primary and secondary account holders automatically populate within the grid.
If the email is configured for Contact roles, the grid populates with the contact(s) who are related to the person/account(s) associated with the workflow, and hold a "To" role assigned to the template.
If desired, additional "To" recipients can be added to the email by clicking the  button that appears in the top of the grid.
 |
For more information on adding a "To" recipient, please see the Adding "To" Recipients section in this topic. |
The grid that appears in this section displays the following columns of information for each primary recipient on the email:
| Column | Description |
| Select the check box to add the person as a primary recipient of the email. When this check box is selected, the email is sent to the recipient at the email address identified within the Email column. | |
| "To" Recipient |
Displays the name of the email recipient(s). |
| Displays the email address on record for the recipient. | |
| Source |
Displays the account to which the person is associated. If the person is a secondary on the account, the word "Secondary" appears next to the account number as shown in the below example.
|
The Add "CC" Recipient section provides the ability to identify the recipient(s) to be carbon copied on the email. When a template is selected, this section populates recipients based on the account(s) selected for the workflow and the contact(s) related to the person/account(s) with a"CC" role assigned to the template.
A "CC" recipient can be added to the email by clicking the  button that appears in the top of the grid.
|
For more information on adding a "CC" recipient, please see the Adding "CC" Recipients section in this topic. |
The grid that appears in this section displays the following columns of information for each "CC" recipient assigned to the email:
| Column | Description |
| Select the check box to carbon copy the recipient on the email. When this check box is selected, the recipient is CC'd on the email that is sent to the email address identified within the Email column. | |
| "CC" Recipient | Displays the name of the recipient. |
| Displays the email address on record for the recipient. | |
| Source |
Displays the account to which the person is associated. |
The Attachments section enables the ability to attach documents directly to an email. This section automatically includes all documents attached to the account or case associated with the workflow from the Account or Case Documents screen. Within the Attachments section users are also able to perform the following actions:
| Button | Description |
 |
Click to open the Document Upload window to upload a document for an account. Within this window, users are able to select the desired document and identify the document details such as a description of the document, the document type, and the associated account. |
 |
Click to open the Document Upload window to upload a document for a case. This button only appears in the Attachments section when the Send Email workflow step executes in a Case workflow. |
 |
Click to view the attached document. |
 |
Click to refresh the Attachments section and display the most up to date information for the document(s). |
|
For more information on the above actions, please see the Upload Document and View Document sections in this topic. |
The Attachments grid displays the following columns of information for each document uploaded to the Send Email step:
| Column | Description |
|
Select the check box next to the desired document to attach it to the email. When a document is uploaded to the Send Email workflow step, the check box is automatically selected for the document. |
|
| File Name | Displays the name of the document uploaded to the workflow step. |
| Description | Displays the description provided for the document. |
| Account | Displays the account to which the document is related. |
| Date Created | Displays the date the document was uploaded to Temenos Infinity. |
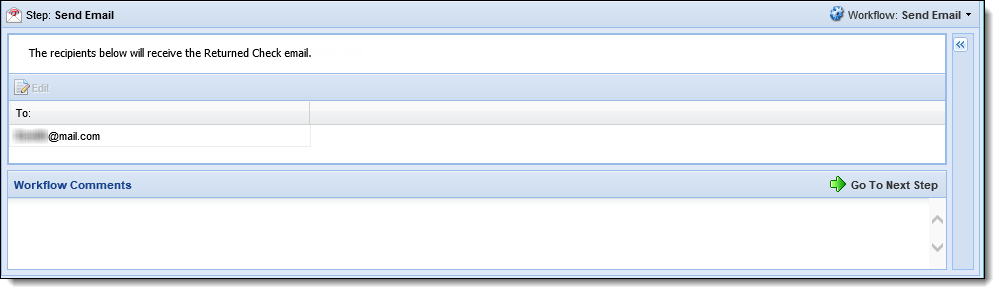
When  is selected, the next screen of the Send Email workflow step appears. This screen displays a grid that lists the email address for each "To" recipient assigned to the email. If desired, users can select a recipient within the grid and click
  to modify the email content for that specific recipient.
To execute the Send Email workflow step, select the desired email template within the Template drop-down and identify the email address from which the email is to be sent.
Once a Template and From email address are identified, select the check box next to a person's name in the Add "To" Recipient grid to add him or her as a primary recipient of the email. If recipients appear in the Add "CC" Recipient section, select the check box next to each desired person in the grid to include him or her as a copied recipient on the email.
If desired, click one of the following buttons to assign additional recipients to the email:

Clicking opens a Search window to locate additional recipients to add to the email.
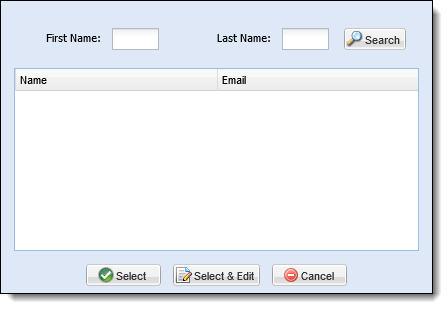
To add a "To" recipient:
 .
. .
.
|
When an email is configured for Contact Roles, only persons listed as a contact may be added to the email as a "To" recipient. If a person who is not listed as a contact is selected within the Search window, a message a received upon clicking to inform that only contacts can be added to the email as a "To" recipient. For information on adding contacts to an email, please see the Add CC Recipient section in this topic. |
 |
The  functionality is only available for contacts. When is clicked, and a person that is not listed as a contact is selected within the grid, a message appears to inform that the person cannot be edited from the Search window. functionality is only available for contacts. When is clicked, and a person that is not listed as a contact is selected within the grid, a message appears to inform that the person cannot be edited from the Search window. |
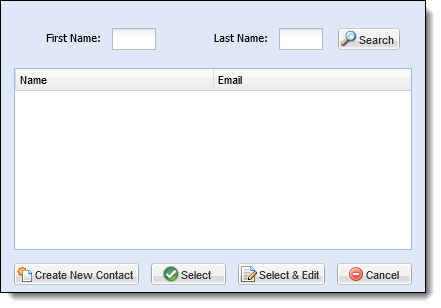
Clicking opens a Search window to locate additional contact recipients to add to the email. Within this window, users are able to add an existing contact as well as create a new contact to add to the email.
To add an existing contact as a "CC" recipient:
. icon appears next to the email address for any person who is a current Contact in Temenos Infinity.
Button Description Click to add the contact to the email. Once Click to modify the contact's information prior to adding the contact to the email.
This functionality is only available for contacts. When Upon clicking
- The Contacts window from the Address Book (System Management > Address Book > Contacts) opens to update information for the contact.
- Update the desired information within the Contacts Window and click
.
- Upon clicking
- Within the Contact Relationship window:
- Select Person or Account from the first drop-down to relate the contact to either the person or account that is associated with the email.
- From the second drop-down, select a role that identifies how the contact is related to the person or account. This drop-down includes the values configured for the CONTACT_RELATIONSHIP lookup in Field Configurations.
- Once a value is selected for each field, the
button is enabled within the window. Click
- Upon clicking
To create a new contact:
 within the Search window.
 |
Though Email is not a required field within the New Contact window, a contact must have an email address on record in order to be added as an email recipient. If an email address is not entered, the contact is not added to the email upon clicking and a message appears to inform that a contact cannot be added without an email address. |
.When all recipients have been assigned to the email, navigate to the Attachments section and perform one of the following actions to attach any necessary documents to the email:
To upload a document to an email:
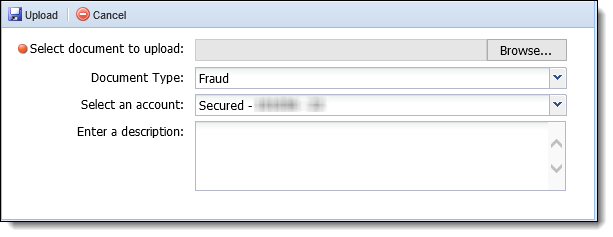
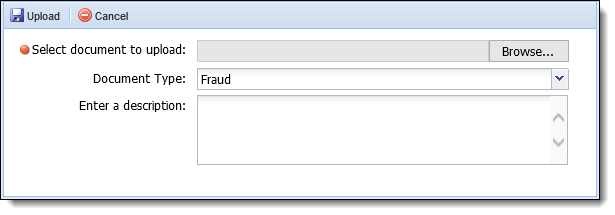
or within the Attachments grid. is clicked, the Document Upload window appears as follows:
When
| Field | Description |
| Select document to upload | Click Browse... to open the Window Explorer and locate the document to attach to the email. |
| Document Type | Select an option from the drop-down to identify the type of document being uploaded. This drop-down list includes the values configured for the DOCUMENT_TYPE lookup by the system administrator in System Management > Field Configurations. |
| Select an account | If more than one account is associated with the workflow, identify the account to which the attachment is related. This drop-down includes all accounts selected for the workflow and only appears when uploading an account document. |
| Enter a description | Enter a description of the document to provide additional information about the content and purpose of the attachment. |
 to upload the document to the Attachments grid. is clicked, a message appears to confirm that the document was uploaded successfully. Click OK to close the message and return to the Send Email workflow step. The document is added to the Attachments grid and is selected as an attachment for the email.
|
Once a document is uploaded, it cannot be removed from the Attachments grid. If the document should not be included as an attachment on the email, de-select the check box next to the document name in the grid before proceeding with the workflow. |
To view a document that was uploaded to the Attachments grid:
.Once all Template, Recipient and Attachment details are complete, click to proceed with the workflow.
Within the second screen of the Send Email workflow step, review the list of recipients to ensure that all "To" recipients have been added to the email. If desired, select a recipient within the list and click to modify the email content for that recipient.
When is clicked, the following window appears to make the necessary modifications:
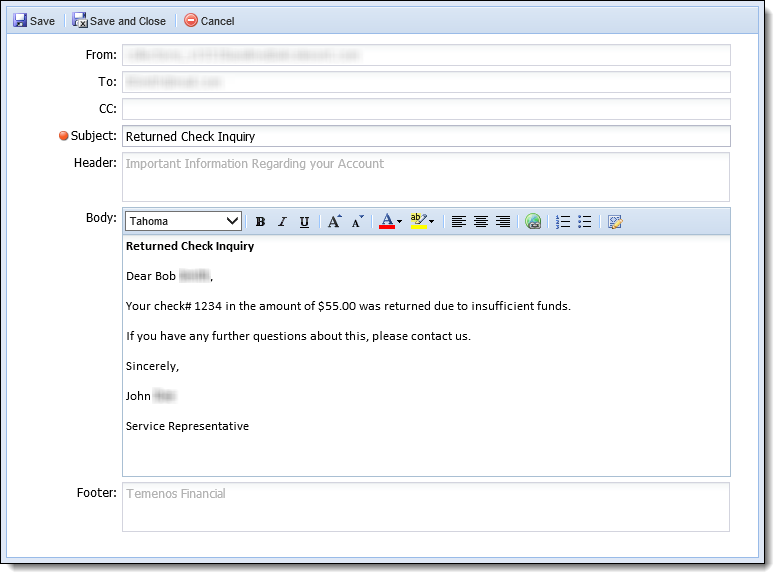
Within the Edit window:
When pre-configured, the Header and Footer fields are read-only and pre-populate with the text defined by the system administrator.
to exit the Edit window and return to the Send Email Workflow step.Once all information for the Send Email workflow step is complete, click . Upon clicking , the email is generated and sent to all of the assigned recipients.
If there are no other steps to the workflow, the workflow completes. The email is available to print in the Email History screen and a note identifying that the email was sent is automatically recorded in the Workflow History comments.
|
If the email was sent to multiple people related to an account, all of the emails sent appear in the Email History screen. |
When Company or Contact fields are included in an email template, the fields populate with values for the first active company or contact related to the account, case, or person in context with the company type, or contact relationship, mapped to the field. For example, if Bruce Banner is a contact related to the person in context, with a relationship of Landlord, and the email template is configured to include the Person > Contacts > Landlord > First Name field, a value of "Bruce" populates for the field during email generation.
|
Companies and Contacts are related to an account, case, or person in the Contacts screen. When there are multiple companies or contacts of the same type, the email is generated with values for the first active company or contact established on that screen for the account, case, or person. For more information on the Contacts Screen, please see the Contacts Screen topic in this guide. |