
Elements - System Administrator and User Guide - Hosted
Mail Tab
| End-User Guide > Workspace > Loan Maintenance > Mail Tab |
Elements provides users with the ability to send letters and emails to clients from within the workspace. Letters and emails can be generated at the client level or can be linked to a specific loan.
From the Mail tab on the workspace, a user can generate letters and emails based on existing templates defined by a system administrator in System Management > Collection > Mail Templates or can generate mail ad-hoc. A user can also view previously generated letters and emails.
 |
Access to this tab and the functions contained within are controlled by administrator-defined Security Profiles. |

Mail that has been previously generated for the client is displayed in this tab and the total number of mail generated is displayed in brackets on the tab.
|
The number of records displayed varies according to the Filter Options currently enabled in the workspace. |
This topic contains the following sections:
To generate a new letter for the client based on an existing mail template, ensure that the desired contact, loan and address is selected in the workspace, if necessary, and navigate to the Mail tab. Select the desired letter template from the Mail Template drop-down and click  on the Mail tab.
The Mail Data window is displayed, listing the all of the merge fields and the value of each field included in the letter.
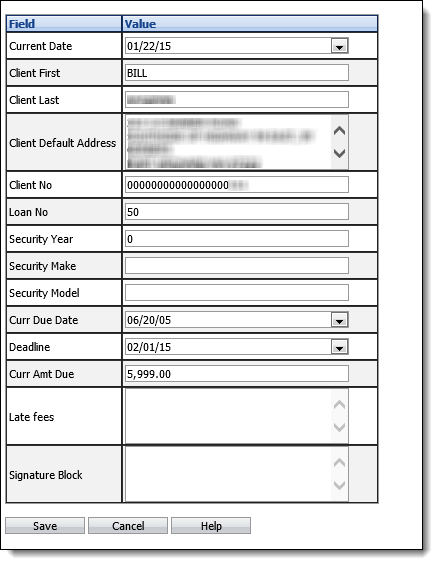
If necessary, edit any merge field values. If any values are edited, they are only used for the letter - they are not saved to the client record. When finished, click Save. Click Cancel to disregard creating the letter.
Upon clicking Save, the Mail Detail window is displayed, where the actual letter is displayed and can be edited and printed.

The sections of the Mail Detail window are defined as follows:
| Mail Detail Section/Field | Description | ||
| Links | The letter is automatically linked to the client and the loan highlighted in the loan grid. If a contact record is selected in the workspace, the letter is linked to the contact, as well. Click the Contact or Loan check box to unlink the letter from the currently selected loan and/or contact. The letter cannot be unlinked from the client. | ||
| Description | The default description of the letter, as configured by a system administrator, is populated in this field but can be edited. | ||
| Body | The Body section of the window displays exactly what will print. The text and format can be edited, as required. Any changes made here are not be saved to the standard letter template. | ||
| Print Now |
Click this button to print the letter now.
A prompt appears to confirm that the letter should be printed. Click OK to proceed with printing the letter. The Windows print dialog box is displayed. Make any changes to the default printer settings, if required, then click Print. A prompt then appears asking if the letter printed properly. Click Yes or No as appropriate. If an auto follow-up note is configured for the selected mail template and Yes was clicked at the previous prompt, a follow-up note is added to the Action tab of the workspace. A copy of the letter is also added to the Mail tab displaying the |
||
| Print Later | Click this button to print the letter at a later time through Delayed Letter Printing. A copy of the letter is added to the Mail tab of the workspace, displaying a printer icon ( ) to indicate the letter has not yet been printed. A paper icon ( ) to indicate the letter has not yet been printed. A paper icon ( ) is displayed on the Mail tab once the letter is printed. ) is displayed on the Mail tab once the letter is printed. |
To generate a new email for the client based on an existing mail template, ensure that the desired contact, loan and address is selected in the workspace, if necessary, and navigate to the Mail tab. Select the desired email template from the Mail Template drop-down and click  on the Mail tab.
The Mail Data window is displayed, listing the all of the merge fields and the value of each field included in the email.

If necessary, edit any merge field values. If any values are edited, they are only used for the email - they are not saved to the client record. When finished, click Save. Click Cancel to disregard creating the email.
Upon clicking Save, the Mail Detail window is displayed, where the actual email contents are displayed and can be edited and sent.
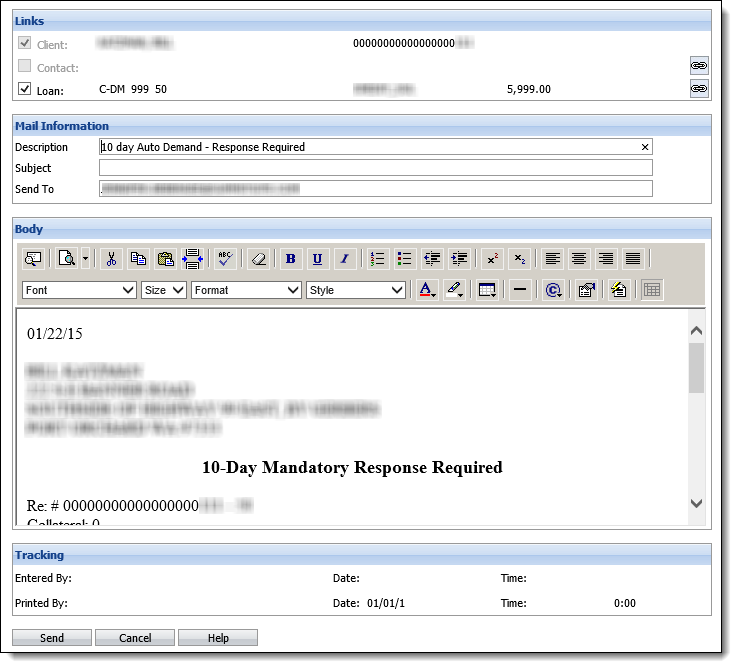
The sections of the Mail Detail window are defined as follows:
| Mail Detail Section/Field | Description |
| Links | The email is automatically linked to the client and the loan highlighted in the loan grid. If a contact record is selected in the workspace, the email is linked to the contact, as well. Click the Contact or Loan check box to unlink the email from the currently selected loan and/or contact. The email cannot be unlinked from the client. |
| Mail Information | The Mail Information section of the window displays the default email description, as defined by a system administrator. It also displays the default subject line and the client or contact's default email address (depending on which record is selected in the workspace). These fields can be edited as desired. |
| Body | The Body section of the window displays the exact text of the email. The text and format can be edited, as required. Any changes made here are not saved to the standard email template. |
When finished making any changes, click Send. The email is sent to the account holder.
If an auto follow-up note is configured for the selected email template, a follow-up note is added to the Action tab of the workspace. A copy of the email is also added to the Mail tab.
A letter can be generated for the client that does not contain any merge fields.
To create an ad-hoc letter, ensure that the desired contact, loan and address is selected in the workspace, if necessary, and navigate to the Mail tab. Ensure that the Mail Template drop-down is empty and click on the Mail tab.
The Mail Detail window is displayed.
![]()
The sections of the Mail Detail window are defined as follows:
| Mail Detail Section/Field | Description | ||
| Links | The letter is automatically linked to the client and the loan highlighted in the loan grid. If a contact record is selected in the workspace, the letter is linked to the contact, as well. Click the Contact or Loan check box to unlink the letter from the currently selected loan and/or contact. The letter cannot be unlinked from the client. | ||
| Description | Enter a unique description of the letter. | ||
| Body | Enter the body text of the letter. The Body section of the window contains a toolbar with functions to change the font size and style, add tables and utilize other common Word processing features. | ||
| Print Now |
Click this button to print the letter now.
A prompt appears to confirm that the letter should be printed. Click OK to proceed with printing the letter. The Windows print dialog box is displayed. Make any changes to the default printer settings, if required, then click Print. A prompt then appears asking if the letter printed properly. Click Yes or No as appropriate. If an auto follow-up note is configured for the selected mail template and Yes was clicked at the previous prompt, a follow-up note is added to the Action tab of the workspace. A copy of the letter is also added to the Mail tab displaying the |
||
| Print Later | Click this button to print the letter at a later time through Delayed Letter Printing. A copy of the letter is added to the Mail tab of the workspace, displaying a printer icon ( ) to indicate the letter has not yet been printed. A paper icon ( ) to indicate the letter has not yet been printed. A paper icon ( ) is displayed on the Mail tab once the letter is printed. ) is displayed on the Mail tab once the letter is printed. |
An email can be generated for the client that does not contain any merge fields.
To create an ad-hoc email, ensure that the desired contact, loan and address is selected in the workspace, if necessary, and navigate to the Mail tab. Ensure that the Mail Template drop-down is empty and click on the Mail tab.
The Mail Detail window is displayed.
![]()
The sections of the Mail Detail window are defined as follows:
| Mail Detail Section/Field | Description |
| Links | The email is automatically linked to the client and the loan highlighted in the loan grid. If a contact record is selected in the workspace, the email is linked to the contact, as well. Click the Contact or Loan check box to unlink the email from the currently selected loan and/or contact. The email cannot be unlinked from the client. |
| Mail Information | Enter a Description and Subject of the email. The client or contact's default email address (depending on which record is selected in the workspace) is displayed in the Send To field. |
| Body | Enter the body text of the email. The Body section of the window contains a toolbar with functions to change the font size and style, add tables and utilize other common Word processing features. |
When finished creating the email, click Send. The email is sent to the account holder.
If an auto follow-up note is configured for the selected email template, a follow-up note is added to the Action tab of the workspace. A copy of the email is also added to the Mail tab.
To view an existing letter or email, ensure that the desired contact, loan and address is selected in the workspace, if necessary, and navigate to the Mail tab. Highlight the desired letter or email to view and click  .
.
The Mail Detail window is displayed as a read-only window. The Type field in the Mail Information section of the window displays the mail's generation method (ad-hoc, third party, delayed, batch, etc.).
To reprint the mail, click Reprint. When finished viewing the mail, click Cancel to return to the workspace.