The Promise to Pay workflow step is used to record promises on account(s) in context for the workflow. In addition to generating a promise to pay on one account, promises can be generated on multiple accounts or on a person as a whole as long as the promise step is included in a multi-account workflow.
Running the Promise to Pay Workflow Step
Navigate to the Workflows menu in the Left Navigation Panel and click the Promise to Pay workflow that was created by the administrator.
If running a multi-account promise to pay workflow, the Select Items pop-up window appears. Select the accounts to be included in the workflow. By default, the account that is open in the workspace is automatically selected. The accounts in this window are available to enter promise arrangements on.
 |
The Select Items pop-up window contains the Related Accounts grid. The Related Accounts grid must be configured to display somewhere on the workspace in order for the multi-account workflow to work correctly. |
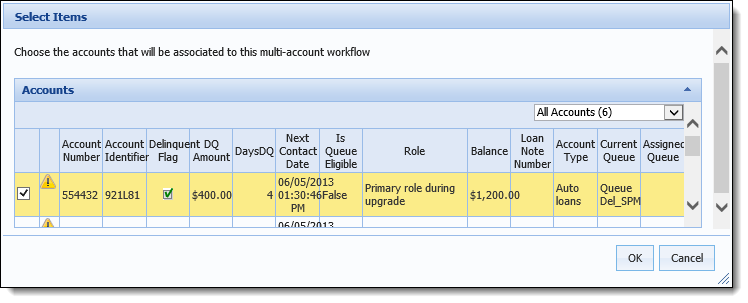
Once all accounts are selected, click OK to continue to the Promise to Pay workflow.
|
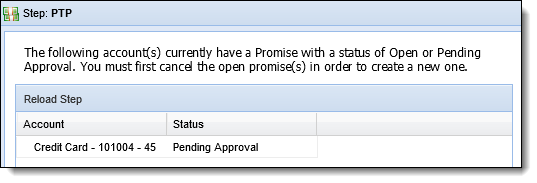
There can be only one open promise on an account at a time. If there is already an open or pending promise on an account, the workflow prompts to cancel the open promise in order to create a new one.
|
The Promise to Pay step appears in the workspace with two sections: Accounts and Payments.
The Accounts section displays the account for which the user is taking a promise. From here, users can set the Promise Amount, Number of Payments, Payment Method, Frequency, First Payment and Discount.

Details of each field are included below.
Field Details
| Column | Description | Picture | ||
| Promise Amount |
To set the Promise Amount, click within the Promise Amount column and enter the total promise amount for that account.
|
 |
||
| Number of Payments |
To set the number of payments, click within the Number of Payments column. Click the drop down and select the number of payments that are to be made towards the promise amount.
|
 |
||
| Payment Method |
To set the Payment Method, click within the Payment Method column. Click the drop down and select the method of payment for the promise. The payment method drop down is set in System Management >Payment Types.
|
 |
||
| Frequency | To set the Payment Frequency, click within the Payment Frequency drop down column. Click the drop down to select the frequency. | 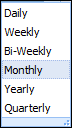 |
||
| First Payment | Determine the first payment date by clicking in the First Payment column. Click the calendar icon and select the first payment date. | 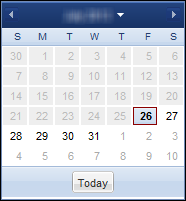 |
||
| Discount |
Users can also set a discount on the total DQ amount. This allows the account holder to not pay the full delinquent amount to be considered current. Click in the Discount column and open the drop down. Select a discount to apply. The values in the drop down represent percentages of the total DQ amount. If a discount is applied, it disperses among the scheduled payments.
|
 |
When finished customizing the promise to pay details, click Generate Payments at the top of the Accounts section. Based on the selections, the system generates the list of payments in the Payments section of the workflow step. The following columns display in this section:
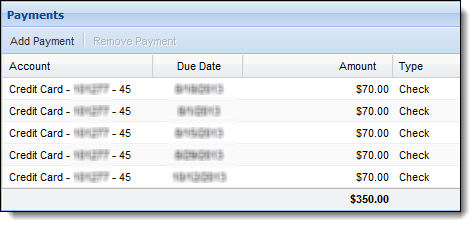
| Column Name | Description |
| Account | The account to which the promise to pay is applied. |
| Due Date | The Due date of each payment. |
| Amount | The amount that is owed to satisfy the promise. |
| Type | The payment type for the promise. |
As shown above, a promise value of $350.00 was made, with the number of payments set to 10. The payment method was set to check, the frequency to monthly and the initial due date to XX/XX/XXXX. The system calculates the amount of payments and provides all of the payment information for the promise in the section.
Adding a Payment
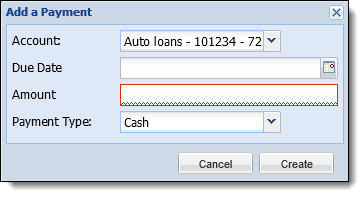
Individual payments can be added within the Payments section by clicking the Add Payment button. Clicking this option opens a pop-up. Select the account to apply the promise to, the due date, amount of the payment and the payment type and click Create. The new payment populates in the Payments list.
Any payments added to a promise automatically update the information in the Accounts section of the workflow step.
Editing a Payment
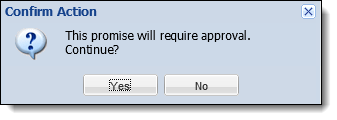
Individual payments’ due dates, amounts and the type can be edited manually by clicking in the respective column in the Payments section. If the changes exceed the limitations set by the system administrator, the approval confirmation appears and the next step in the workflow is assigned to a user to approve the changes on the promise.
Individual payments can be added within the payments section by clicking the Add Payment button at the top of the section. Clicking this option opens a pop-up. Select the account to which the promise is applied, the due date, amount of the payment and the payment type and click Create. The new payment populates in the Payments list. To cancel adding the new payment, click the Cancel button.
Any changes made to a payment automatically update the information in the Accounts section of the workflow step.
Removing a Payment
To remove a payment from this section, highlight a payment and click Remove Payment. The following message appears stating that when an individual promise payment is removed or cancelled, the total promise amount is updated. Click OK.
Any changes made to a payment automatically update the information in the Accounts section of the workflow step.
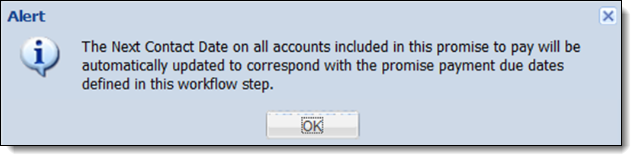
When finished entering all payment information, click Go To Next Step to complete the workflow step. If configured, the Next Contact date adjusts to correspond to the promise due date.
|
Configuring the Next Contact Date is at the discretion of the System Administrator. The following options are available to set when a promise is created/edited:
|
When the promise is submitted, it is documented in the Promise History screen. Please see the Promise History Screen topic for more information.