
Temenos Lifecycle Management Suite - Recovery Product Guide
Repayment Plans
| End-User Guide > Recovery Process > Repayment Plans |
A repayment plan is a strategy created by a financial institution to help a debtor pay back funds that have been charged off. The Lifecycle Management Suite's Recovery module provides users with the ability to create both traditional and non-traditional repayment plans on charged-off accounts. Repayment plans not only assist the financial institution in getting their money back, but also assist the debtor in creating a repayment schedule that fits their budget and current financial situation.
This topic reviews the complete repayment plan process which includes the following steps:
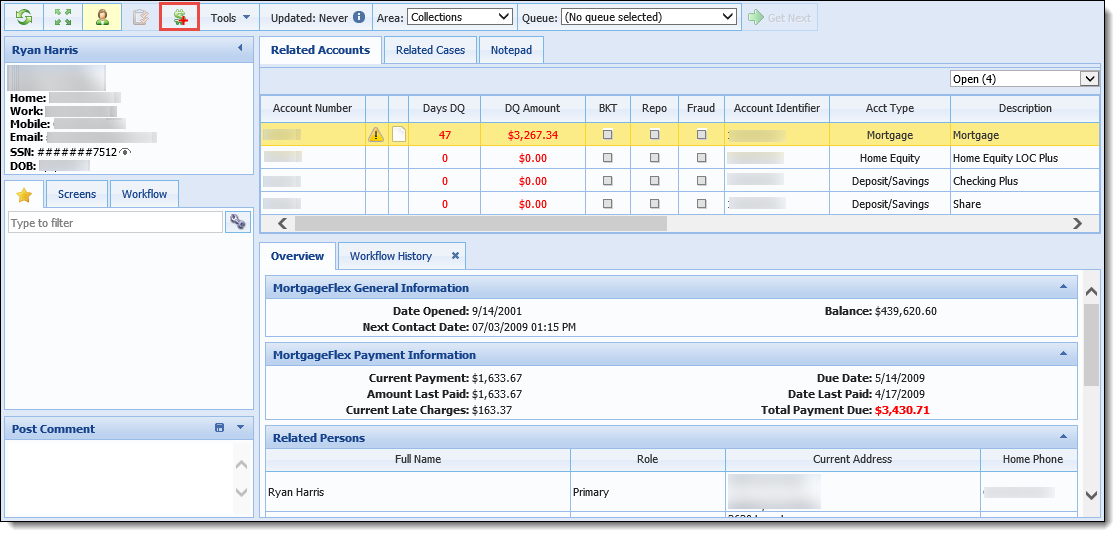
To create a new repayment plan with the charged-off account in context in the workspace, click  within the workspace toolbar.
 |
is only available within the workspace toolbar if the Create Repayment Plan permission is set to Change within Users and/or Security Groups in System Management. |
The Create Repayment Plan pop-up window is displayed with the Accounts tab selected by default. The Accounts tab lists all charged-off accounts in the related accounts grid to which the person in context has any relationship (primary, secondary, etc.).

Information for the Accounts tab is displayed within the following columns:
| Column | Description |
| Account Identifier | Displays the account number of the charged-off account. |
| Account Type | Displays the account type of the charged-off account. |
| Balance | Displays the balance of the recovery account (i.e. the amount that was charged-off). |
Identify the account to include in the repayment plan by selecting the check box next to the desired account.
|
While more than one account can be selected for inclusion in the repayment plan, at least one account must be selected in order for the repayment plan to be created. |
When all accounts have been selected, navigate to the Persons tab. The Persons tab displays all people that have any role (liable or not liable) on the accounts listed within the Accounts tab.
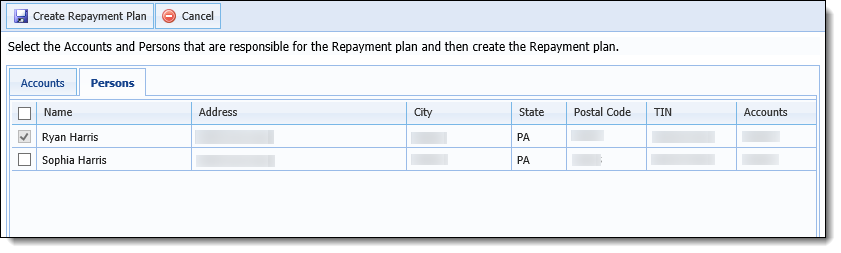
Information for the Persons tab is displayed within the following columns:
| Column | Description | ||
| Name | Displays the name of the liable person. | ||
| Address | Displays the street address of the liable person. | ||
| City | Displays the city of the liable person. | ||
| State | Displays the state of the liable person. | ||
| Postal Code | Displays the postal code of the liable person. | ||
| TIN |
Displays the Tax Identification Number of the liable person.
|
||
| Accounts | Displays the account identifier of the account for which the person is liable. |
Identify the person to include in the repayment plan by selecting the check box next to the desired person.
|
By default, the person in context is selected for inclusion in the repayment plan and cannot be removed. However, more than one additional person can be selected for inclusion in the plan. |
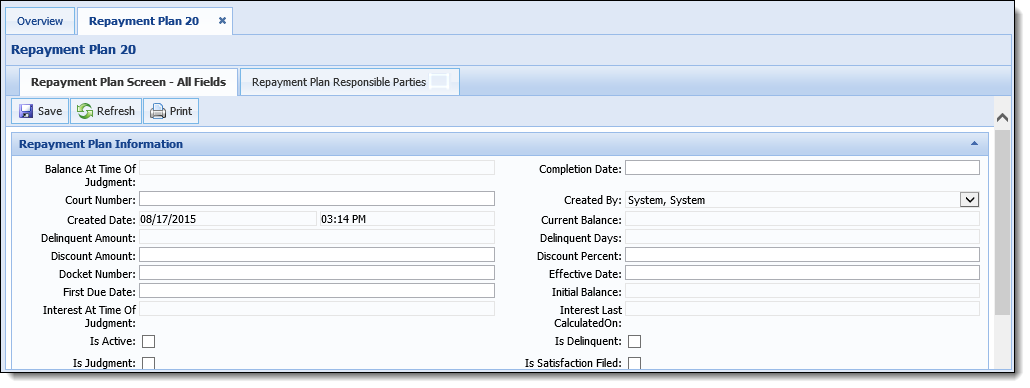
Once all persons have been selected, click  . The Create Repayment Plan pop-up window closes and the workspace automatically refreshes to display the new repayment plan as a separate tab in the Overview section. The Repayment Plan tab is labeled with the repayment plan's ID number and contains all of the repayment plan screens configured within System Management > Modules > Recovery.
|
The repayment plan's ID number is automatically assigned in the database upon clicking  . . |
Upon creating the repayment plan, the allocation method is set to Order. This is indicated in the read-only Repayment Plan Allocation Method field, which may be added to a repayment plan panel in System Management. The allocation method determines how funds are applied to accounts in a repayment plan when a payment is received.
 |
The allocation method can be changed via the Repayment Plan Accounts panel. For more information on allocation methods, please see the Repayment Plan Accounts Panel topic of this guide. |
The Repayment Plan status is calculated each time an action occurs, such as creating or activating a repayment plan, and displays within the Repayment Plan Status Id field that can be configured to appear in a Repayment Plan screen by the system administrator. The Repayment Plan statuses that are available populate from the REPAYMENTPLAN_STATUS lookup in Field Configurations and include the following values:
| Status | Description |
| Repayment Plan Active | Set when a repayment plan is activated with the  button. button. |
| Repayment Plan Canceled | Set when a repayment plan is canceled with the  button. button. |
| Repayment Plan Completed | Set when a repayment plan is completed with the  button. button. |
| Repayment Plan Delinquent | Set when a scheduled payment is late and the Is Delinquent flag is set to true for an active repayment plan. |
| Repayment Plan Initialized | Set when a repayment plan is created, but not yet activated in the Recovery module. |
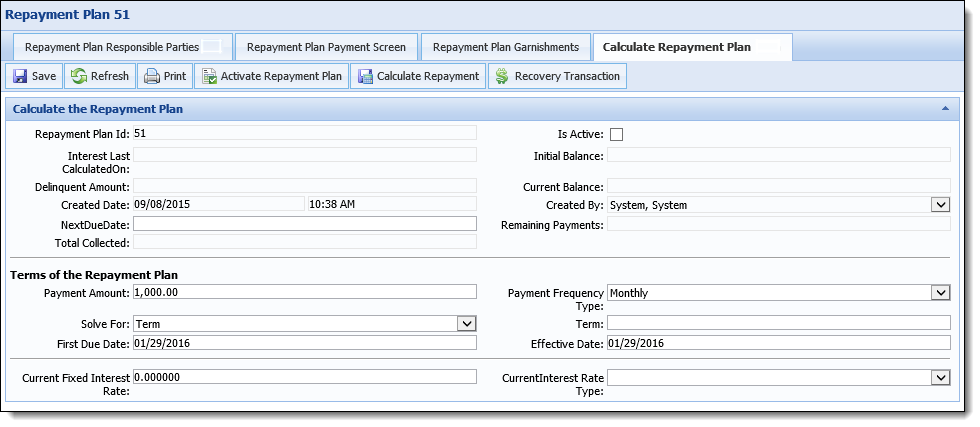
After a repayment plan has been created, the amortization schedule, payment amounts, and due dates must be determined in order to generate a payment schedule. To perform these calculations, navigate to the repayment plan screen containing the Calculate Repayment button ( ).
).
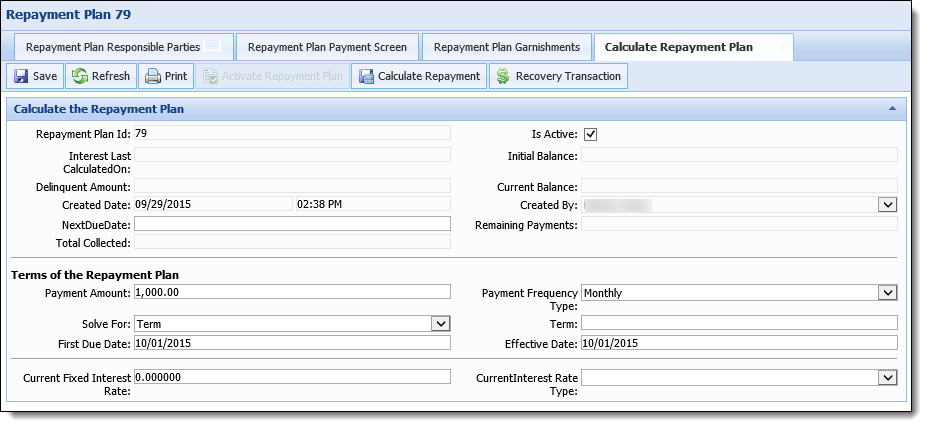
Enter information within the following fields:
 |
The following fields must be manually added to the Repayment Plan type screen that contains the Calculate Repayment button and must be completed in order for the calculation function to work correctly. If a field does not contain data, an error is returned upon clicking stating that the calculation cannot be performed. |
|
In addition to the fields below, it is recommended that the Payment Amount, Maturity Date, Remaining Payments, and Next Due Date fields are included in the Repayment Plan screen that contains the button. |
| Field | Description | ||||||||||
| Initialization Balance (Repayment Plan Amount) | The total amount to be included within a repayment plan. By default, the sum of all account balances included in the repayment plan displays. | ||||||||||
| Solve For |
From the drop-down, select the value that the calculator solves for.
|
||||||||||
| Payment Frequency Type |
From the drop-down, select one of the following options to indicate how often the debtor agrees to make payments towards the repayment plan.
|
||||||||||
| Current Interest Rate |
If a fixed interest rate is set on a repayment plan, this field indicates the fixed interest rate. By default, the interest rate for the recovery account or repayment plan is derived from the Interest Rate panel.
|
||||||||||
| Interest Rate Type |
If a variable interest rate is being used for a repayment plan, this field indicates the variable interest rate type being charged, i.e. Prime Rate.
|
||||||||||
| First Due Date |
Indicates the date that the debtor's first payment is due. By default, one month from the current date displays. However, this value can be changed by clicking within the field and selecting a new date from the calendar that appears. |
||||||||||
| Effective Date |
Indicates the date when calculations take effect. By default, the current date displays. However, this value can be changed by clicking within the field and selecting a new date from the calendar that appears. |
||||||||||
| Term |
Indicates the number of payments included within a repayment plan based on the Payment Frequency Type. For example, if Monthly is selected from the Payment Frequency Type drop-down and 12 is entered within the Term field, the debtor is required to make payments once a month for 12 months.
|
||||||||||
| Payment |
The amount the debtor is to pay at each scheduled payment.
|
Once all of the information is entered within the aforementioned fields, click .
|
If a payment schedule currently exists for the repayment plan, a warning message is received upon clicking that indicates recalculating the schedule removes all existing scheduled payments for the repayment plan and confirms that the user wishes to proceed with the recalculation. |
Upon clicking , the Payment Amount or Term, Maturity Date, Remaining Payments, and Next Due Date fields are updated and a payment schedule is created.
In addition to the fields noted above, the Repayment Plan fields included in the following section are automatically set within the Repayment Plan screen each time data is modified in order to accurately determine the status of the repayment plan and ensure that data within the fields is up to date.
 Automatically Calculated Repayment Plan Fields
The following fields are automatically calculated for a repayment plan based on payment details and/or values set within Repayment Plan fields:
| Field | Description | Example | |||||||||||||||||||||||||
| Next Due Date |
Indicates the date that the next payment is due for the repayment plan. This field is set to the date of the oldest repayment plan payment that has a Repayment Plan Payment Status of Late or Payment Scheduled. |
Repayment Plan 100 has the following three payments:
In this example, Next Due Date is set to 2/15/15 since it the oldest payment on record for the repayment plan and has a status of Late. |
|||||||||||||||||||||||||
| Delinquent Days | Indicates the number of days that the repayment plan is delinquent. This field is calculated based on the difference between the current date and the value for Next Due Date. |
If today is 8/25/2015 and Next Due Date is 8/15/2015, then Delinquent Days is 10.
If today is 8/15/2015 and Next Due Date is 8/25/2015, then Delinquent Days is 0. |
|||||||||||||||||||||||||
| Is Delinquent | When selected, indicates that the repayment plan is delinquent. This field is dependent on the value configured for the Grace Period field by the system administrator in the Recovery Settings tab in Solution.Recovery. A repayment plan is considered late when the Next Due Date and Grace Period are less than the current date. |
The Next Due Date is 8/21 and the Grace Period is set to 3 days.
In this example, the IsDelinquent flag is set to true for the repayment plan on 8/25. |
|||||||||||||||||||||||||
| Delinquent Amount | Indicates the amount that the repayment plan is delinquent. This field is calculated based on the sum of all of remaining balances for payments that have a Repayment Plan Payment Status of Late. |
Repayment Plan 100 has the following three payments:
In the above example, the Delinquent Amount field is set to $300. |
|||||||||||||||||||||||||
| Total Collected | Indicates the total amount that has been collected from payments on both the repayment plan and recovery account. This field is calculated based on the sum of all repayment plan and recovery account transactions that are not reversed and include a transaction code with a category of Payment/Recovery and a Posting Type of Credit. |
The following three transactions exist for a Recovery account:
The Transaction Codes for the above transactions are configured as follows:
In this example, the Total Collected field is set to $300. |
|||||||||||||||||||||||||
| Current Balance |
Indicates the current balance of the repayment plan. This field is set based on the sum of all General Ledger entries for the repayment plan.
|
The following General Ledger entries and transactions exist for a Recovery account:
In this example, the Current Balance field is set to $5200 ($5000 + $500 - $300). |
|||||||||||||||||||||||||
| Aggregate Initialization Balance | Indicates the balance of the Repayment Plan that is being initialized. This field is calculated based on the sum of the Amount to Include GL balances for all accounts in the repayment plan. |
This amount is reflected in the Totals row under the Amount To Include column in the Repayment Plan Accounts screen.
|
|||||||||||||||||||||||||
| Remaining Payments | Indicates the number of payments remaining on a repayment plan that have a Repayment Plan Payment Status of Late or Payment Scheduled. |
Repayment Plan 100 has the following three payments:
In this example, the value of the Remaining Payments field is set to 2. |
Depending on the Solve For method chosen, the repayment plan term or payment amount is calculated using the Solve for Term or Solve for Payment formulas.
|
For more information on transaction processing, please see the Transaction Processing section of the Recovery Transactions topic in this guide. |
The Repayment Plan Payment Status is calculated each time data is updated within the following four fields on a repayment plan payment:
|
The payment statuses can be found in the Repayment Plan Payment Status lookup in System Management > Field Configurations. |
Reference the table below for an overview of when each payment status is set for a repayment plan:
| Status | Description |
| Payment Scheduled | Set when the Remaining Amount on a payment is greater than zero and the Payment Date is less than or equal to the current date. |
| Paid | Set when the Remaining Amount on a payment is zero and the Date Paid is less than or equal to the Payment Date. |
| Late | Set when the Remaining Amount on a payment is greater than zero and the Payment Date is greater than the current date. |
| Paid-Late | Set when the Remaining Amount on a payment is zero and the Date Paid is greater than the Due Date, or when a partial payment has been made after the Due Date. |
| Cancelled | Set when the Repayment Plan status is set to Cancelled. |
Payments may be scheduled in two ways: automatically for traditional repayment plans or manually for non-traditional repayment plans. Once a payment schedule is created, it is available within the Repayment Plan Scheduled Payments panel.

A traditional repayment plan is created using the Recovery module's calculate repayment functionality, based on either the Solve for Term or Solve for Payment calculation method. Upon clicking , the Payment Amount or Term, Maturity Date, Remaining Payments, and Next Due Date fields are updated and a payment schedule is created.
A non-traditional repayment plan is manually created when payments are scheduled to the Repayment Plan Scheduled Payments panel. These types of plans allow recovery agents to set up irregular payments that do not follow a traditional amortization schedule.
|
For more information on creating and maintaining a repayment plan, refer to the Repayment Plan Scheduled Payments panel topic. |
Once a repayment plan has been calculated and payments have been scheduled, the plan must be activated in order to create the ledger entries used to track the balances of the repayment plan. To activate a repayment plan, navigate to the repayment plan screen containing the Activate Repayment Plan button ().
|
is disabled if the repayment plan has a status of Active or Delinquent or if the plan is cancelled or completed, as indicated by the Repayment Plan Status Id field available for addition to repayment plan type screens. Additionally, the Activate Repayment Plan permission must be set to Change within Users and/or Security Groups in System Management in order for the button to be enabled. |
Click .
Upon clicking , validations are performed to ensure amortization has been calculated, at least one payment exists, the remaining balance is zero after the last scheduled payment and that no accounts associated with the plan exist in another active repayment plan. Additionally, the validations ensure that each recovery account does not have a balance of zero.
|
If accounts are included in the repayment plan that exist in another active repayment plan, a message appears upon clicking that indicates the other repayment plan must be cancelled in order to activate the plan in context. |
If the repayment plan passes the validations, the Repayment Plan Status is set to Active and a message appears indicating the plan has been activated successfully.
Ledger entries to track balances are also created for the repayment plan, its associated accounts, and their components. The ledger entries are created to track the allocations on the repayment plan transactions.
|
Ledger entries for a repayment plan can be viewed within the Balances Summary panel on a Repayment Plan type screen. The Balances Summary panel also provides users with the ability to apply adjustment transactions to correct the balances of a repayment plan that may have been entered incorrectly during plan creation, as once a repayment plan is activated it cannot be "un-activated." |
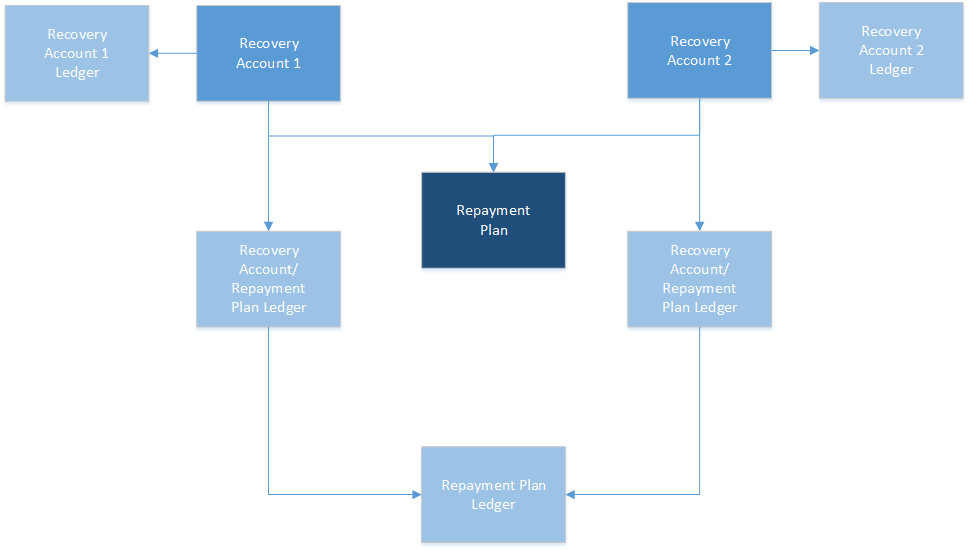
Repayment Plan Ledger Creation Details
|
The repayment plan ledger, associated account ledger(s), and the recovery account(s) ledger(s) only capture transactions when funds are distributed to the account via the Advanced Allocation section of the Recovery Transaction Screen. |
In the below example, two recovery accounts are associated with a repayment plan, resulting in up to five ledger entries created for each repayment plan transaction.
To view an existing repayment plan, with the charged-off account in context, select the person or account screen that contains the Related Repayment Plans panel from the workspace left navigation panel. The screen renders as a new tab in the Overview section of the workspace, displaying all active and inactive repayment plans for the person or account.
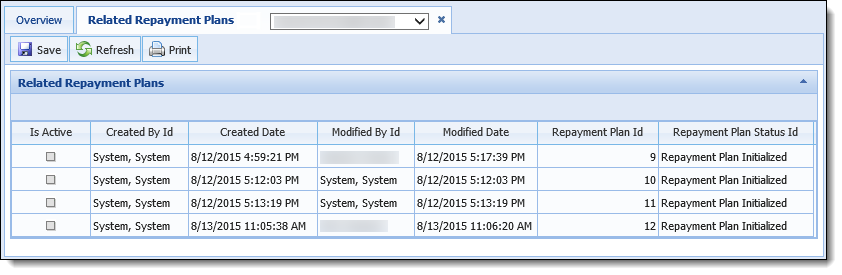
Double-click the desired repayment plan to open its details in a separate tab. The tab is labeled with the repayment plan's ID number and contains all of the repayment plan screens configured within System Management > Modules > Recovery.

Complete the repayment plan screens as required. Once all screens for the repayment plan are complete, click  to retain the information within the screen.
Users, with the appropriate permissions, have the ability to terminate a repayment plan at any point throughout its lifecycle. For example, a repayment plan can be cancelled if it has been a long time since it was created and it would be easier for the financial institution and debtor to create a new plan, rather than try to modify each element of the current plan.
To cancel a repayment plan, click  .
.
|
|
A message appears to confirm that the repayment plan should be cancelled. Click Yes to proceed with the cancellation. Once the plan is cancelled, another message appears to indicate that the cancellation has been successful. Click OK to close the message and return to the repayment plan screen.
Upon successful cancellation of the repayment plan, the Repayment Plan Status is set to Repayment Plan Canceled and the IsActive flag is set to false. Additionally, the Activate, Recovery Transaction, Calculate, Finalize Repayment Plan, and Cancel Repayment Plan buttons are disabled and the Transaction panel is read-only.
Users, with the appropriate permissions, have the ability to complete a repayment plan when it has been paid off and the following repayment plan flag fields have been reviewed.
|
The IsNoPaymentsWithBalance, IsPaymentsWithNoBalance, and IsFractionalAmount flag fields may be added to repayment plan type screens. |
| Field | Description |
| IsNoPaymentsWithBalance | This read-only field is selected (set to true) when the repayment plan does not contain any payments with a remaining balance but the repayment plan balance does not equal zero. |
| IsPaymentsWithNoBalance | This read-only field is selected (set to true) when the repayment plan contains scheduled payments with a remaining balance greater than zero but the repayment plan balance does equal zero. |
| IsFractionalAmount | This read-only field is selected (set to true) when the repayment plan contains component balances that have a fractional amount below a penny. |
Reviewing these flag fields helps ensure that the plan and its payments are in-sync and that all inconsistencies are corrected prior to finalization. For example, a repayment plan and its payments could be out-of-sync if the debtor has paid early or late, resulting in less or more interest being accrued.
Once any repayment plan payment issues are corrected, click to finalize the repayment plan.
|
|
A message appears to confirm that the repayment plan should be finalized. Click Yes to proceed with the finalization.
The finalization process validates that the IsNoPaymentsWithBalance, IsPaymentsWithNoBalance, and IsFractionalAmount fields are all set to false. If any of these fields are true, a message appears to the user containing suggestions for how to resolve the issue so the repayment plan can be finalized.
Once the repayment plan passes the aforementioned validations, it is finalized and the following updates occur:
Additionally, a message appears to indicate that the finalization has been successful. Click OK to close the message and return to the repayment plan screen.