Temenos Lifecycle Management Suite - Origination Product Guide
Applicants
| End-User Guide > Application Processing > Origination > Applicants |
The Loan or Account Origination modules provide users with the ability to efficiently collect pertinent applicant information directly within screens and panels, as well as easily modify applicant information throughout the application process.
 |
The Loan or Account Origination modules support the ability to add multiple applicants to an application. |
The Applicants topic includes an overview of applicant details to assist users with the collection of applicant information, as well as provides instructions for adding, editing, and deleting applicants from an application.
All applicants share common details that are defined when adding or editing an applicant during the application process.
While the applicant types that are available in an application are custom to each institution, the following applicant types are system-defined and provided by default:
 |
Applicant Types are created and managed from the Applicant Types page in System Management > Origination > Applicant Types. For more information, please see the Applicant Types topic in the Administrator Guide. |
|
At least one applicant must be added to an application. |
| Applicant | Description | ||||
| Primary |
The primary applicant is the main individual associated with the application and any included products. The primary applicant may have additional applicants, such as a joint applicant or guarantor to strengthen the application and increase the chance of approval.
|
||||
| Guarantor | A guarantor is an individual who pledges their own assets if a situation arises in which the original applicant(s) cannot perform their loan or account obligations. Guarantors appear on the documents and legally agree that any debt owed to the financial institution will be repaid. | ||||
| Joint |
A joint applicant is an individual who shares the financial responsibility of a loan or an account as well as the benefits of ownership for any associated products. Joint applicants appear on the documents and legally agree to share the rights and liabilities of the loan or account. |
||||
| Non-Signing Spouse |
A non-signing spouse does not have financial responsibility to a loan's repayment or an account's funding. These applicant types may receive information specific to the loan or account, such as balance inquiries.
|
||||
| Beneficiary | A beneficiary is an individual who receives, or may become eligible to receive, funds, or other benefits from a loan or an account in the event that the primary applicant and, if applicable, joint applicant pass away. | ||||
| None |
A None role indicates that an individual does not hold a role on the current application and/or associated non-loan products. This individual does not have any financial responsibility for the loan or account. An applicant can be assigned a role on an application and not have any association with the included product(s). For example, an applicant can be a Joint of Guarantor on a loan application and be assigned a role of None on the included product(s). An applicant can also be assigned a None role for the application and still be assigned a role on the included product(s). For example, an applicant can have a None role on an application, but still be assigned a role of Beneficiary on one or more account products.
|
|
System administrators have the ability to configure the order in which applicant types appear in an application, determine the applicant types that are included in application aggregate and risk calculations, if a TIN is required for the applicant type, or whether or not an applicant type automatically receives adverse action notifications. For more information, please see the Applicant Types topic in the Administrator Guide. |
This section provides an overview of the following functionality to modify an applicant’s type/role on an application as well as any account products associated with the application:
The Applicant Type and Applicant Roles fields provide an easy way to edit the applicant type or applicant role on an application when configured to appear within an Applicant or Application screen.
|
In order for these fields to display within the screen, the Applicant Type and/or Applicant Roles fields must be added to a panel configured to appear on the Applicant or Application screen by the system administrator in System Management > Origination > Screens. |
The Applicant Type field displays the applicant type assigned to the applicant and provides a drop-down list of the applicant types available to be assigned during the application process. This field defaults to the applicant type assigned when the application is created, but can be changed using the drop-down list.
To modify an applicant type, select an option from the list and click  within the screen to retain the changes.
|
The primary applicant type cannot be altered using this functionality, therefore the Applicant Types drop-down is disabled when the primary applicant is in context. For all other applicants, the drop-down is enabled, but does not include the option to select Primary. For more information on how to change or alter a primary applicant type within an application, please see the Make Primary section within this topic. |
Back to Editing Applicant Type/Role ^
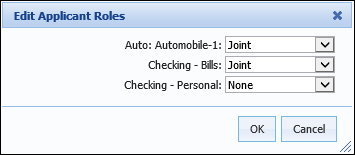
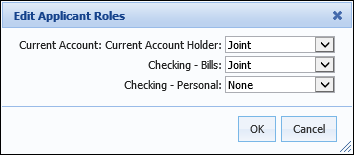
The Applicant Roles field displays an applicant’s role on an application, and any associated products, as well as provides the ability to modify an applicant's role. This field defaults to the role(s) assigned to the applicant when the application is created, but can be changed by clicking  .
.
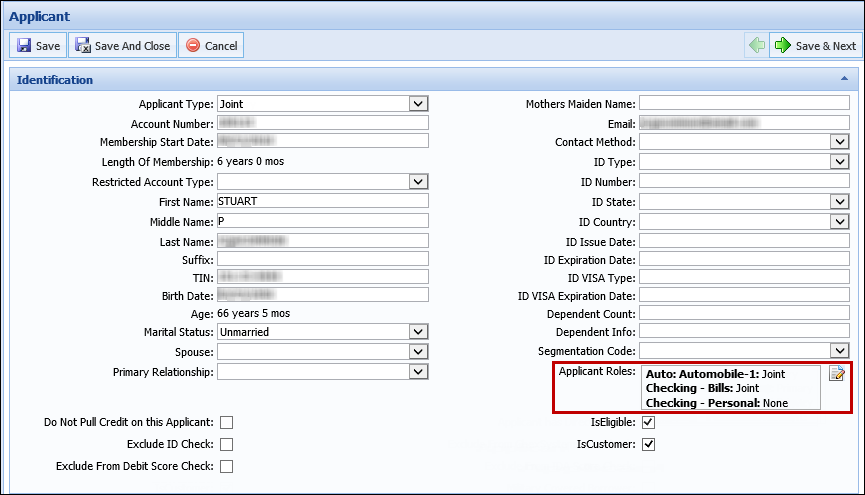
The following example displays how the Applicant Roles field appears within an account application:
Clicking opens the Edit Applicant Roles pop-up window. Use the drop-down lists to modify the applicant’s role on the application and/or each account product associated with the application. The drop-downs include all roles assigned to the sub-product and each account product by the system administrator.
|
Roles are assigned to the Sub-Product within the Table Entries tab in Loan Application Types and/or Account Application Types. Roles are assigned to each account product from System Management > Origination > Account > Account Products. |
|
The role of the Primary Applicant on an application cannot be altered using this functionality. If the applicant being edited is the Primary Applicant, the Edit Applicant Roles pop-up window opens when is selected, but the drop-downs are disabled. For all other applicants, the drop-downs are enabled, but do not include the option to select Primary. For more information on how to change to or alter a primary role within an application, please see the Make Primary section within this topic. |
Once all role modifications have been made, select OK. Click within the screen to retain the changes.
 |
Clicking OK within the Edit Applicant Roles pop-up window does not permanently retain the changes made. In order for the applicant role(s) to update within the application, the screen must be saved. |
Back to Editing Applicant Type/Role ^
Primary ownership of an application cannot be transferred using the Applicant Type or Applicant Roles field and can only be completed by clicking the  button within the Applicants Card View. Selecting the Applicants heading within the People, Products, and Collateral section of the application or the Applicants screen within the workflow or Screens list opens the Applicants Card View to enable this functionality.
|
For more information on the Applicants Card View, please see the Overview of Applicants Card View section in this topic. |
|
By default, the button is only enabled pre-decision; however, depending on configurations made by the system administrator, this button may also be enabled after an application has been decisioned.
Reference the following section for an overview of the configurations required to enable the Make Primary functionality post-decision:
In order for the
|
Within the toolbar in the Applicants Card View, click to transfer primary ownership of the application.
|
A TIN must always be provided for the Primary applicant. An error is received upon clicking if the TIN field is blank for the current applicant. If a TIN is not required for the current applicant type, the applicant cannot be made Primary on the application until a TIN is entered. |
A confirmation message appears to verify that the selected applicant should be made primary. Select Yes to transfer primary ownership of the application or No to cancel the transfer and return to the Applicants Card View.
|
If the applicant order is updated after an application has been decisioned, certain calculations in the application may be modified; therefore the confirmation message that appears to verify that the selected applicant should be made primary alerts users that they are about to change the applicant to primary after a decision has been made, which could render previously calculated aggregates, ratios, and indicators as inaccurate. Within the message, select Yes to transfer primary ownership of the application or No to cancel the transfer and return to the Applicants Card View. If desired, calculations can be re-run after the applicant order is updated on the application. |
|
With this functionality, the selected applicant becomes the Primary applicant on the application as well as all associated account products. The previous Primary applicant assumes the roles that were once assigned to the new Primary. For example, in the screenshot above, Marty McFly is the Joint applicant on the application and a Beneficiary on the checking account. When Marty is made Primary, Doc Brown is assigned the role of Joint on the application and becomes the Beneficiary on the checking account. |
Back to Editing Applicant Type/Role ^
When adding or editing an applicant, users are able to collect and enter applicant information within the corresponding panels and screens configured to appear in the sub-product application.
This section provides an overview of the panels and screens that can be used to collect the following applicant information:
|
In addition to entering information within the panels and screens reviewed in this section, the applicant information collection process also includes the ability to:
|
|
The panels and screens used to collect applicant information are configured by the system administrator in System Management > Origination > Screens. |
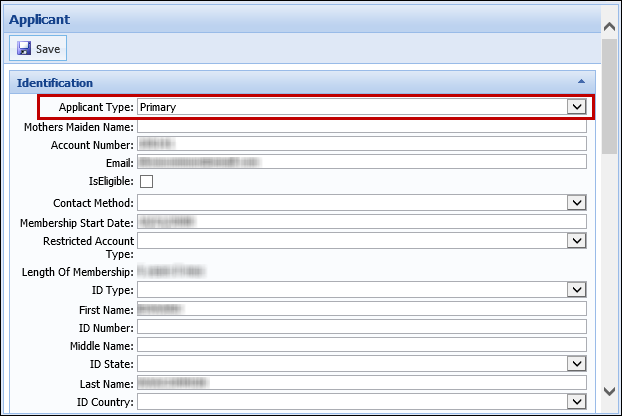
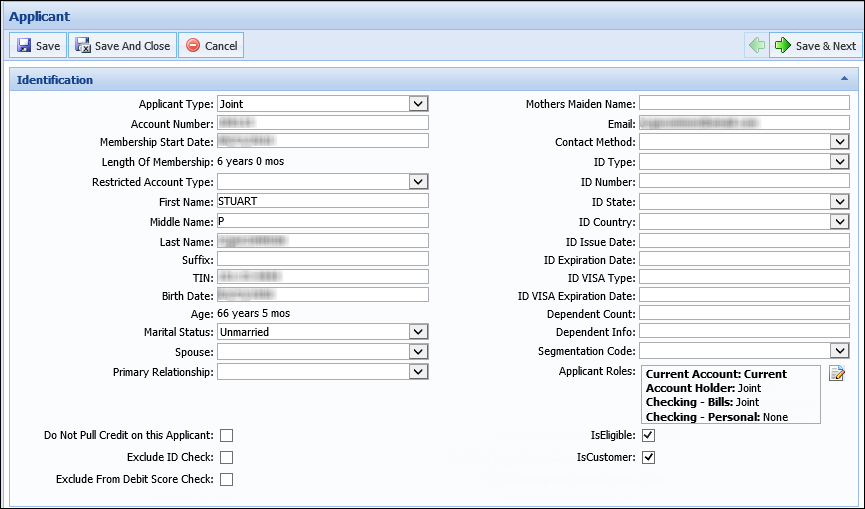
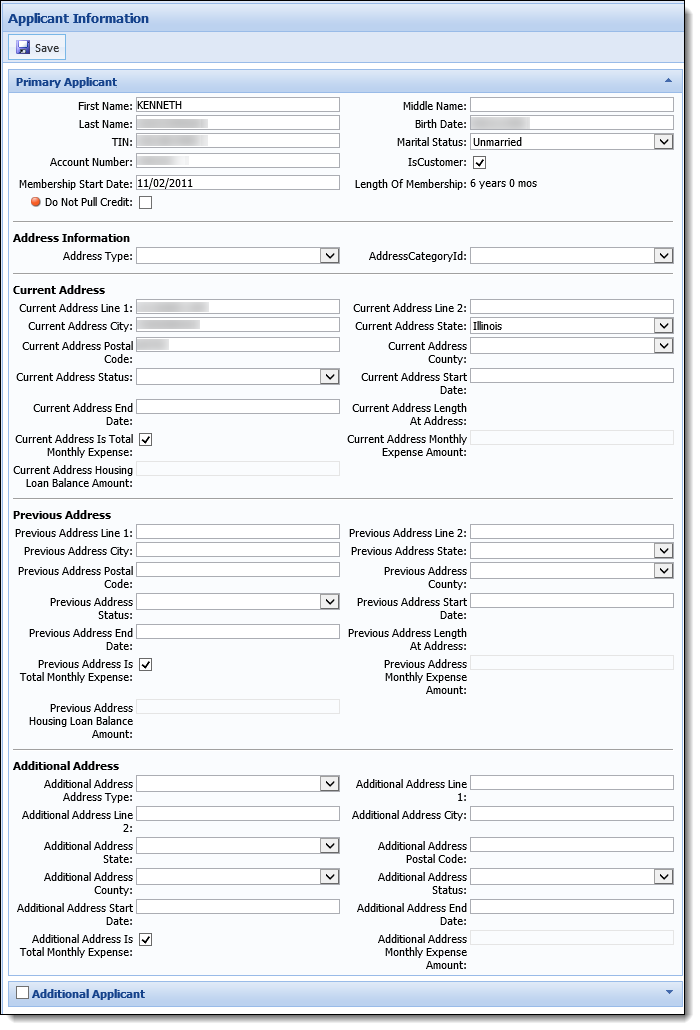
Users are able to input the information used to identify an applicant within the Identification panel. This information may include: Name, Tax ID Number, Birth Date, Marital Status, and Identification Type.
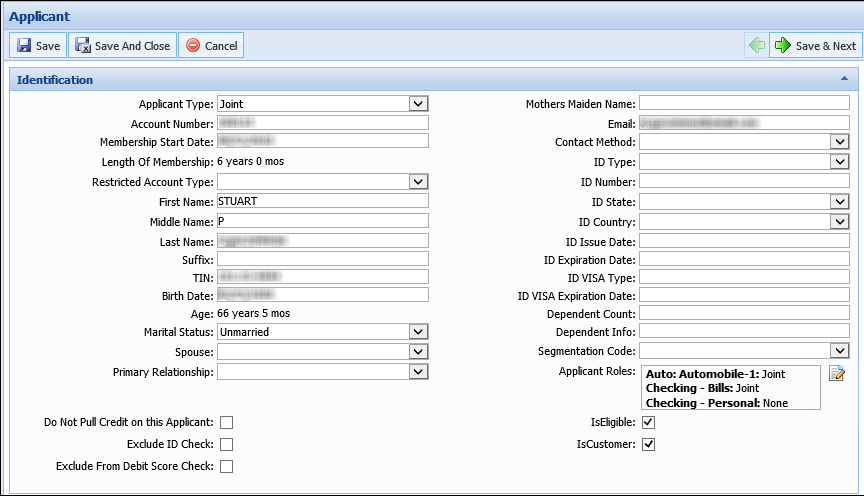
The following example displays how the Identification panel appears within an account application:

in the Screen toolbar to retain the identification information. Temenos Infinity supports the use of a ScanShell scanner to retrieve data from an applicant's Driver's License or Passport Card, and populate the data within the corresponding Applicant fields in an application.
|
In order to use this functionality, a windows form application exe must be installed on the machine being used for the ID scan. For information on the configurations required to use a ScanShell scanner, please see the ScanShell Data Import topic in the Administrator guide. |
|
Driver's License and Passport Cards are the only ID Types supported by ScanShell.
|
When the ScanShell functionality is active, administrators can add a Scan ID button to an Applicant screen, which provides the ability to call the ScanShell scanner during the application process.
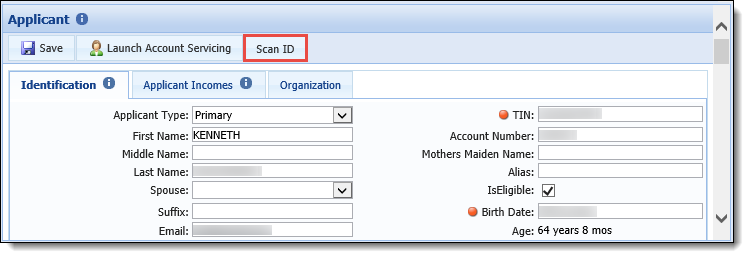
To begin the scanning process, place the applicant's ID on the scanner at the branch. Click Scan ID in the screen to initiate the scanning process in the application.
|
The ID is scanned automatically upon clicking Scan ID. If an ID is not on the scanner when Scan ID is clicked, the scanning process does not begin. |
Once initiated, a message appears in the workspace to identify that scanning is in progress.
Upon completion of the scan, the following information is imported from the ID, and populated within the corresponding Applicant fields in the application:
The following occurs when data populates in the application:
|
Information from the ID automatically appears in the Applicant screen; however, the workspace must be refreshed for the information to populate in different areas of the application, such as the Application Navigator. |
|
If the ID is expired, or of an unsupported type, an error is received that the ID could not be processed. |
|
Temenos is not able to determine if there are problems with the ScanShell device; however, if any errors occur during the scanning process, the information can be reviewed in the Error Log on the institution's server.
|
In addition to values populating from the ID, after a scan is complete, a front and back image of the ID is attached to the application.
|
The system is unable to determine if an image is unreadable or blurry. If this occurs, it is the responsibility of the financial institution to re-scan the image. |
Images from the ScanShell process are added to the Application Documents window with the following values:
|
After an ID Scan, when a subsequent application is created for the applicant, the system pulls Applicant data from the core for Name, Address and Birth Date, but populates the application with the ID Type, ID Number, ID State, ID Expire Date, and ID Issue Date values from the ID Scan performed in the previous application. |
Back to Applicant Information ^
The Eligibility panel can be configured by the system administrator to include a series of questions that are used to determine if an applicant is eligible to become an account holder at the financial institution. This panel can be configured to appear within an Applicant screen assigned to the workflow model to provide users with the ability to assist an applicant with becoming an account holder, while simultaneously working through the application process.
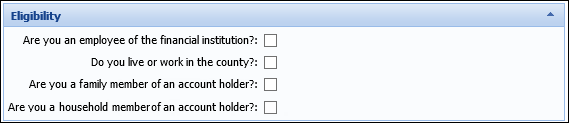
To determine eligibility, review the eligibility questions with the applicant and select the check box next to each question that applies to the applicant.
Applicant eligibility can be set manually by selecting the IsEligible check box or automatically through a business rule configured by the system administrator.
|
In order for applicant eligibility to be set manually, the IsEligible field must be configured to appear within the panel by the system administrator in System Management > Origination > Screens. |
|
For more information on panel and rule configuration for Applicant Eligibility, please see the Applicant Eligibility topic in the Administrator guide. |
If an applicant is not eligible to become an account holder, a validation error is received at time of disbursement that prevents the application process from continuing.
Back to Applicant Information ^
The Applicant Addresses panel is used to capture an Applicant’s address information. The Applicant Addresses panel contains a grid that displays the addresses provided for the applicant and enables the ability to add, edit, and delete addresses from an application.

A toolbar is located above the Applicant Addresses grid that allows users perform the following actions:
| Button | Description | ||
 |
Allows a user to input an applicant address in the application. | ||
 |
Allows a user to edit an applicant address previously entered in the application. | ||
 |
Allows a user to remove an applicant address from the application. | ||
 |
Allows a user to copy the address of the Primary Applicant and assign it to an additional applicant.
|
The Add function allows users to manually input an applicant’s address that was not pre-populated by the Loan or Account Origination modules or core.
To add an address, click within the Address toolbar to open the Applicant Address screen in a new window. Enter the address information in the corresponding fields. Be certain to complete all required fields.
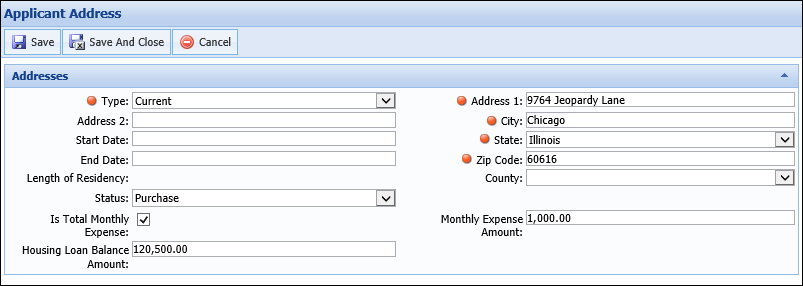
Within the Status field, identify whether the address is classified as:
| Status | Description | ||
| Living with others | Indicates the applicant is living with one or more individuals, but is not named on the mortgage or lease as a responsible party. If an applicant is living with others, he or she may be responsible to pay a Monthly Expense in exchange for lodging. | ||
| Own |
Indicates the applicant owns the property outright and no Monthly Expense is paid on the property.
|
||
| Purchase |
Indicates the applicant address currently has an open mortgage and is a being purchased by the applicant.
|
||
| Rent |
Indicates the applicant address is a rental property where the applicant is named on the lease and pays a Monthly Expense. |
||
| Other | Indicates another living arrangement not classified by one of the aforementioned options. |
|
Selections made in the Status field affect the editability of the following fields:
|
 Applicant Housing Expense Amounts
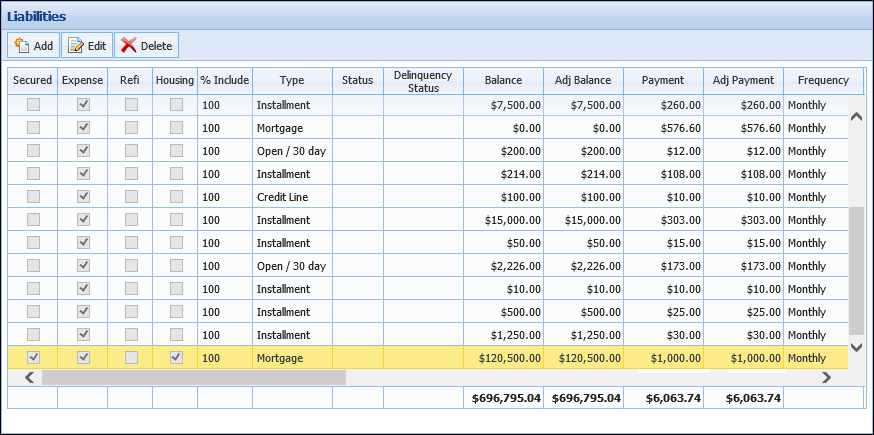
If multiple applicants share the same address, the Monthly Expense and Housing Loan Balance amounts can be assigned to one applicant or split among all applicants.
If the same address is shared by multiple applicants, during decision processing, the Loan or Account Origination modules validate the values provided in the Status, Monthly Expense Amount and Housing Loan Balance Amount fields. The Is Total Monthly Expense check box indicates that the monthly housing expense is shared equally among applicants.
|
Institutions are able to default selection of the Is Total Monthly Expense field through the Direct Total Monthly Expense Default and Indirect Total Monthly Expense Default solution parameters, located on the System tab in System Management > Modules > Origination. |
If the Is Total Monthly Expense Amount field is not selected, users are able to update the Monthly Expense Amount. To modify a monthly expense amount, users are able to update the Monthly Expense Amount field for each applicant or update each applicant's Percentage Responsible for the housing liability. Upon updating the Percentage Responsible field, the Loan or Account Origination modules calculate the Monthly Expense Amount. Once the Monthly Expense Amount field is updated, the Loan or Account Origination modules calculate the Percentage Responsible.
|
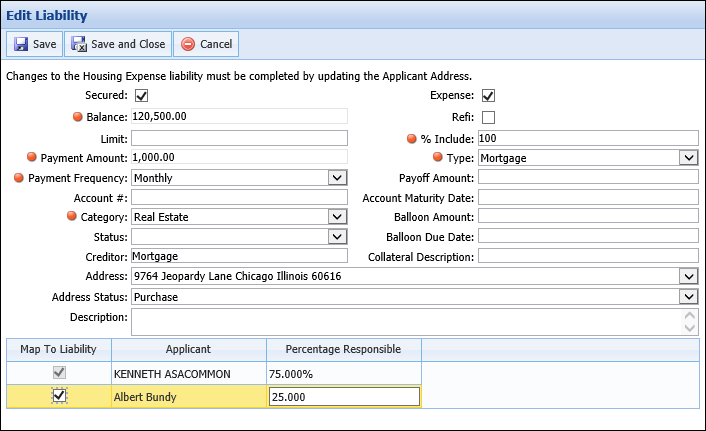
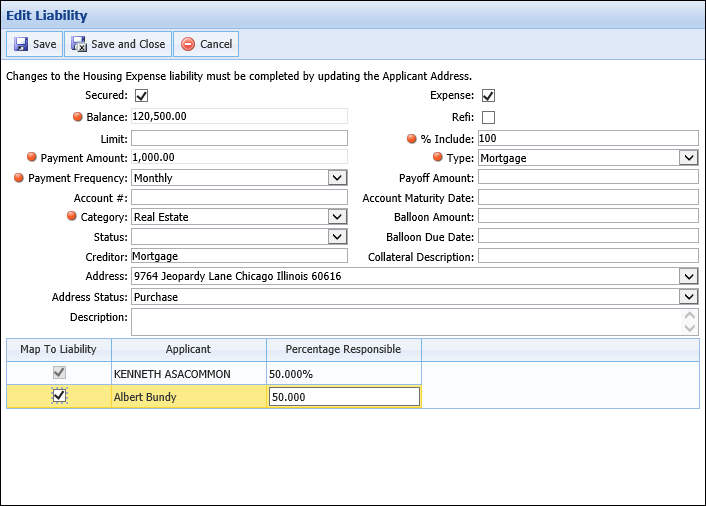
For example, Ken and Albert are joint owners of a property with a $1000.00 mortgage payment. Ken is responsible for paying $750 and Albert is responsible for the remaining $250.
Upon initially adding the address, the Is Total Monthly Expense check box is selected and the financial responsibility is split equally. The user navigates to the Liabilities screen, selects the Housing Liability, and updates the percentage responsible to Ken 75% and Albert 25%.
The user then saves the liability and navigates back to the applicant screen. Ken's Monthly Expense Amount is now $750.
|
|
If an incorrect address expense amount was entered on a screen where primary and joint applicants appear on separate screens, users are unable to update the amount if the Is Total Monthly Expense fields. A system validation prevents this field from being cleared on an applicant if the check box is selected on another applicant. To update the amount, navigate to the Liabilities screen and update housing liability's Percentage Responsible. Once updated, the Is Total Monthly Expense field becomes unselected and users are then able to update the Monthly Expense Amount.
If the primary and joint applicants appear on the same screen, users are able update the address amounts because the screen does not have to be saved in between applicant address modifications. If no save occurs, validations are not processed. |
Once all fields are complete, click  to retain the address information and return to the application.
The new address information appears within the Applicant Addresses grid.
|
Saving an address does not clear the form. A user must manually clear the screen to enter another address. |
|
If a user is adding multiple addresses, the user must close out the Applicant Address screen after each save. If the screen is not closed, the new address overwrites the previously entered address. |
The Edit function allows users to update an address that has been provided by the user or pre-populated by the core or Loan or Account Origination modules.
. to retain the updated address information and return to the application.The Delete function allows users to remove an address that has been provided by the user or pre-populated by the core or Loan or Account Origination modules.
. |
When a current address record is added for an applicant, a housing expense liability is created and linked to that address. If any modifications are made to an address, there may be adverse reactions. For example, if the Address Status is changed from Mortgage to Rent, or Live with Others, the mortgage tradeline from the credit report is removed from the Liabilities screen. The only way to break a link between an address and housing expense liability is to delete the address record from the application; therefore, if a modification to the Address Status is required, it is highly recommended that the existing address is deleted, and a new address with the correct status is added for the applicant. Additionally, when an address is a housing liability, and not associated with the core or a tradeline, if any address field changes for the liability record, the existing liability is deleted and a new liability is created. Since it is now a new address record, % to Include defaults to 100% for the liability. |
Depending on screen configurations made by the system administrator, in addition to the Addresses panel, users may also have the ability to enter information for an applicant's current, previous, and additional addresses within a Primary and/or Additional Applicant panel on an Application screen.
|
When Previous Address and Additional Address fields are configured to appear within the Primary and/or Additional Applicant panels, the following behavior occurs for the Address Type field:
|
Back to Applicant Information ^
The Applicant Phones panel is used to capture an applicant’s phone number information. The Applicant Phones panel contains a grid that displays the phone numbers provided for the applicant and enables the ability to add, edit, and delete phone information from an application.
A toolbar is located above the Applicant Phones grid that allows users perform the following actions:
| Button | Description |
|
Allows a user to input an applicant phone number in the application. |
|
Allows a user to modify an applicant phone number previously entered in the application. |
|
Allows a user to remove an applicant phone number from the application. |
The Add function allows users to manually input an applicant’s phone number that was not pre-populated by the Loan or Account Origination modules or core.
To add a phone number for an applicant, click within the Applicant Phones toolbar to open the Applicant Phone screen in a new window.
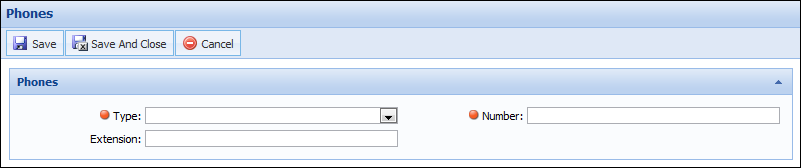
Enter all required phone number information in the corresponding fields. Be certain to complete any required fields.
Once all fields are complete, click to retain the phone number information and return to the application.
The new phone information appears within the Applicant Phones grid.
|
Saving a phone number does not clear the form. A user must manually clear the screen to enter another phone number. |
|
If adding multiple phone numbers, the Applicant Phone screen must be closed after each save. If the screen is not closed, the new phone number overwrites the previously entered phone number. |
The Edit function allows users to update a phone number that has been provided by the user or pre-populated by the core or Loan or Account Origination modules. Clicking Edit from the Applicant Phones toolbar opens the Applicant Phone screen in a new window.
. to retain the updated phone information and return to the application.The Delete function allows users to remove a phone number that has been provided by the user or pre-populated by the core or Loan or Account Origination modules.
.Back to Applicant Information ^
The Loan or Account Origination modules provide three panels that enable the ability to capture an applicant's income and employment information. Depending on the type of screen created, the Applicant Incomes, Primary Applicant Income or Additional Applicant Income panel can be configured to appear on a screen to capture and display this information.
The Applicant Incomes panel is used to capture a primary and/or additional applicant’s income and employment information within an Applicant screen. This panel contains a grid that displays the income and employment information provided for the applicant and enables the ability to add, edit, and delete this information from an application.

A toolbar is located above the Applicant Incomes grid that allows users perform the following actions:
| Button | Description |
|
Allows a user to input applicant income and employment information in the application. |
|
Allows a user to edit applicant income and employment information previously entered in the application. |
|
Allows a user to remove applicant income and employment information from the application. |
Adding Income and Employment Information
The Add function allows users to manually input an applicant’s income and employment information that was not pre-populated by the Loan or Account Origination modules or Core. Clicking within the Applicant Incomes toolbar opens the Applicant Income screen in a new window.
Enter all required income and employment information in the corresponding fields. Be certain to complete any required fields.
|
The fields within the Applicant Income screen are defined by the system administrator in System Management>Origination > Screens. |

|
If not manually updated, the % To Apply field defaults to 100, which denotes that 100% of the income is to be included in the application. |
|
In order for Employer Address information to save, Address Line 1 must be completed. Failure to input Address Line 1 results in the deletion of Employer City, State, and Zip Code data. |
Once all income and employment information is complete, click to retain the information and return to the application. The information populates in the Applicant Incomes grid.
|
Saving income and employment information does not clear the form. A user must manually clear the screen to enter a different income and employment record. |
Editing Income and Employment Information
The Edit function allows users to update income and employment information that has been provided by the user or pre-populated by the core or Loan or Account Origination modules.
. to retain the information and return to the application. The information populates in the Applicant Incomes grid.Deleting Income and Employment Information
The Delete function allows users to remove income and employment information that has been provided by the user or pre-populated by the core or Loan or Account Origination modules.
.Back to Applicant Information ^
The Primary and Additional Applicant Income panels are used to capture income and employment information within an Application screen. This panel allows users to add, edit, and delete employment and income information directly within the grid without navigating to another screen.
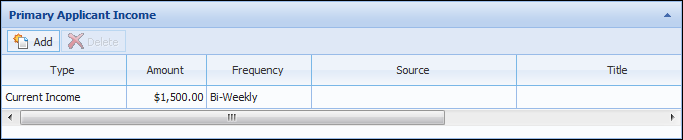
Adding Income and Employment Information
to insert a row. in the Screen toolbar to retain the income and employment information.
The Amount field is not required for completion or validated upon clicking
Editing Income and Employment Information
When an income record has been added to the grid in the Applicant Income panel, users are able to modify the information directly within the grid.
in the Screen toolbar to retain the income and employment information.
The Amount field is not required for completion or validated upon clicking
Deleting Income and Employment Information
.Back to Applicant Information ^
The Declarations panel displays a list of questions a user must ask an applicant to gather miscellaneous background and financial information pertinent to the application. The questions listed within the grid are custom to each institution and defined with the assistance of Temenos Professional Services or Customer Care.
|
The Description column can be customized to include a description up to 2000 characters. |
Users have the ability to add a custom Explanation if an affirmative answer is given by the applicant.
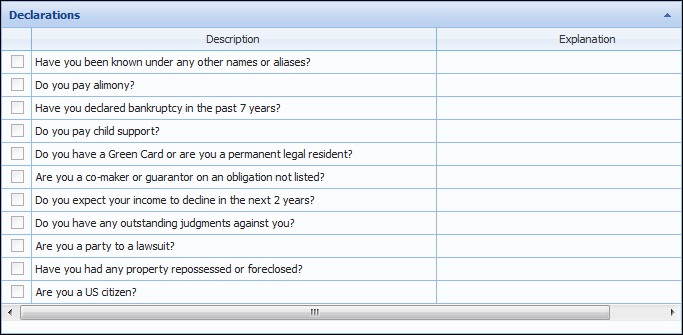
in the Screen toolbar to retain the answers. Back to Applicant Information ^
Based on the Editability assigned by the system administrator, users may be able to update applicant information throughout various stages of the application process. This section provides an overview of the following applicant actions that can be performed within an application:
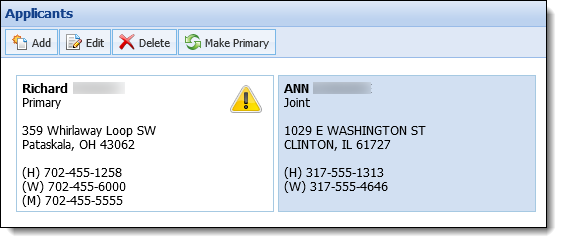
When the Applicants heading is selected within the Application Navigator or the Applicants screen is selected within a workflow or the Screens List, the Applicants Card View appears displaying all applicants related to the application.
|
For more information on these areas of the application, please see the Application Workspace topic within this guide. |
The Applicants Card View provides an overview of information specific to each applicant as well as enables users to perform various applicant actions throughout the application process.

This screen displays a card for each applicant including the following information:
|
If a notification specific to an applicant is available, a  displays within the applicant’s card. The notification can be viewed within the Notifications tab in the Application Navigator. displays within the applicant’s card. The notification can be viewed within the Notifications tab in the Application Navigator.
For more information on the Notifications tab, see the Application Navigator section of the Application Workspace topic within this guide. |
A toolbar is located at the top of the screen that enables the ability to perform the following actions:
| Icon | Description | ||
 |
Allows a user to add an additional applicant to the current application. | ||
 |
Allows a user to edit an applicant that is assigned to the current application | ||
 |
Allows a user to remove an applicant from the current application. | ||
 |
Allows a user to transfer the ownership of an application by making a Joint applicant the Primary owner.
|
The Loan or Account Origination modules allow applicants to be added to an application from multiple areas within the workspace. This section provides an overview of the methods and processes available for adding an applicant.
|
If the OFAC connector is active, an OFAC search executes when an applicant is added to an application, unless the Exclude From OFAC Check check box is selected. By default, when the Is Customer flag is set to true for the primary and/or joint applicant(s), the Exclude From OFAC field is automatically set to true for those applicants in the application. For more information, please see the OFAC Connector Guide. |
When adding applicants to an application, users are able to add both existing account holders as well as non-account holders.
Applicants can be added from the following sections within the Application Navigator:
Depending on the configuration of the workflow model, the Workflow may contain the option to add an Applicant if configured to include an Applicants screen. Selecting the Applicants screen within a workflow opens the Applicants Card View to provide the ability to add an applicant to the application.
The following example displays how the Workflow may appear within an account application:

|
The Applicants screen must be assigned to the workflow model mapped to the sub-product in order to appear within the workflow. |
Back to Add Applicant Methods ^
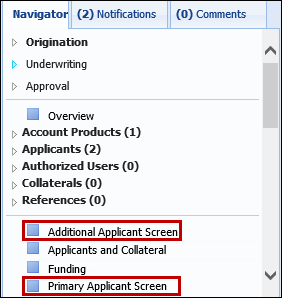
Depending on the configuration of the workflow model, the Screens List in the Application Navigator may contain a screen that allows users to add and identify an applicant. Selecting the Applicants screen within the Screens list opens the Applicants Card View to enable the ability to add an applicant to the application.
The following example displays how the Screens List may appear within an account application:
|
The Applicants screen must be assigned to the Workflow Model mapped to the sub-product in order to appear within the Screens List. |
Back to Add Applicant Methods ^
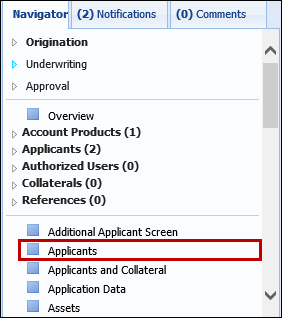
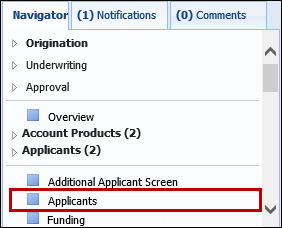
When applicants are added to an application, their records appear in the People, Products, and Collateral section of the Application Navigator for easy access. Each applicant record is added to the Applicants list located beneath the Workflow. A number corresponding to the amount of applicants assigned to the application displays next to the Applicants heading.
|
An Applicant screen must be assigned to the Workflow Model mapped to the sub-product in order for the Applicants list to appear within the Application Navigator. |
From the People, Products, and Collateral section, there are two methods to add applicants:

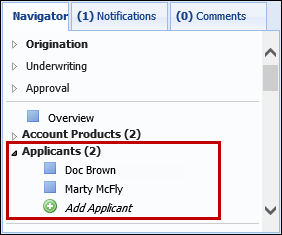
Selecting the Applicants heading opens the Applicants Card View to provide the ability to add an applicant to the application.
Selecting  automatically prompts the Add Applicant window to open to directly enter the applicant’s information.
Back to Add Applicant Methods ^
When an Applicant is added from a Workflow, the Screens List or by selecting the Applicants heading within the Application Navigator, the Applicants Card View appears displaying all applicants related to the application.
To add an applicant to an application click .
|
For more information on this screen, please see the Overview of Applicants Card View section within this topic. |
Back to Add Applicant Methods ^
Using the aforementioned methods, applicants can be added from the following locations:
The Primary Applicant panel provides the ability to manually add a primary applicant to an application within screens and workflow screens. For example, if all applicants are deleted from the Applicants Card View, a primary applicant can be manually added to an application by entering data within the fields in this panel.
|
A TIN must always be provided for the Primary applicant; therefore, a value must be entered within the TIN field on the Primary Applicant panel or an error is received upon trying to save the screen. |
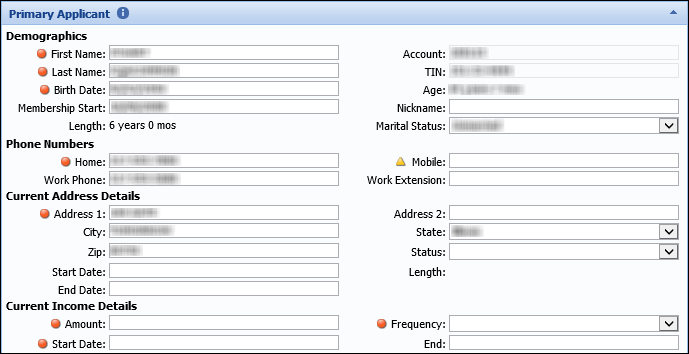
to retain the information. The primary applicant is added to the application and appears within the Application Navigator.
To add a primary applicant using this process, update all necessary fields within the panel and click to retain the information. The primary applicant is updated within the Applicants list in the Application Navigator.
Back to Add Applicant Processes ^
The Additional Applicant panel allows users to add subsequent applicants to an application within screens and workflow screens.
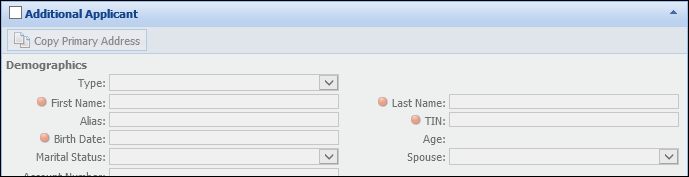
To add an applicant from this panel, select the checkbox within the panel header. Selecting this check box opens the Add Applicant window to enter the applicant’s information.
In addition to the aforementioned process, users are able to manually add applicant data within the fields in the Additional Applicant panel.
|
If the TIN field is configured as a required field on the Additional Applicant panel, a TIN must be entered for the applicant in order to save the screen, regardless of whether a TIN is required for the applicant type. If the TIN field is not configured as a required field on the panel, but a TIN is required for the applicant type, then a TIN must be entered for the applicant in order to save the screen. |
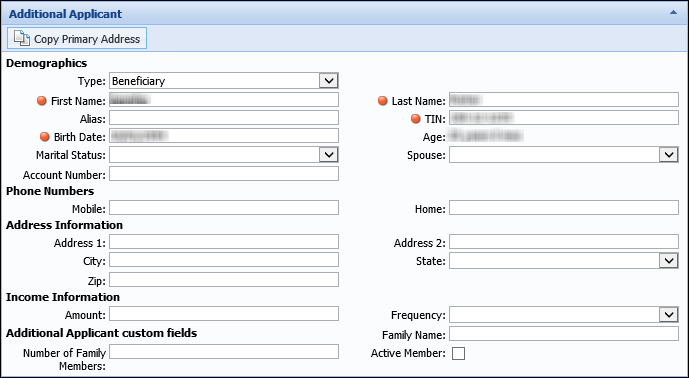
Once the applicant information is entered, click to retain the information. The additional applicant is added to the application and appears within the Applicants list in the Application Navigator.
|
Only a single joint applicant can be added to an application using the fields within the Additional Applicant panel. Attempting to add subsequent applicants using this process overwrites the previously added joint applicant. |
Back to Add Applicant Processes ^
The Add Applicant window appears when the following actions are performed:
within the Applicants Card View. within the Application Navigator.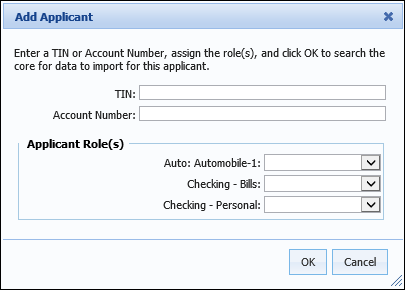
The following example displays how the Add Applicant window appears within an account application:
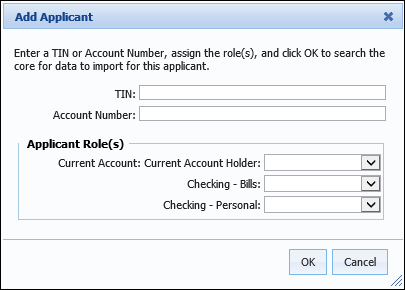
Enter a TIN and/or Account Number for the applicant and identify the applicant’s role on the application and/or any associated products by selecting an option from the Applicant Role(s) drop-down list(s). The drop-downs include all roles assigned to the sub-product and each account product by the system administrator.
|
Roles are assigned to the Sub-Product within the Table Entries tab in Loan Application Types and/or Account Application Types. Roles are assigned to each account product from System Management > Origination > Account > Account Products. |
Once all applicant information has been added, click OK.
|
If the selected applicant type for the application is configured to require a TIN by the system administrator in System Management > Origination > Applicant Types, a value must be entered within the TIN or Account Number field in the Add Applicant window. If a value is not provided, an error message is received upon clicking OK to inform that an Account Number or TIN is required. If a TIN is NOT required for the applicant type, a TIN or Account Number does not need to be entered within the Add Applicant window and the user is able to proceed with adding the applicant upon clicking OK. |
When adding an applicant to an application, the system performs an automatic search for existing information from the core as well as prior applications to determine if the applicant is an existing account holder or a non-account holder.
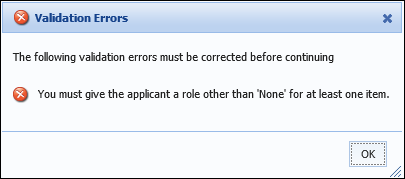
|
While "None" may be an available application type, an applicant cannot be assigned a "None" role on the application as well as each account product. Every applicant must have a role on at least one item or the following error is received:
|
If adding an existing account holder, the system retrieves the account holder data and populates the applicant record in the application.
|
Users are able to manually update the information within the Applicants screen. For more information, see Editing Applicants. |
If the applicant exists on multiple accounts or is not primary on an account, users are prompted to select the account from which their data is retrieved.
|
When a TIN is entered to add an applicant, the system returns all records for the applicant that are related to the TIN. When an account number is entered to add an applicant, all records related to the account number are returned, including those for Joint applicants related to the account. |
From the Select Data To Create Applicant pop-up window, select the Use data from below radio button and choose the account containing the correct applicant information. Click OK to add the selected applicant to the application.
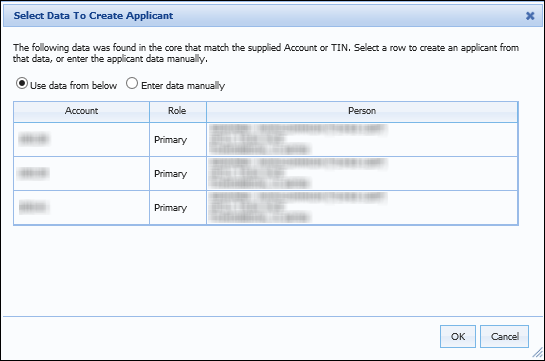
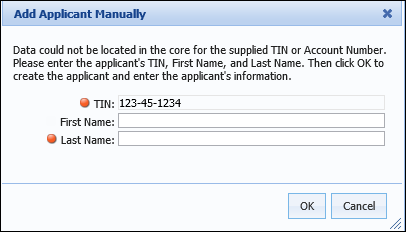
The option to manually add applicant information is also available by selecting the Enter data manually radio button. Clicking OK opens the Add Applicant Manually pop-up window.
If the selected applicant type requires a TIN, the TIN field pre-populates with the number provided within the Add Applicant window. Enter the applicant's First Name and/or Last Name within the fields that display and click OK to create the applicant record in the application.
|
If the applicant type selected within the Add Applicant window is configured to require a TIN by the system administrator in System Management > Origination > Applicant Types, a  icon appears next to the TIN field, as shown in the example below, and a TIN must be provided to add the applicant to the application. If the applicant type does not require a TIN, the TIN field is not marked as required and the applicant can be added with only a First and/or Last Name. icon appears next to the TIN field, as shown in the example below, and a TIN must be provided to add the applicant to the application. If the applicant type does not require a TIN, the TIN field is not marked as required and the applicant can be added with only a First and/or Last Name.
|
Once the applicant record is created, users may begin adding the applicant information.
|
To learn more about the applicant information that can be added to an application, please see the Applicant Information section within this topic. |
If adding a non-account holder, the Add Applicant Manually pop-up appears upon clicking OK in the Add Applicant window to manually enter the applicant information.
If the selected applicant type requires a TIN, the TIN field pre-populates with the number provided within the Add Applicant window.
|
If a TIN is not required for the applicant type, the icon does not appear next to the TIN field and a blank value populates for the TIN in the Add Applicant Manually window. |
Enter the applicant's First Name and/or Last Name within the fields that display and click OK.
Once OK is selected, the application is considered to be in progress and a new tab opens on the desktop for the application. The application process then begins. This process is described throughout this document in the Application Navigation and Application Processing sections.
An applicant record is created in the application with the First Name, Last Name, and, if required, the TIN of the applicant. Once the applicant record is created, users may begin adding the applicant information.
|
An applicant's eligibility is determined within a custom Eligibility panel that can be configured to appear in an Applicant screen by the system administrator. If the Eligibility panel includes the IsEligible field, applicant eligibility can be set manually by selecting the IsEligible check box, or it can be set automatically through a business rule authored by the system administrator.
For more information, please see Eligibility within the Applicant Information section of this topic. |
|
To learn more about the applicant information that can be added to an application, please see the Applicant Information section within this topic. |
Back to Add Applicant Processes ^
When processing an application, users are able to revisit the applicant in order to edit information that was previously provided.
Applicant information can be modified from the following sections within the Application Navigator:
|
If the OFAC connector is active, the Loan or Account Origination modules execute an OFAC search if an applicant's first or last name is changed, unless the Exclude from OFAC Check check box is selected. For more information, please see the OFAC Connector Guide. |
To edit applicant information from the workflow within the Application Navigator:
The following example displays how the Workflow may appear within an account application:
 from the Workflow toolbar until the desired applicant’s screen is active.
In order for to navigate to an applicant, the Origination stage must be active.
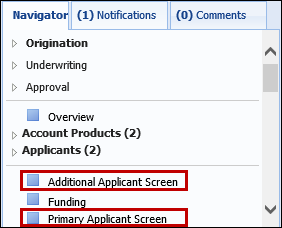
to retain the changes.To edit applicant information from the Screens List in the Application Navigator:
The following example displays how the Screens List may appear within an account application:
to retain the changes.To edit applicant information from the People, Products, and Collateral section in the Application Navigator:
to retain the changes.When the Applicants heading is selected within the Application Navigator or the Applicants screen is selected within a workflow or the Screens List, the Applicants Card View appears displaying all applicants related to the application.
To edit information for an applicant, double-click on the desired applicant or highlight the applicant and select .
The Applicant screen opens to make any necessary modifications. After all changes have been made, click to retain the updated applicant information.
|
If more than two applicants are on the application, this is the recommended method to use to edit applicant information. |
To delete an applicant, select the Applicants heading within the People, Products, and Collateral section of the Application Navigator to open the Applicants Card View. Highlight the applicant record to be removed and click .
A confirmation message appears to confirm whether the selected applicant should be deleted. Select Yes to remove the applicant from the application or No to retain the applicant and return to the Applicants Card View.
|
The Primary Applicant on an application cannot be deleted. When the primary applicant is highlighted within the Applicants Card View, is disabled. |
Depending on an Application Screen's configuration, users may be able to open a workspace to check if the applicant has any records in Account Servicing. To search the Account Servicing modules for applicant records, click  .
.
|
This button is only available to institutions that have active Origination and Account Servicing modules. Additionally, the button is disabled if any of the following scenarios are true:
|
Upon clicking the system uses the applicant's TIN to search the Account Servicing modules for a matching TIN. If a match is found, a person workspace opens for the first matching person returned in the results.
|
If a person is not found in the Account Servicing modules, the system displays a message that indicates no matching person was found in Account Servicing. |