
Temenos Lifecycle Management Suite - Origination Product Guide
Authorized Users
| End-User Guide > Application Processing > Origination > Authorized Users |
An Authorized User is not typical for all loan sub-products and may not be eligible to be added to a loan application.
When adding account holders and non-account holders to an application, the system retrieves and populates existing information from the core and prior applications.
 |
Multiple authorized users can be added to a loan application. |
The following methods can be used to add authorized users to a loan application:
Depending on the configuration of the workflow model, the Workflow may contain the option to add an Authorized User. Upon navigating to the Authorized User screen, users are able to identify the Authorized User to be added to the loan application. For more information on identifying the authorized user, refer to the Authorized User Information section.
|
An Authorized User panel may be added to any user-defined screen in a workflow. |
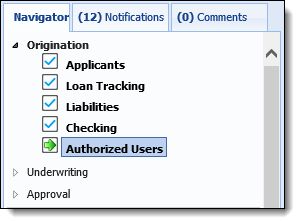
Depending on the configuration of the workflow model, the Application Navigator may contain a screen that allows users to add and identify an authorized user. Upon selecting the Authorized User screen, users are able to identify the authorized user to be added to the loan application.
|
An authorized user panel may be added to any user-defined screen. |
For more information on identifying the authorized user, refer to the Authorized User Information topic.
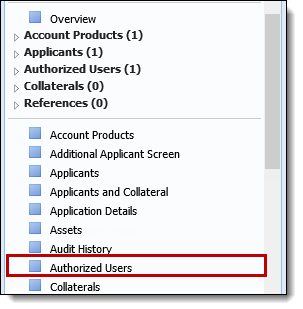
 Application Navigator - Authorized User Section
When authorized users are added to an application, their records appear in the Application Navigator for easy access. Each authorized user record is added to the authorized user list located beneath the Workflow. If multiple authorized users are assigned to the application, a number corresponding to the amount of authorized users displays next to the Authorized Users heading.
|
For the Authorized Users Section to be available, an Authorized User screen must be mapped to the Workflow Model. |
In addition to displaying the list of authorized users, the Authorizer Users Section allows users to Add, Edit, and Delete authorized users.
There are two methods to add authorized users:

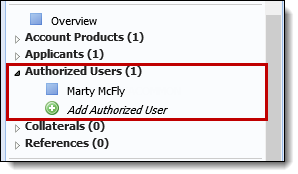
Authorized Users are able to be added to a loan application by clicking within the Application Navigator. The Add Authorized User option is located beneath the Workflow section and indexed under Authorized Users.
Clicking opens the Add Authorized Users screen in a new window.
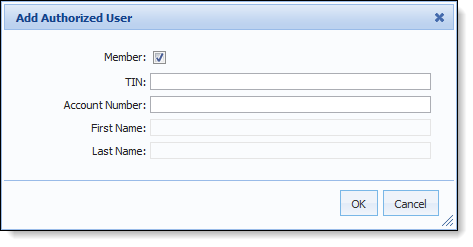
In the Add Authorized User screen, identify if the authorized user is a Member and enter the corresponding identifiers. Click OK to add the desired authorized user. When an authorized user is selected, users are able to input the authorized user’s information. For more information, see the Authorized User Information section.
Selecting the Authorized Users heading navigates users to the Authorized Users screen.
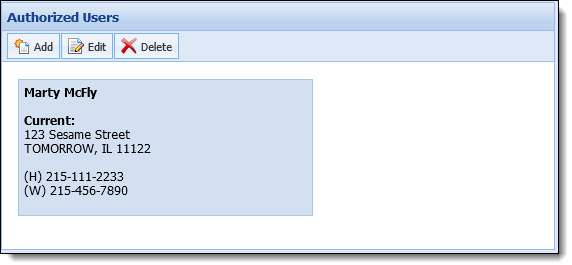
A toolbar is located at the top of the Authorized User screen that allows users to perform the following actions:
| Icon | Description |
 |
Allows a user to add an authorized user to the current application. |
 |
Allows a user to edit an authorized user that is assigned to the current application. |
 |
Allows a user to remove an authorized user from the current application. |
In the Add Authorized User screen, identify if the authorized user is a Member and enter the corresponding information. Click OK to add the desired authorized user.
Upon creating an authorized user, users are able to identify the authorized user. For more information on identifying an authorized user, see the Authorized User Information section.
When processing an application, users are able to edit authorized users’ information.
|
The editability of authorized users can be restricted according to the application’s status. For more information on Editability, see the Administrator Guide. |
If all of the authorized users have been added to an application by navigating the assigned Workflow, users are able to click  within the Workflow toolbar until the authorized user screen is active.
|
In order for to navigate users to the Authorized User screen, the Workflow Stage that contains the authorized user must be the active stage. |
Users are also able to manually select the specific screen from the Workflow to access the authorized user screen.
to make the desired modifications. Once all changes are complete, save the screen.The Authorized Users section contains an itemized list of the authorized users associated with an application. Select the desired authorized user's name to edit the information.
When the desired authorized user’s screen is the active screen, make the necessary modifications. Once all changes are complete, save the screen.
In addition to selecting the specific authorized user from the list, users are also able to access the Authorized User screen by clicking the Authorized Users grouping. Selecting the Authorized Users heading opens the Authorized User screen. Users are able to edit an authorized user’s information by double-clicking the desired authorized user or highlighting the desired authorized user and clicking Edit.
When the authorized user screen is the active screen, make the desired modifications. Once all changes are complete, save the screen.
While processing an application, users are able to remove an authorized user from the application. Users are able to remove an authorized user from an application by selecting the Authorized User screen or Authorized Users section.
. within the Authorized Users toolbar.