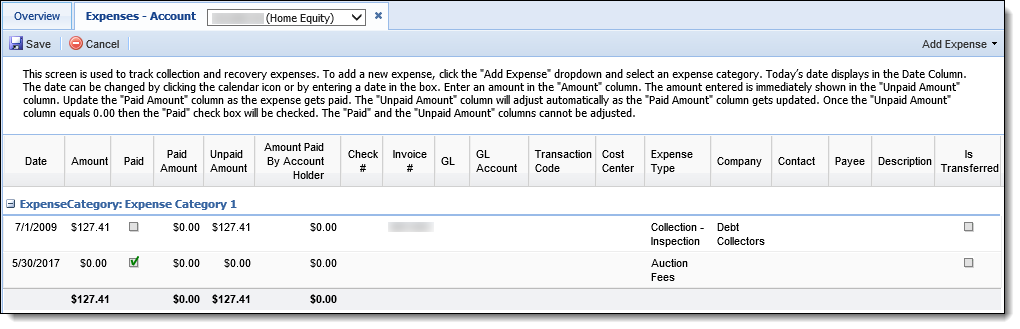
Within the Expenses screen, collection and recovery expenses can be manually entered for the account in context. By default, expenses are grouped by category, with the newest expense within each category appearing last. Once entered, each expense is listed as a row within the grid, with columns designating various fields of information.
From this screen, users can perform the following actions:
 |
In order for a user to add and update expenses within the Expenses screen, the Edit Expenses permission must be set to Change for the user or security group within the Permissions tab in System Management > Users, or System Management > Groups > Security Groups. If the permission is set to None, the toolbar is not available, and the screen displays as read-only in the workspace.
|
Adding Expenses
 |
Once an expense has been added, it cannot be deleted. |
To track a new expense within Temenos Infinity, click the Add Expense drop-down to select an expense category.
|
Expense categories are defined in the database by a Temenos Customer Care Representative or Project Manager. |
Once an expense category is selected, a new row is added to the grid and information can be entered within the following columns:
| Column Name |
Description |
| Date |
Enter the date in which the expense is assessed. This value defaults to the current date, but is editable. Click the Date value and manually enter the date or select it from the calendar tool. |
| Amount |
Enter the total expense amount. |
| Paid |
If selected, this check box indicates that the expense is paid in full. This check box is read-only.
|
This field is automatically selected when the Unpaid Amount field is updated to $0.00. |
|
| Paid Amount |
Enter the total amount of the expense that was paid.
|
This value may be a positive or negative dollar amount. |
|
| Unpaid Amount |
Displays the remaining unpaid expense balance.
|
Populating the Amount or Paid Amount fields automatically updates the Unpaid Amount field. This field is read-only. |
|
| Amount Paid By Account Holder |
Enter the total amount of the expense paid by the account holder. This field is only available when the Recovery module is active in Temenos Infinity.
 |
If a Non-Reimbursable Expense GL Account is selected, the Amount Paid By Account Holder field becomes read-only and cannot be edited. |
|
| Check # |
Enter the number of the check used to pay the expense. |
| Invoice # |
Enter the number of the invoice used to assess the expense. |
| GL |
Enter the general ledger account number where the expense is to be credited. The GL Account may be associated with Collections-specific GL Accounts. |
| GL Account |
Using the drop-down, select the general ledger account where the expense is to be credited.
|
If a Non-Reimbursable Expense GL Account or Non-Reimbursable Other Cost/Fee GL Account is selected, the Amount Paid By Account Holder field becomes read-only and cannot be edited. |
|
The values available within the GL Account drop-down are configured by a system administrator in System Management > Recovery > GL Accounts. This drop-down reflects the terminal node for Recovery GL Accounts with GL Account Types of Reimbursable Expense, Non-Reimbursable Expense, Reimbursable Other, and Non-Reimbursable Other. The parent and child GL Accounts are separated by the GL Account Delimiter assigned in Recovery Settings by a system administrator in System Management > Modules > Recovery. For example, a GL Account Type of Reimbursable Expense with a sub account of Overdraft Fees is displayed as Reimbursable Expense > Overdraft Fees. |
|
An expense transaction can be assigned either a Recovery GL Account or a Recovery Transaction Code. Once a GL Account is selected for an expense, the Transaction Code field cannot be edited. |
|
| Transaction Code |
Using the drop-down, select the transaction code associated with the expense transaction.
|
The values available within the Transaction Code drop-down are configured by a system administrator in System Management > Recovery > Transaction Codes. This drop-down reflects Transaction Codes that have a category type of Expense or Other Cost/Fee where only one Posting Rule is defined. For more information on Posting Rules, please see the Transaction Codes topic in the Administrator Guide.
|
|
An expense transaction can be assigned either a Recovery GL Account or a Recovery Transaction Code. Once a Transaction Code is selected for an expense, the GL Account field cannot be edited. |
|
| Cost Center |
Enter the assessing cost center. |
| Expense Type |
Using the drop-down, select the type which classifies the expense.
|
The fields available within the Expense Type drop-down are configured in System Management > Field Configurations > COLL_EXPENSE_TYPE. |
|
| Company |
Using the drop-down, select the name of the company associated with the expense.
|
This drop-down includes an alphabetical list of all companies configured by the system administrator in System Management > Address Book > Companies.
|
When a company is disabled in the Companies page, the option continues to appear in this drop-down list, but the word "Inactive" is appended to the company name. For example, Debt Collectors (Inactive). |
|
|
| Contact |
Using the drop-down, select the name of the contact for the company associated with the expense.
|
This drop-down includes a list of all contacts who are related to the company in System Management > Address Book > Contacts.
|
If there are no contacts configured for a company, a blank value populates within the drop-down list for this field. |
|
|
| Payee |
Enter the name of the expense payee. |
| Description |
Enter a description for the expense. |
| Is Transferred |
If selected, indicates that the expense has been successfully transferred to a Recovery GL Account. This check box is read-only.
|
Once an expense is successfully transferred, and the Is Transferred check box is automatically selected, the user is unable to make any further changes to the expense on the Expenses screen. Any changes must be made in the Recovery module. For more information, please see the Recovery Transactions topic in the User Guide. |
|
|
Applicable Recovery GL Account Number and Transaction Code Number fields are available for use in queues, views, and reports, but are not available within screens. |
When finished adding expenses, click  within the top of the screen. Click
  to disregard any changes.
Updating Expenses
|
Once an expense has been transferred, it cannot be edited. |
Expenses can be updated by clicking within any of the following columns:
- Date
- Amount
- Paid Amount
- Amount Paid By Account Holder
- Check #
- Invoice #
- GL
- GL Account or Transaction Code, depending on which was initially assigned
- Cost Center
- Expense Type
- Company
- Contact
- Payee
- Description
