The Default Settings page controls how the Collection Element functions in an institution's environment. From System Management, select Collection > Default Settings from the Customize group on the Configure tab. System default settings are displayed in 14 different sections.
Display
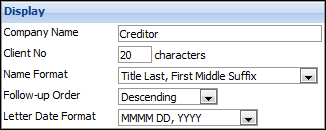
Enter the following information in the Display section.
| Field | Description |
| Company Name | Enter the institution's name to print on all reports and to display at the top of the Elements screen. |
| Client No | Enter the number of digits to display in the client number. The maximum is 20. |
| Name Format | Select the preferred client and contact name format from the drop-down list. This format is used in all reports and on all screens. |
| Follow-up Order | Select the order in which follow-up notes are displayed in the workspace as either Ascending (earliest date first) or Descending (most recent date first). |
| Letter Date Format |
Select the date format to print on all letters. This format applies to all merge fields that input a date into a letter. An example of a few options using date 08/05/10:
|
Security
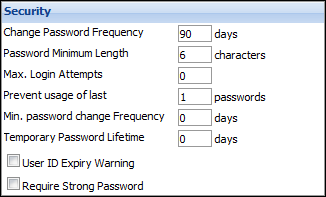
Enter the following information in the Security section.
| Field | Description | ||
| Change Password Frequency | Enter the frequency, in days, in which users are required to change their password. | ||
| Password Minimum Length | Enter the minimum length required for each user's password. The default is 8 characters. | ||
| Max. Login Attempts | Enter the maximum number of times a user can attempt to login with the incorrect password before the system locks their User ID. If a User ID is locked, the System Administrator must reset their password in User Maintenance by unchecking the locked box. | ||
| Prevent usage of last | Enter the length of time a user is forced to keep their password. This prevents users from resetting their password twice in the same day, for example. | ||
| Min. password change Frequency |
Enter the minimum number of days that must pass before a password is changed. This security feature prevents a user from changing their password before a minimum number of days have elapsed.
|
||
| Temporary Password Lifetime | Enter the length of time before a temporary password expires if it has not been changed by the user. This is important for new users being added in User Maintenance with the default password 'password,' as well as when resetting an existing users password. | ||
| User ID Expiry Warning | Select this box to warn users when their User ID is about to expire. This warning is displayed at login starting 10 days before the actual expiry date. On the actual expiry date the user is unable to login. | ||
| Require Strong Password |
If selected, each user password must include at least:
|

Promises
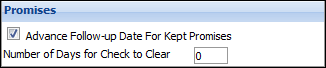
Enter the following information in the Promises section.
| Field | Description |
| Advance Follow-up Date For Kept Promises | If a client has multiple promises to pay on an account, selecting this option causes the follow-up date for the account to advance automatically to the day after the next promise when the first promise is Kept. |
| Number of Days for Check to Clear | Enter the number of days to serve as a "grace period" for promises. For example, when this field is left blank, a promise due and made on 2/19 shows as broken because the payment information is not loaded into Elements via the download until the next day. |
New User Defaults

Enter the following information in the New User Defaults section.
| Field | Description |
| Default Call Back | Enter the amount of time, in minutes, that pass before a client that requires a Call Back reappears in the queue. This is the default time for all New Users. This setting can be overwritten for each user through User Preferences. |
| Date Format | Select the desired date format from the drop-down list. This format is the default date format for all New Users. This setting can be overwritten for each user through User Preferences. |
| Time Format | Select either a 12 hour or a 24 hour clock from the drop-down. This format is the default time format for all New Users. This setting can be overwritten for each user through User Preferences if the individual user prefers a different time display. |
New Loan Defaults
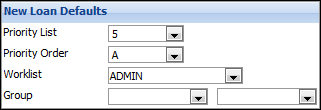
Enter the following information in the New Loan Defaults section.
| Field | Description |
| Priority List | The Collection Element prioritizes the order in which clients are displayed for review. Priority List helps determine the order in which accounts are presented. Enter a number from 1 to 9 where 1 is the highest priority to be assigned as a default to all new loans. |
| Priority Order | The Collection Element prioritizes the order in which clients are displayed for review. Priority Order also helps determine the order in which accounts are presented. Enter a letter from A to Z where A is the highest priority to be assigned as a default to all new loans. |
| Worklist | Specify the default worklist for newly downloaded loans. Loans can be sent to a different worklist through the Download Application based on rules setup in Worklist Assignment Maintenance. Users with the appropriate access rights can also transfer a client to a different worklist manually. |
| Group | Select a default loan group for new loans from the drop-down list. All new loans coming into the Collection Element are automatically assigned to that group. Loans can be manually reassigned to other groups, if desired. Loan groups are created through Loan Group Maintenance. |
New Client Defaults

Enter the following information in the New Client Defaults section.
| Field | Description |
| Group and Subgroup | Select a default client group (first drop-down) and subgroup (second drop-down) from the drop-down lists. All new clients coming into the Collection Element are automatically assigned to that group and subgroup. Clients can be manually assigned to other client groups, if desired. Client groups are created in Client Group Maintenance. |
Promise Status
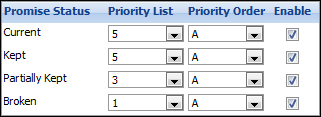
Enter the following information in the Promise Status section.
| Field | Description |
| Current | Select the Priority List and Priority Order for a promise if the promise to pay is kept and the account is brought Current (amount due is 0.00). This setting defaults to 5A. Select the Enable checkbox to activate this setting. |
| Kept | Select the Priority List and Priority Order for a promise if the promise to pay is Kept. This setting defaults to 5A for any kept promise. Select the Enable checkbox to activate this setting. |
| Partially Kept | Select the Priority List and Priority Order for a promise if the promise to pay is Partially Kept. It may be desired for this account to appear before other accounts in a Collectors queue if a promise is not fully kept. This setting defaults to 3A for any partially kept promise. Select the Enable checkbox to activate this setting. |
| Broken | Select the Priority List and Priority Order for a promise if the promise to pay is Broken. It may be desired for this account to appear before other accounts in a Collectors queue if a promise is broken. This setting defaults to 1A for any broken promise. These accounts will hold a higher priority within a worklist. Select the Enable checkbox to activate this setting. |
Pre-authorized Payments

Enter the following information in the Pre-Authorized Payments section.
| Field | Description |
| Activate Pre-Authorized Payments | Select this checkbox to activate Pre-Authorized Payments, if desired. |
Flag Warnings
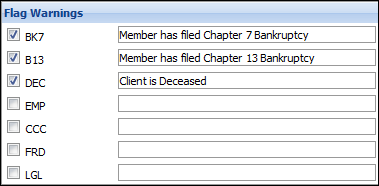
Enter the following information in the Flag Warnings section.
| Fields | Description |
| BK7, B13, DEC, EMP, CCC, FRD, LGL |
Enter a warning text for any of the seven Client Flags. This warning is displayed whenever a user views a client record where one or more of these flags are set. If there are multiple warning messages (due to multiple flags being set for a client), all of the messages are displayed in the same prompt. The client flags are always displayed on the workspace, regardless of whether a warning message is entered or not. The pre-set labels for these flags are |
 and are displayed at the top center of the workspace. By default, the two Bankruptcy flags have warnings.
Download Settings
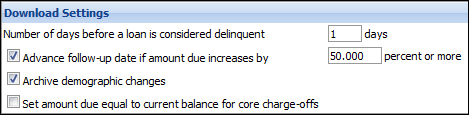
Enter the following information in the Download Settings section.
| Field | Description |
| Number of days before a loan is considered delinquent | Enter the number of days to grant an overdue loan/account before it is considered delinquent. Any clients that have at least one delinquent loan/account has a red delinquency flag  displayed at the top of the Workspace. displayed at the top of the Workspace. |
| Advanced follow-up date if amount due increases by | Select this option for the download to reset a future follow-up date to the current date if a loans' amount due value increases by the specified percentage or more. |
| Archive demographic changes | Select this option for the download to record any demographic changes to a client or contact record. Archived client/contact details (name, birth date, SSN, etc.) result in the creation of a new record holding the original client/contact information for the values that were changed. The main client/contact record holds the new data. Archived phone numbers, e-mail addresses or mailing addresses result in a new record being added to the client/contact record. The original record is identified by a "+" before the description. |
| Set amount due equal to current balance for core charge-offs | Select this option for the download to set the Current Amount Due in the Collection Element to be equal to the current balance. |
Mail Options

Enter the following information in the Mail Options section.
| Field | Description |
| SMTP Server | Enter the SMTP Server name if it is different from the web server. Otherwise, leave this field blank. If the institution is sending correspondence via e-mail to clients, enter the Exchange server name here if different from the web server. |
Follow-up Paging Options

Enter the following information in the Follow-up Paging Options section.
| Field | Description | ||
| Use paging for Follow-up notes |
Select this checkbox for follow-up notes to display on multiple pages in the workspace. This prevents all follow-up notes from displaying in one long list. If enabled, buttons labeled Newest, Forward, Back and Oldest are displayed above the follow-up notes in the workspace that can be used to navigate through the pages of follow-up notes.
|
||
| Number of Follow-Up notes per page | Enter the number of follow-up notes to display on each page. |

Windows Authentication Options

Enter the following information in the Windows Authentication Options section.
| Field | Description |
| Use Windows Authentication for Elements | Select this checkbox to enable Windows Authentication. If enabled, users are not required to enter their usernames and passwords each time they log in to Elements - they just click a button to log in. |
| Windows Authentication Virtual Directory | Enter the Windows Authentication virtual directory. |
Share Path Location

Enter the following information in the Share Path Location section.
| Field | Description |
| Location of SHAREPATH |
When finished entering all information, click the Save button at the bottom of the page. A prompt appears indicating the settings have been saved.