Priority Assignment uses criteria to determine the order in which loans appear for a user to work. Loans with higher priorities are presented to a user to work before those of a lower priority. A priority is assigned to a loan during the nightly download.
The download assigns priorities to loans based on the order in which the priority assignment criteria appears in System Management. The download compares a loan to each priority criteria until it finds a match. If a loan meets the criteria of the first priority in this list, it is not considered for any other subsequent priority.
 |
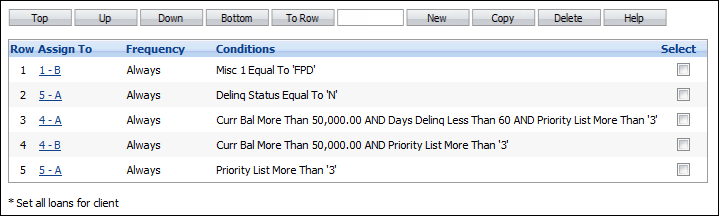
The order of the priority assignment formulas is critical since the Download processes the formulas in the order in which they are displayed in the list. If a loan should have a priority other than one that is currently assigned, confirm the order of priorities is correct in this list. |
With the above screen shot, a client with two delinquent loans (#1 has a balance of $60,000 and is 59 days delinquent, #2 has a balance of $500 and is in first payment default), would have the following priorities assigned to their loans:
- Loan #1 would have a priority of 4-A and Loan #2 would have a priority of 1-B when they are first loaded into Elements.
- The next time the download runs, assuming no payments are made on either loan, Loan #1 changes to priority 4-B since it is now 60 days delinquent. Loan #2 remains at priority 1-B.
- The next time the download runs, the priorities do not change.
There can be an unlimited number of Priority Assignment formulas. Most commonly, Priority Assignment is used to:
- Assign the same priority level to all loans for a specific client, provided one of the client's loans meets the specified priority conditions.
- Assign different priorities to individual loans for the same client.
- Limit changes in priority to newly or more delinquent loans.
- Reset Inactive (non-delinquent) loans to a default priority.
Any combination of rules can be used when creating priority assignment formulas.
From System Management, select Collection > Priority Assignment from the Worklist/Queues group on the Configure tab. A list of Priority Assignments currently configured in the system is displayed.
From this screen, users can create, edit, delete and rearrange the order of priority assignment formulas.
Creating Priority Assignment Criteria
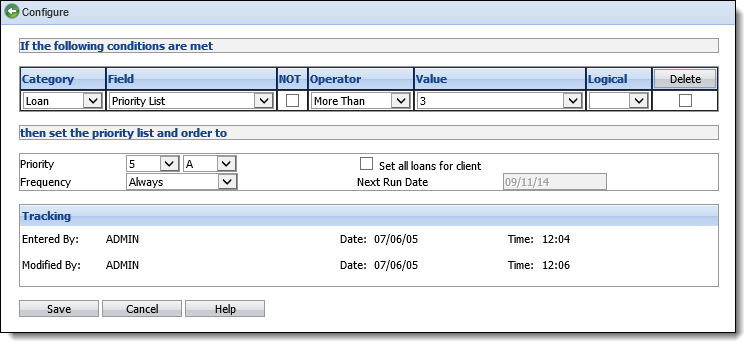
Click the New button on the Priority Assignment screen. The new priority assignment screen is displayed.
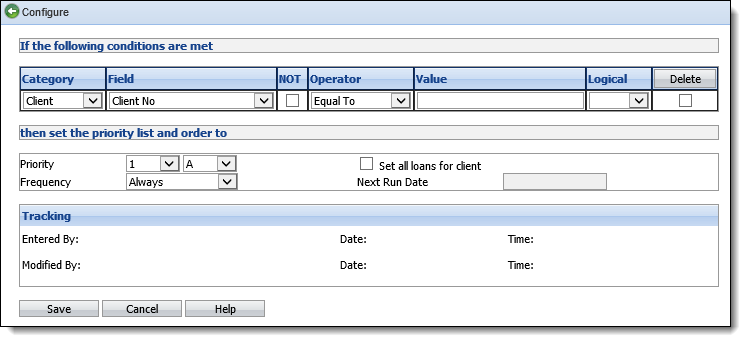
Build the criteria for the priority using the fields defined below.
 |
Criteria for Priority Assignment is defined the same way it is for Worklists. |
| Field | Description | ||
| Category | Select the category to be Client, Contact or Loan. These categories dictate what field selections are available. The Client category allows client-level fields, such as name and address, to be available. The Contact category allows contact-level fields, such as contact name and address, to be available. The Loan category allows loan-level fields, such as delinquency status and current balance, to be available. | ||
| Field | Select the desired field from the drop-down. The available values are displayed based on the chosen Category. For example, if Client is the Category, Loan fields such as Loan Type or Days Delinquent are not available in the Field drop-down. Only Client-related fields, such as Client Last or First Name, would be available. | ||
| NOT | Select this checkbox to use "NOT" in conjunction with the selected operator. | ||
| Operator |
Select the desired Operator (Less Than, More Than, Equal To, etc.). The available values are displayed based on the type of Field chosen. For example, Equal To is the only Operator value available for flag fields.
|
||
| Value | Select the Value for the field. The type of value (date, flag, character) that can be entered is based on the Field and Operator chosen. For example, a value of True or False are the only allowed values for flag fields. | ||
| Logical |
Select the Logical value.
|
||
| Priority | Select the priority to which loans should be assigned if they meet the criteria. | ||
| Set all loans for client | Click the "Set all loans for client" checkbox to assign all of a client's loans to the priority provided the client or at least one of the client's loans meets the priority conditions. | ||
| Frequency | Specify how often (Always, Weekly, Monthly or Never) this priority assignment should be performed. Always is selected by default. If the frequency is Weekly or Monthly, specify the Next Run Date. | ||
| Next Run Date | If the Frequency is Weekly or Monthly, select the next run date from the calendar drop-down. |
Repeat for as many lines of criteria as desired.
To delete a condition, click the checkbox next to the condition and click Delete.
When finished building criteria, click Save. Click Cancel to cancel building the priority criteria.
|
New worklist assignment criteria is added to the bottom of the list on the Worklist Assignment page. The criteria list may need to be rearranged so the worklist assignments work exactly as desired. |
Rearranging Priority Assignment Criteria
On the Priority Assignment screen, click the checkbox next to the Priority Assignment formula to move.
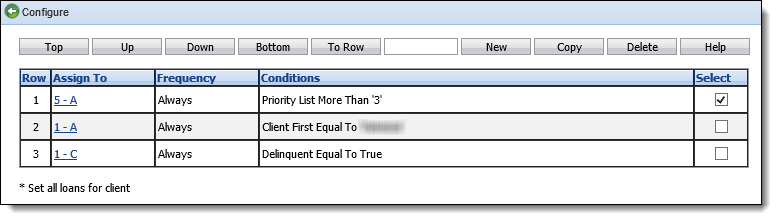
Use the buttons defined below to move it to the desired position.
| Button | Description |
| Top | Click Top to move the selected Priority Assignment formula to the top of the list. |
| Up | Click Up to move the selected Priority Assignment formula up one position in the list. |
| Down | Click Down to move the selected Priority Assignment formula down one position in the list. |
| Bottom | Click Bottom to move the selected Priority assignment formula to the bottom of the list. |
| To Row | Enter a row number in the text box and click Move to reposition the selected Priority Assignment formula to the specified position. |
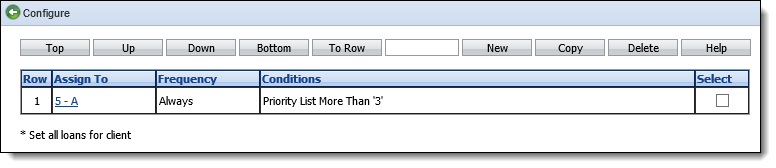
Copying Priority Assignment Criteria
Click the checkbox next to the Priority Assignment criteria to copy. Click Copy.
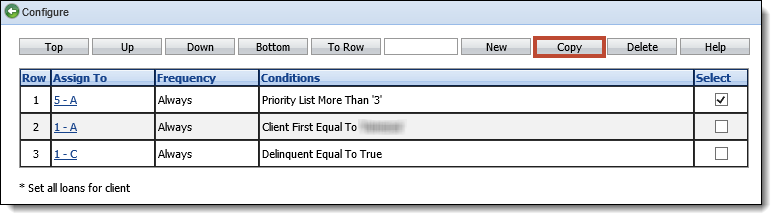
Make any changes necessary to create a new formula and click Save. Click Cancel to disregard any changes.
Editing Priority Assignment Criteria
Click the link of the priority to edit.

Make any changes and click Save. Click Cancel to disregard any changes.
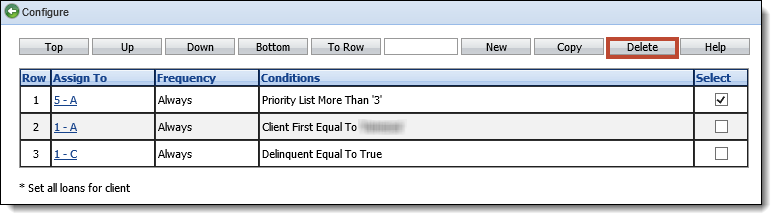
Deleting Priority Assignment Criteria
Click the checkbox next to the Priority Assignment formula to delete. Click Delete.
A prompt appears to confirm the deletion. Click OK to confirm. Click Cancel to disregard the deletion.

Once OK is selected, the priority is deleted and removed from the Priority Assignment screen.
|
This removes the priority assignment permanently. To re-use a priority assignment at a later date, edit the assignment and change the frequency of the priority assignment to Never. To enable the priority assignment again, change the frequency from Never to Always, Weekly or Monthly, as required. |
Complex Priority Assignment Criteria
The following is an example of more complex priority assignment criteria.
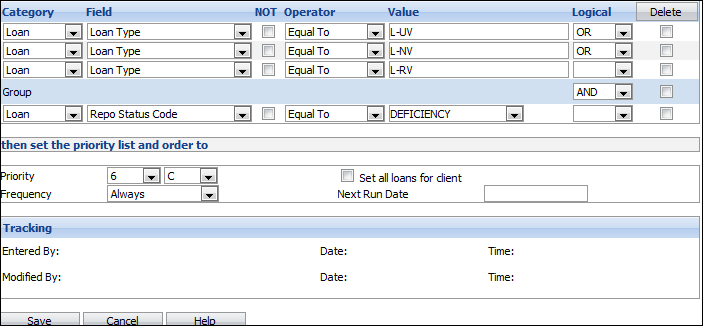
The conditions are split into two groups - one based on loan type and the other on Repo status. Since the Logical value for this condition is set to AND, both groups of conditions must be met in order for a loan to be assigned to the specified priority. Any loan with a loan type of L-UV, L-NV or L-RV (vehicle loans) are assigned a priority of 6C PROVIDED the Repo Status Code is Deficiency.