The sub-products identified within Loan Product Definition are the items that populate in the Product: Sub-Product field when initializing an application.
The Sub-Products tab displays a list of all loan sub-products organized by the associated category. Within each category, sub-products are arranged according to their assigned product type. From this tab, administrators are able to create, copy and edit sub-products available at an institution.

 |
The first sub-product created for each product type becomes the default. Default sub-products may be used as a base for creating and copying sub-products and may also be available for application processing |
The grid within the Sub-Products Listing page displays the following columns of information for each sub-product:
| Column | Description |
| Category | Displays the name of the category associated with the sub-product. |
| Product | Displays the name of the product type associated with the sub-product. |
| Sub-Product | Displays the name of the sub-product. |
| Active | Displays a  if the sub-product is active. if the sub-product is active. |
| Risk Model | Displays the name of the risk model assigned to the sub-product. |
| Pricing Model | Displays the name of the pricing model assigned to the sub-product. |
| Decision Model | Displays the name of the decision model assigned to the sub-product. |
| Workflow Model | Displays the name of the workflow model assigned to the sub-product. |
| Last Modified | Displays the date that the sub-product was last modified. |
| Last Modified By | Displays the name of the user who made the last modification. |
| Date Created | Displays the date that the sub-product was created. |
| Created By | Displays the name of the user who created the sub-product. |
| Product ID |
Displays an automatically generated number that allows instutions to assign sub-products to certain connectors. |
This topic includes the following attributes and instructions that assist administrators with creating, copying and editing sub-products:
- Sub-Product Attributes
- Creating a Loan Sub-Product
- Copying a Loan Sub-Product
- Editing a Loan Sub-Product
Sub-Product Attributes
Each sub-product contains attributes which are organized into a series of tabs. The defined attributes determine the settings and defaults for the sub-product.

General
General attributes define the sub-product's defaults, tolerances, terms and models. These items drive sub-product behaviors within the Framework. General Attributes are broken down into the following sections:
Product Attributes
Product attributes include all configurations which determine the sub-product defaults and tolerances. The table below provides field details for the Product Attributes section:
| Field Name | Details | ||||
| Sub-Product Name |
Enter the name of the sub-product.
|
||||
| Active | Check the box to activate the Sub-Product. | ||||
| Product Name | Defaults to the Product selected. | ||||
| Category Name |
Defaults to the category associated with the selected product. |
||||
| Loan Type | Select Closed End (installment) or Open End (revolving). | ||||
| Real Estate Type | Select "None" for Non-Home Equity Sub-Products or "Home Equity" for all Home Equity Sub-Products. | ||||
| Debt Protection Account Class | Used for loan calculator settings to determine how to properly calculate insurance/debt protection coverage. This selection determines which Debt Protection plans are available for selection in the Debt Protection panel.  |
||||
| Trade Type | Used to determine if an application should be added into Post-Loan Aggregate and Ratio calculations. |
||||
| Trade Category | Used to determine if an application should be added into Post-Loan Aggregate and Ratio calculations. |
||||
| Disbursement Method | Used to determine which active connector interface should be used to disburse the application (e.g. Symitar, DataSafe, OSI, PSCU). | ||||
| Interest Type |
Select appropriate option for interest calculation.
|
||||
| Document Set | Used to determine which IMM Document Set is requested during Document Processing. | ||||
| Core Processor Product Codes one and two | Enter the Core Product Code. Both fields may be needed depending on the core processor. | ||||
| Disbursement Date (days from App Date) | Enter the number of days to default the Disbursement Date from the Application Date. This is just to set a default value. The Disbursement Date can be updated manually on the Loan Application. | ||||
| First Due Date (days from Disbursement (days from Disbursement Date) | Enter the number of days to default First Payment Due Date from the Application Date. This is just to set a default value. The First Payment Due Date can be updated manually on the Loan Application. | ||||
| Minimum Loan Amount |
Enter the Minimum Loan amount for the Sub-Product. If an application is entered for less than the minimum amount, the system requires an override to continue with the loan process.
|
||||
| Maximum Loan Amount |
Enter the Maximum Loan amount for the Sub-Product. If an application is entered for more than the maximum amount, the system requires an override to continue with the loan process.
|
||||
| Maximum LTV |
Enter the Maximum LTV for the Sub-Product (if applicable). If an application exceeds the Maximum LTV, the system requires an override to continue with the loan process.
|
||||
| Minimum Term |
Enter the Minimum Term for the Sub-Product. If an application is entered for less than the minimum term, the system requires an override to continue with the loan process.
|
||||
| Maximum Term |
Enter the Maximum Term for the Sub-Product. If an application is entered for more than the Maximum Term, the system requires an override to continue with the loan process.
|
||||
| Approval Tolerance Type | Select Amount or Percent of Approved Amount from the Approval Tolerance Type dropdown to calculate how much over the approved amount an application can be funded for. | ||||
| Approval Tolerance Factor |
Set either the Dollar Amount or the Percentage of Approved Amount based on the selection for Approval Tolerance Type. If the end user tries to fund the loan for more than the Approved Amount plus the tolerance factor, the system requires an override to continue with the loan process.
Example: Approval Tolerance Type is set to Amount. Approval Tolerance Factor is set to $500.00. A loan was approved for $10,000.00. The end user could fund the loan up to $10,500.00. If the end user tried to fund the loan for $10,501.00, the system would require an override. |
||||
| Queue Escalation Threshold (hours) |
Set the maximum amount of time an application should be in a queue. If time is exceeded, the system highlights the application in the queue contents and sends an email notification.
|
||||
| Queue Aging Limit (days) |
Set the maximum number of days an application should be in a queue. If maximum number is exceeded, the system highlights the application in the associated queue and sends an email notification to all parties in the Queue Notification.
|
||||
| Prepayment Penalty | Set the dollar amount charged as a Prepayment Penalty. | ||||
| Doc Stamp Program |
Select the Doc Stamp Program which applies the Sub-Product.
|
||||
| Billing Cycle Required | Select the checkbox to enable the Billing Cycle field to appear in WebLoan. When this checkbox is selected, the Billing Cycle field must be completed during application processing. |

Loan Terms/Draw Period Terms
The Loan Terms/Draw Period Terms section includes configurations which determine how a sub-product's payments and draw terms are calculated. The fields available in this section toggle based on the selections made in the Loan Type, Real Estate Type and Payment Type fields.
The table below provides field details for the Loan Terms/Draw Period Terms section:
| Field Name | Details |
| Payment Type |
Select appropriate payment type for the Sub-Product. Only one payment type may be selected. If a Sub-Product allows for more than one payment type, an additional Sub-Product needs to be created.
The Payment Types that populate in this drop down depend on the selection made in Loan Type. Selections for Closed End Loan Type:
Selections for Closed End Loan Type:
|
| Balloon Payment Types |
Balloon Payment Type becomes active if Balloon is selected for Payment Type.
|
| Balloon Term (Months) |
Becomes active if Balloon is selected for Payment Type. Enter the number of months in which the balloon has to be repaid.
Example: the loan is for 60 months and amortized over 120 months. Sixty would be entered in the Balloon Term field. |
| Billing Percentage Rate | Becomes active if Open End was selected for Loan Type. Enter the percentage to be used to calculate payments. |
| Minimum Payment Amount | Becomes active if Open End was selected for Loan Type. Enter the minimum payment amount for the Sub-Product. This shows as the payment amount if the calculated payment is lower than the minimum payment amount. |
| Draw Period Term (Months) | Becomes active is Open End was selected for Loan Type. Enter the number of months for the term of the Draw Period. |
| Factor per Hundred | Enter the numeric value multiplied by the Balance to calculate the Payment Amount. |
| Factor Partial | Informs the calculator how to handle the last partial factor (to round it up, truncate it, or use the partial portion as is).  |


Repayment Period Terms
The Repayment Period Terms section includes configurations which determine the payment terms for balloon sub-products. The fields available in this section toggle based on the selections made in the Loan Type, Real Estate Type and Payment Type fields.
The table below provides field details for the Loan Terms/Draw Period Terms section:
| Field Name | Details |
| Payment Type | Select an appropriate payment type for the repayment period. Only one payment type may be selected. If a Sub-Product allows for more than one payment type, an additional Sub-Product needs to be created. |
| Balloon Term (Months) |
Becomes active if Balloon is selected for Payment Type. Enter the number of months in which the balloon has to be repaid.
Example: the loan is for 60 months and amortized over 120 months. Sixty would be entered in the Balloon Term field. |
| Repayment Period Term (Months) | Enter the number of months when a balloon fully matures. |
Model Selection
The Model Selection section includes configurations that define application workflow and decision rendering for each sub-product. The table below provides field details for the Model Selection section of the General attributes:
|
For more information on the Models below, please see the Defining Models topic within this guide. |
| Field Name | Details |
| Risk Model | Select the appropriate Risk Model for the Loan Sub-Product from the drop-down list. This drop-down list includes all active Risk Models configured in System Management > Lending > Risk Models. |
| Pricing Model | Select the appropriate Pricing Model for the Loan Sub-Product from the drop-down list. This drop-down list includes all active Pricing Models configured in System Management > Lending > Pricing Models. |
| Decision Model | Select the appropriate Decision Model for the Loan Sub-Product from the drop-down list. This drop-down list includes all active Decision Models configured in System Management > Lending > Decision Models. |
| Workflow Model | Select the appropriate Workflow Model for the Loan Sub-Product from the drop-down list. This drop-down list includes all active Workflow Models configured in System Management > Lending > Workflow Models. |
Credit Bureaus
Credit Bureaus enables institutions to assign specific Credit Bureaus and Risk Models to loan sub-products. An institution is also able to specify the sequence to be used when ordering credit reports and assign the number of days in which a previously order credit report has expired. These configurations ensure appropriate and current scores are used when decisioning sub-products.

Credit Bureaus is broken down into the following sections:
Aging and Rollover
Aging and Rollover enables institutions to determine when a new credit report is required and which credit bureaus are used when processing credit for a sub-product.
The Aging and Rollover section includes the following fields:
| Field Name | Details |
| Credit Bureau Report Age (Days) | Enter the number of days a credit report can be used, before requesting a new one from the bureau. |
| Use Credit Bureau Assignment Rule |
Select this option if the institution is using business rules to determine which credit bureau to use. For example: geographic preference.
Select an appropriate rule from dropdown list of the particular sub-product. |
| Use a Specified Sequence |
Select this option if the institution wants to specify which order to use the credit bureaus and doesn’t need additional business logic.
For example, the list in the screen shot above has Experian and Equifax set to be used. Experian appears 1st in the list, therefore they are the bureau that is called 1st to get a credit report. If there is no response or no file available, the system rolls to Equifax which is the next bureau in the list. |
Products and Options
Products and Options contains configurations which enables institutions to configure the credit models that are to be pulled when pulling credit for each sub-product.
The Products and Options section includes the following fields:
| Field Name | Details |
| Credit Bureau | Select the specific credit bureau from the Credit Bureau dropdown. |
| Available/Assigned boxes | Assign the products to be pulled from the bureau for this sub-product by selecting a product and/or option from the Available box and moving it to the Assigned box using the arrows on the screen. Repeat for all bureaus that are active and selected for use. |
Table Entries
Within the Table Entries tab, administrators can define the field options available for each sub-product. These configurations ensure only relevant options populate as options within drop-downs and tables.

The following fields can be configured:
| Field | Description | ||
| Collateral Code | Select the collateral codes that are available when disbursing an application. | ||
| Payment Frequency | Select the payment frequencies that are available when inputting loan terms. | ||
| Purpose Code | Select the purpose codes that are available when disbursing an application. | ||
| Ratios | Select the ratios that are to be displayed in the ratios panel. Ratios assist institutions with evaluating an individual's total amount of indebtedness and creditworthiness. Ratios are values that compare two aggregates to assess the strength of an application. An example of a ratio is Total Debt to Income. |
||
| Aggregates |
Select the aggregates that are to be displayed in the aggregates panel. |
||
| Vendor Type |
Select the vendor types available when processing new applications.
|
||
| UDAP Overdraft Fee Option |
Select the UDAP overdraft options when inputting the loan terms of credit card sub-products.
|
||
| Skip Payment Type |
Select the skip payment types that are available when inputting loan terms.
|
||
| Payment Type | Select the payment types that are available when inputting loan terms. |
|
With the exception of Aggregates and Ratios, the available field lookup values are defined within Field Configurations. |
To add table entries, click on a Field in the grid to display the available table options. Move the appropriate options from the Available box to the Assigned box by dragging & dropping or using the arrow keys. Repeat for all fields listed in the grid.
Cross-sell Products
Cross-sell Products allows administrators to assign the cross-sell product rules to sub-products. This configuration enables institutions to generate specific cross-sells for sub-products, if the conditions identified in the assigned rules are met. If rule conditions are met, opportunities are presented in the Cross-Sells screen.

To assign cross-sell rules, drag and drop the desired items from the Available grid to the Assigned grid or by using the arrow keys. The Assigned rules determine which Cross-sell Products are offered on the Cross-Sells screen.
|
Prior to assigning cross-sell product rules, they must first be authored within Rules Management using the Cross-sell Products rule category |
Stipulations
Stipulations allows administrators to assign the stipulation rules to sub-products. This configuration enables institutions to automatically add stipulations to an application, if the conditions identified in the assigned rules are met.
|
Stipulation can be open for all users to complete or permission based. Stipulation permissions allow institutions to define which security groups are able to clear outstanding stipulations. Without identifying security group permissions, there is no distinction between who cannot clear stipulations. Using specific vocabulary templates, institutions are able to indicate which security groups have permission to clear specified stipulations. |
If rule conditions are met, stipulations are presented in the Stipulations panel and/or Notifications tab in the left navigation pane.
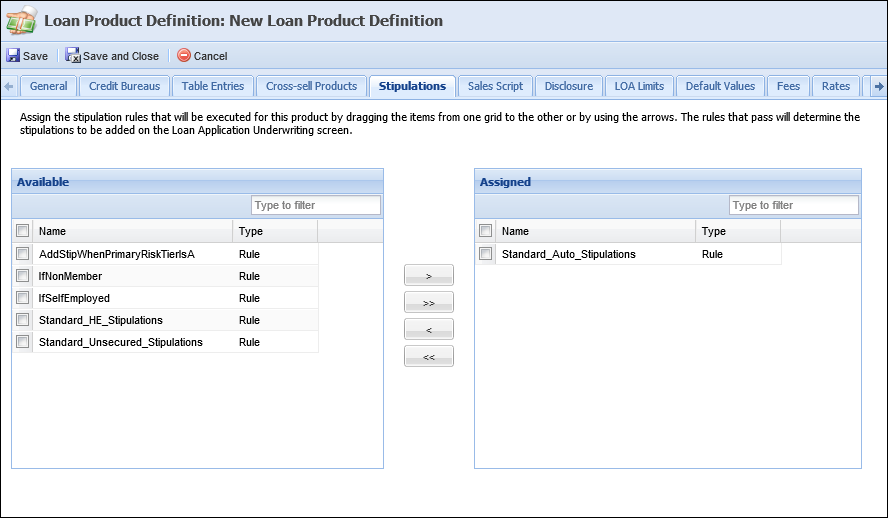
To assign stipulation rules, drag and drop the desired items from the Available grid to the Assigned grid or by using the arrow keys.
|
Prior to assigning stipulation rules, they must first be authored within Rules Management using the Stipulations rule category |
Sales Script
Sales Script allows administrators to enter a sub-product value statement that can be used as a sales tool when initiating a new application. This sales script populates on the New Loan Application screen and varies based on the selection made in the Product: Sub-Productfield.

Within the text box, enter the desired sales script using the following rich text options:
- Font choices (e.g. Arial, Calibri, Tahoma, Times Roman)
- Font options (e.g. bold, italic)
- Font sizes
- Font color
- Text alignment
- Bullets and Numbering
- Hyperlinks
LOA Limits
LOA Limits allows administrators to assign the loan officer approval limit rules to sub-product. This configuration allows institutions to ensure only specific users and groups can manually approve loan applications.

To assign loan officer approval rules, drag and drop the desired items from the Available grid to the Assigned grid or by using the arrow keys.
|
Prior to assigning LOA Limits rules, they must first be authored within Rules Management using the Loan Officer Approval Limits rule category. |
Default Values
Default Values allows administrators to assign rules to sub-products that determine the default values which populate in the specified fields. This configuration allows institutions to decrease the amount of time required to process an application and increase accuracy by pre selecting the values of fields within an application.

To assign default value rules, drag and drop the desired items from the Available grid to the Assigned grid or by using the arrow keys.
|
Prior to assigning default value rules, they must first be authored within Rules Management using the Default Values rule category. |
Fees
Fees allows administrators to assign fee rules to sub-products. This configuration enables institutions to automatically add fees to an application, if the conditions identified in the assigned rules are met. If rule conditions are met, fees are assigned to the application and presented in the Fees panel.
Fees decreases the amount of time required to process an application and increases revenues by ensuring appropriate fees are assessed.

To assign fees, drag and drop the desired items from the Available grid to the Assigned grid or by using the arrow keys.
|
Prior to assigning fee rules, they must first be authored within Rules Management using the Fees rule category. |
Rates
Rates allows administrators to configure Introductory and Variable rates for applicable sub-products.

The below table defines the fields used in the Introductory Rates section:
| Field Name | Details | ||||||
| Introductory Rate | Check the box if this Sub-Product has an introductory rate. | ||||||
| Term (Months) | Enter the number of months the introductory term applies to the sub-product. | ||||||
| Rate Method |
Select appropriate way to calculate the introductory rate:
|
||||||
| Actual Rate | Enter the introductory rate; this is required if Actual Rate is selected in the Rate Method field. | ||||||
| Discount Rate | Enter the amount of discount that should be applied to the rate assigned by the Pricing Model. This is required if Discount Rate is selected in the Rate Method field. |
The below table defines the fields used in the Variable Rates section:
| Field Name | Details | ||
| Variable Rate | Check the box if this Sub-Product has an introductory rate. | ||
| Maximum Rate Decrease for Loan |
Enter the Max Rate Decrease Amount for the duration of the loan.
|
||
| Maximum Rate Increase for Loan |
Enter the Max Rate Increase Amount for the duration of the loan.
|
||
| Rate Margin |
Enter the Rate Margin.
|
||
| Maximum Rate Decrease per Change |
Enter the maximum amount a rate can decrease at each variable rate change.
|
||
| Maximum Rate Increase per Change |
Enter the maximum amount a rate can increase at each variable rate change.
|
||
| Rate Change Frequency (Months) |
Select appropriate frequency for rate changes from the drop down list. |
||
| First Rate Change Date (MM/DD) |
Used to capture the month and day of the first change. |
|
These values populate on loan documents during Document Processing. |
Real Estate
Real Estate allows administrators to indicate whether the sub-product is HMDA reportable and enter the number of days in which the quoted values are valid until on the Good Faith Estimate.

The below table defines the fields used in the General section:
| Field Name | Details |
| HMDA Loan | Check the box if applications for the Sub-Product are always HMDA reportable. This defaults the HMDA screen on all applications. Do not check the box if applications are only reportable based on specific loan purposes. |
| GFE INterest Rate | This field is required if the Real Estate Type (under General Tab) equals Home. |
| Period (Days) | This field is used to calculate the GFE Interest Expiration Date. |
| GFE Interest Rate Prior to Settlement (Days) | This field is required if Real Estate Type (under General Tab) equals Home Equity. Furthermore, this is used to capture data to populate onto loan documents during Document Processing. |
| GFE Cost Period (Days) | This field is required if Real Estate Type (under General Tab) equals Home Equity. Furthermore, this is used to calculate the GFE Cost Expiration Date. |
| GFE Settlement (Days) | This field is required if Real Estate Type (under General Tab) equals Home Equity. Furthermore, this is used to capture number of settlement days to populate onto loan documents during Document Processing. |
 |
At disbursement, a validation error may arise if the GFE dates are prior to the current date. A solution parameter exists, which allows the Good Faith Estimate loan expiration date validation to be turned off. By turning off the GFE loan expiration date validation, users no longer receive a validation error if the GFE loan expiration date is not current. To disable the GFE Validations, update the parameter in the Origination tab in the Solution.Lending screen. |
Workspace Summary
Workspace Summary allows administrators to identify the Application Summary that diplays at the top of the Left Navigation Pane when processing applications. This configuration enables users to view a basic overview of the application.

Workspace Summary is divided into two sections: Comments Panel and Summary Panel.
The Comments Panel section allows administrators to set the number of comments that may display in the Workspace Summary section.
The Summary Panel section display a list of all configured summary panels available to be assigned to the sub-product. Each panel populates in a table containing the following columns:
| Column Name | Description |
| Name |
Displays the name of the summary panel. |
| Description | Displays the summary panel's description if one was entered. |
| Used By | Displays the name of the sub-products that use the summary panel. |
| Last Modified | Displays the date when the summary panel was las modified. |
| Modified By | Displays the name of the user who last modified the summary panel. |
| Created Date | Displays the date when the summary panel was created. |
| Created By | Displays the name of the user who created the summary panel. |
The summary panel section also allows the administrator to create, copy, edit and delete summary views.
|
Each panel that has been created displays in the grid and is available to be selected for use on the Sub-Product. Check the box for the panel line item that you would like to have presented for the Sub-Product. If no boxes are checked, there is not a summary panel displayed for the Sub-Product. |
Summary Panel Attributes
When defining a Summary Panel, the following attributes must be defined:
- General
- Panel Design
In General, enter the panel name and enter a description if needed.

In Panel Design, define the format, data and labels displayed in the panel.

To define the format:
- Select the radio button of the desired Layout – 1 or 2 columns.
- Select the desired Font Size which defaults to 11 px, the recommended font size. To change to a different font size, click on the dropdown list.
To define the data:
- Click the Add drop-down and select the type of data you want add into the panel.
"Add" Options Details Field Selecting field provides the lending field list which allows administrators to select the fields to display within the application summary. Field List
The field list is a feature used throughout the Framework to define the fields to display on reports, views and exports. It is also used in criteria building for reports, views, exports and searches. Every field in an institution's Framework system can be found in the field list, including custom fields.
Each field selector window looks the same regardless of how it is accessed. In the below example, the field selector has been accessed through the Fields tab when creating a new report. By default, the field selector opens in a tree format with expandable folders and sub-folders. Click the arrow next to the folder name to expand or collapse. The Emails folder and the Default Email sub-folder have been expanded below.
Expand the folders until the desired field has been found, or search for the field by entering any search text into the search text box and hitting Enter on the keyboard. Click on the field to highlight it blue and click Add Field at the top of the field selector window or double-click on the field to add it to the field list for the report.
Once finished adding all desired fields, click Close to close the field selector window.
The field has been added to the fields tab of the new report window.
A field can also be selected in a search grid format. To change the view of the field selector from a tree to a search grid format, click the View drop-down and select Search Grid.
Locate the desired field by entering any search text into the text box and hit Enter on the keyboard. A list of results display including the field name and location. Click on the desired field to highlight it blue and click the Add Field button at the top of the field selector window or simply double-click on the field to add it to the field list for the report.
Aggregate Selecting aggregate provides the aggregate selector which allows administrators to select the aggregates to display within the application summary. Ratio Selecting ratio provides the ratio selector which allows administrators to select the ratios to display within the application summary. Score
Selecting score provides the score selector which allows administrators to select the scores to display within the application summary.


- Click on the Label column for each row to update the field's label.

 Creating a Panel
- To create a New Panel click
 .
. - Identify General attributes.
- Define format.
- Add content.
- Once all content has been selected, update the field label that displays within the application summary.
- Click
 to save the data and close the Sub-Product window.
 - The sub product is listed in the Sub Products tab in the Loan Product Definition System Management screen.
- To edit a summary panel, select the panel that needs updated from the Summary Panel section and click
 .
. - Modify the required information on each tab to reflect the panels new attributes.
- Once all attributes have been updated, click .
- To copy a summary panel, select the base panel from the Summary Panel section and click
 .
. - Modify the required information on each tab to reflect the panels new attributes.
- Once all attributes have been updated, click .
- To delete a summary panel, select the panel that is to be eliminated from the Summary Panel section and click
 .
. - When prompted, confirm the deletion.
- To create a Sub-Product, click .
- Select the product type from the product drop-down.

- Begin defining the attributes.
- Once all attributes have been defined, click .
- To copy a Sub-Product, select a base sub-product from the sub-product listing page and click .
- Modify the information on each tab to reflect the new Sub-Product's attributes.
- Once all attributes have been defined, click .
- To edit a Sub-Product, select the sub-product that needs updated from the sub-product listing page and click .
- Modify the required information on each tab to reflect the Sub-Product's new attributes.
- Once all attributes have been updated, click .