

| Administrator Guide > Virtual Capture Overview > Virtual Capture Settings |
The Virtual Capture Settings page enables administrators to customize the Virtual Capture application process for their institution. This page can be accessed from System Management > Origination > Virtual Capture > Virtual Capture Settings.
The Virtual Capture Settings page serves as a centralized hub for the important settings used throughout the Virtual application process and provides administrators with the ability to define attributes within the following tabs:
The General tab contains the basic Virtual Capture settings and includes the following sections:
This section of the General tab provides administrators with the ability to define the style and appearance of Virtual Capture for individual applicants.
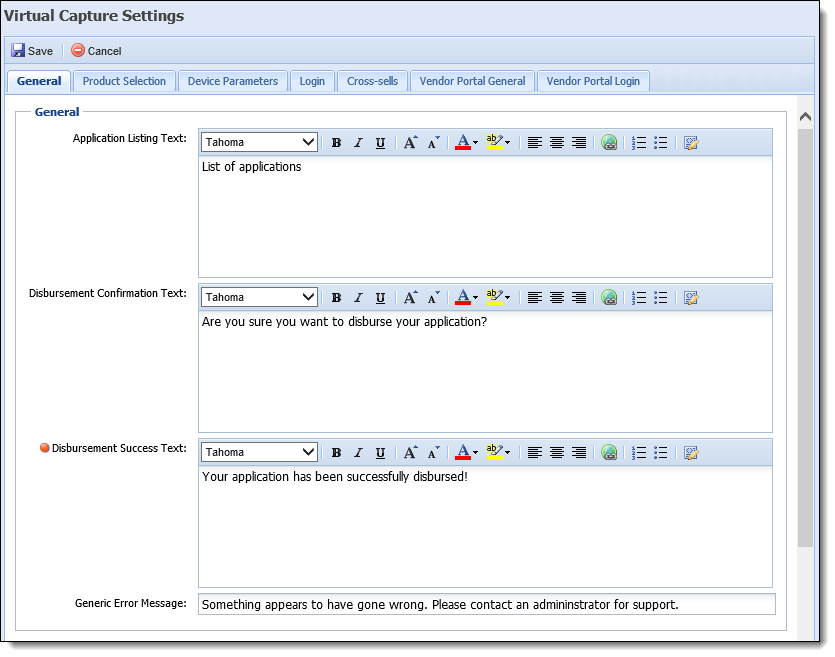
The following fields are displayed within the General section of the General tab:
| Field | Function | ||||
| Application Listing Text | Enter instructions or other text to appear within the List Applications screen in Virtual Capture. | ||||
| Disbursement Confirmation Text | Enter the text to appear within a system confirmation message generated upon clicking  on the last screen of the Approval workflow in Virtual Capture. The disbursement process is initiated after the applicant confirms disbursement can be performed. on the last screen of the Approval workflow in Virtual Capture. The disbursement process is initiated after the applicant confirms disbursement can be performed. |
||||
| Disbursement Success Text |
Enter the text to appear within a system success message generated in Virtual Capture after disbursement is successful.
|
||||
| Generic Error Message |
Enter a generic error message which appears within a system error message when generated in Virtual Capture.
|
This section of the General tab provides administrators with the ability to define a company logo and name to appear within the top navigation bar in Virtual Capture.

The following fields are displayed within the Site Header section of the General tab:
| Field | Description | ||
| Company Logo | Displays the company's logo currently used in Virtual Capture. | ||
| Image |
Click Browse... to locate and upload a new logo image (50 pixels x 50 pixels maximum). The logo is displayed at the top of the Virtual Capture web page.
|
||
| Remove Existing Logo | Select this check box to remove the existing company logo. | ||
| Company Name | Enter the name of the company. The Company Name is displayed in the navigation bar at the top of the Virtual Capture web page. |
This section of the General tab provides administrators with the ability to define the footer to appear within Virtual Capture.

The following field displays within the Site Footer section:
| Field | Description |
| Text | Enter text to display at the footer of the Virtual Capture web page. |
The Product Selection tab provides administrators with the ability to create and manage the loan products available in Virtual Capture.

The grid in this tab displays the following columns of information for each product configured for use in Virtual Capture:
 |
The order in which products appear in the Product Selection grid is determined by the List Order. Products are listed in descending List Order; however, if two or more products include the same List Order, those products are then organized alphabetically. |
 |
Display Name, Category, Sub-Category, and List Order are editable columns that allow administrators to modify the value directly within the grid. For more information, please see the Editing a Product section in this topic. |
| Column | Description | ||
| Application Types | Displays the name of the Loan Application Type configured for use in Virtual Capture. | ||
| Display Name |
Displays how the name of the product appears in Virtual Capture. |
||
| Category | Displays the Category assigned to the product. | ||
| Sub-Category | Displays the Sub-Category assigned to the product in Virtual Capture. | ||
| List Order |
Displays the order in which the product is listed in the Product Selection page in Virtual Capture.
|
||
| Active For Individual | Displays a  if the product is enabled for individual applicants within Virtual Capture. if the product is enabled for individual applicants within Virtual Capture. |
||
| Active For Vendor | Displays a  if the product is enabled for vendors within Virtual Capture. if the product is enabled for vendors within Virtual Capture. |
||
| Replacement Cross-sell | Displays a  if the product is configured to be a replacement cross-sell within Virtual Capture. if the product is configured to be a replacement cross-sell within Virtual Capture. |
||
| Product Id |
Displays the Product Id for the product in Virtual Capture.
|
The buttons within the top of the Product Selection tab provide the ability to perform the following actions:
| Button | Description |
|
|
Provides the ability to create a new loan product for Virtual Capture. |
 |
Provides the ability to modify the settings for an existing product. |
The Product Configuration window appears upon clicking  and selecting a product, or clicking
  to modify a product.
When creating or editing a loan product, the Product Configuration window appears as shown below:
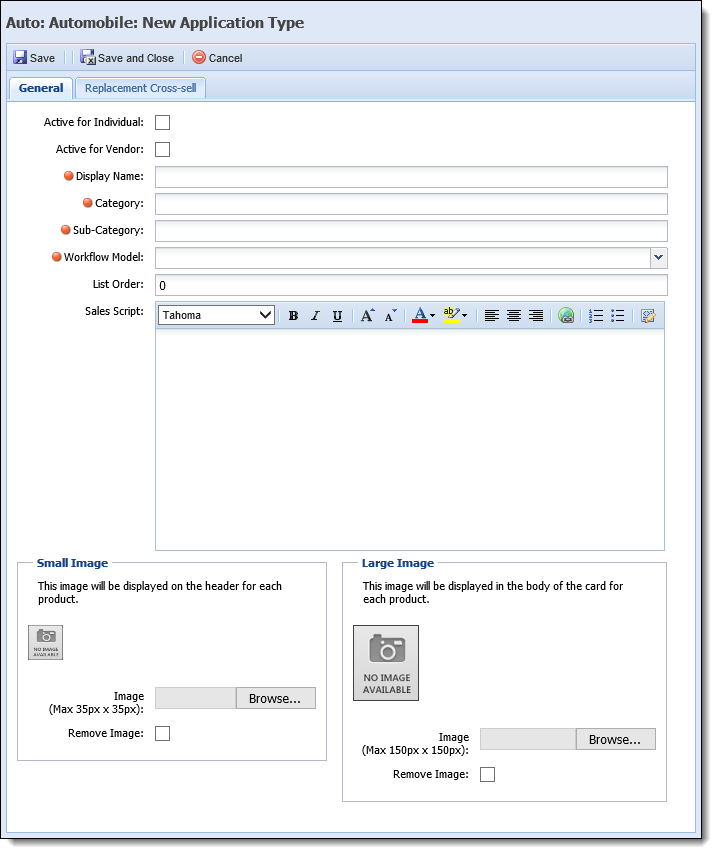
Attributes for a product are defined within the following tabs:
The General tab of the Product Configuration window provides administrators with the ability to define the categorization, image and sales script of the product to be used within Virtual Capture.
The following product attributes are defined within the General tab of the Product Configuration window:
| Product Attribute | Description | ||||||||||||||||||||
| Active for Individual | Select this check box to activate the product for individual applicants in Virtual Capture. Active products are available to be selected by the applicant within the Product Selection page. | ||||||||||||||||||||
| Active for Vendor | Select this check box to activate the loan product for vendors in Virtual Capture. Active loan products are available to be selected within the Product Selection page that is used by vendors to create an application on behalf of the applicant. | ||||||||||||||||||||
| Display Name | Enter the name of the product to be displayed within Virtual Capture. The value entered within this field determines how the product is listed in the virtual application. | ||||||||||||||||||||
| Category |
Enter the category for the product.
|
||||||||||||||||||||
| Sub-Category |
Enter the sub-category for the product.
|
||||||||||||||||||||
| Workflow Model |
Select a workflow model from the drop-down list to assign to the Loan Application Type. This drop-down includes a list of all active workflow models configured in System Management > Origination > Virtual Capture > Virtual Capture Workflow Models.
|
||||||||||||||||||||
| List Order |
Enter a whole number to identify the order in which the product appears in the Product Selection page in Virtual Capture.
|
||||||||||||||||||||
| Sales Script | Enter an informational and appealing value statement for the product that can be used as a sales tool during product selection. The Sales Script appears within the card for the product on the Product Selection page. | ||||||||||||||||||||
| Small Image |
Click Browse... to locate and upload a small image (maximum 35 pixels by 35 pixels) to associate with the product. The small image appears in the header of the product card when the Display Header Image parameter is set for the applicable device.
|
||||||||||||||||||||
| Large Image |
Click Browse... to locate and upload a large image (maximum 150 pixels by 150 pixels) to associate with the product. The large image appears within the body of the product card when the Display Card Image parameter is set for the applicable device.
|
 |
To remove an image from a product, select the Remove Image check box that appears within the Small Image and Large Image sections. Once this check box is selected, and the product configuration window is saved, the image is no longer displayed for the product in Virtual Capture. |
Replacement Cross-sell Attributes
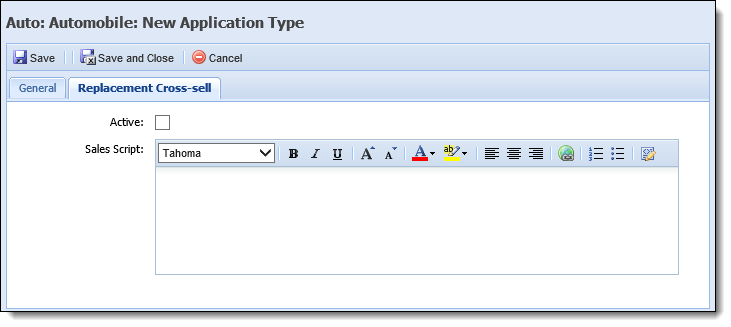
The Replacement Cross-sell tab provides administrators with the ability to activate the loan product as a replacement cross-sell and define the sales script to display for the cross-sell within Virtual Capture.
The Device Parameters tab provides administrators with the ability to configure the look and feel of the virtual application on both small and large devices. Within this tab, administrators can set parameters to control how the virtual application is presented on each type of device an applicant may use to access Virtual Capture. For example, a large device such as a tablet or laptop, or a small device, like a smart-phone or mini tablet.
 |
A device that has a width of 768 pixels or greater is considered a large device. |
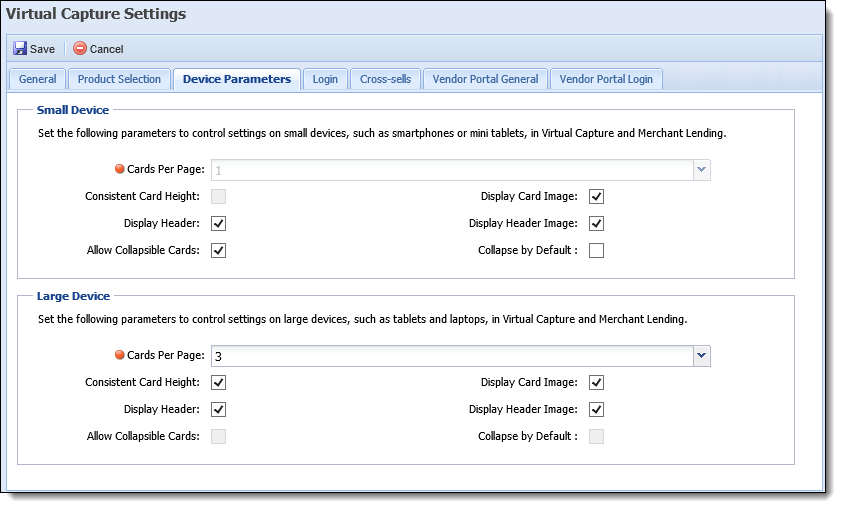
This tab provides the ability to set the following device parameters for both small and large devices:
| Device Parameter | Description | ||||
| Cards Per Page |
Select one of the following options to identify the number of product cards to display in a row within the Product Selection page of Virtual Capture:
The below example displays how the product cards appear in the Product Selection page when the Cards Per Page parameter is set to 3 on a large device:
|
||||
| Consistent Card Height |
Select the check box to configure all product cards to be the same height within the Product Selection page.
When selected, all product cards are set to the same height as the tallest card on the page. If this check box is not selected, the height of the product cards is determined by the amount of content within the card, and does not display consistently within the Product Selection page. In the following example, the Consistent Card Height parameter is set to true for a large device; therefore, each product card is set to the same height.
In the example below, the Consistent Card Height parameter is set to false; therefore the height of each product card is determined by the amount of content included in the body of the card:
|
||||
| Display Card Image |
Select the check box to display the large image for the product within the body of the product card.
|
||||
| Display Header |
Select the check box to display a header row in the top of each product card.
In the following example, the Display Header parameter is set to true; therefore a gray header row is displayed within the product card:
When the Display Header parameter is set to false, the product card appears as shown below:
|
||||
| Display Header Image |
Select the check box to display the small image for the product within the right side of the header row in the product card.
|
||||
| Allow Collapsible Cards |
Select the check box to allow the product cards to be collapsed and expanded in the Product Selection page.
In the following example, the Allow Collapsible Cards parameter is set to true; therefore a "^" appears next to the product name in the header row of the card to allow the applicant to easily expand and collapse each product:
When the Allow Collapsible Cards parameter is set to false, the expand/collapse behavior is not available and the full card is displayed for each product as shown below:
|
||||
| Collapse by Default |
Select the check box to display all product cards in a collapsed view when the Product Selection page is accessed in Virtual Capture.
|
The Login tab contains settings that control how the log-in process works for an individual applicant initializing Virtual Capture. This tab includes the following sections:
Single Sign-on (SSO) is available when accessing the virtual capture site through the financial institution's web site in which the applicant has previously provided authentication. This section of the Login tab provides administrators with the ability to define the error messages that may be received when an applicant signs in to Virtual Capture through the financial institution's web site.
 |
Through SSO, once an applicant selects a product, they are not prompted to enter their login information. An HTTPS request is used to validate the applicant's Username, Password, Person Number, Account Number and TIN with information stored in the core. |
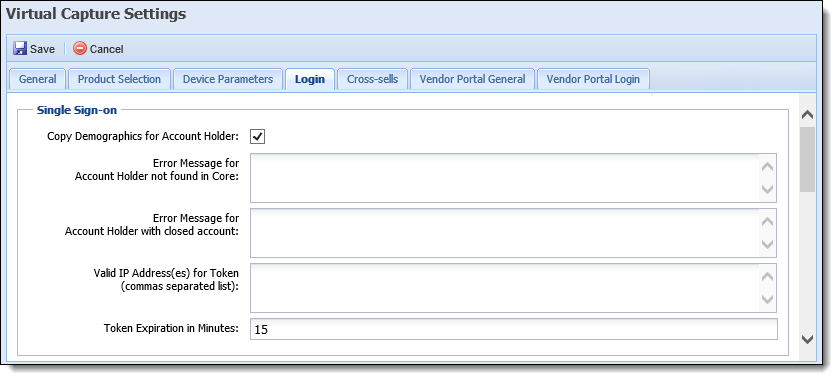
The following fields display within the Single Sign-on section:
| Field | Description | ||
| Copy Demographics for Account Holder |
Select this check box to pre-populate address, phone, and income information for current account holders within a Virtual Capture application.
|
||
| Error Message for Account Holder not found in Core | Enter the error message text to display when the Last Name, SSN and Account Number entered within a screen in Virtual Capture do not match an account in the financial institution's core system. | ||
| Error Message for Account Holder with closed account | Enter the error message text to display when the Account Number entered within a screen in Virtual Capture matches a closed account. | ||
| Valid IP Addresses(es) for Token (commas separated list) |
Enter the IP Addresses that are permitted to access Virtual Capture. When an applicant tries to access Virtual Capture from an IP Address that is not in this list, the applicant receives an error to inform that the single sign on request could not be authenticated and is unable to access the Virtual Capture application. If no IP Addresses are included in this list, applicants are able to access the Virtual Capture application from any IP Address.
|
||
| Token Expiration in Minutes |
Enter the number of minutes that the session token for Virtual Capture is considered valid. After the number of minutes defined within this field expires, an error is received to inform that the token has expired and a new request to access Virtual Capture must be made.
|
This section of the Login tab provides administrators with the ability to configure the login process for applicants who access Virtual Capture through an Online Profile or Guest application. The information configured within this section determines the error messages that return during the login process, as well as the information that appears within the Continue as Guest panel in the Login screen, or the Start New Application screen that populates when creating an application under an online profile.
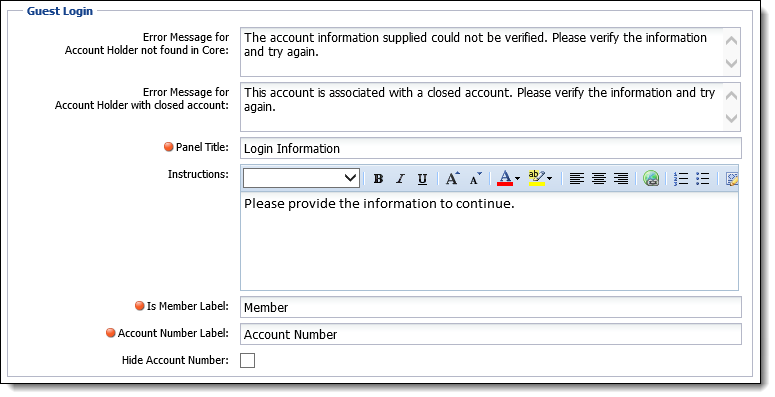
The following fields display within the Guest Login section:
| Field | Description | ||
| Error Message for Account Holder not found in Core | Enter the error message text to display upon clicking  in the Continue as Guest panel or Start New Application screen when the applicant selects Yes from the Member drop-down and the Last Name, SSN and Account Number entered do not match an account in the financial institution's core system. in the Continue as Guest panel or Start New Application screen when the applicant selects Yes from the Member drop-down and the Last Name, SSN and Account Number entered do not match an account in the financial institution's core system. |
||
| Error Message for Account Holder with closed account | Enter the error message text to display upon clicking  in the Continue as Guest panel or Start New Application screen when the applicant selects Yes from the Member drop-down and the Account Number entered matches a closed account. in the Continue as Guest panel or Start New Application screen when the applicant selects Yes from the Member drop-down and the Account Number entered matches a closed account. |
||
| Panel Title |
Enter the title to display at the top of the Login screen in Virtual Capture.
|
||
| Instructions | Enter instructions or other text to appear within the Login screen in Virtual Capture. This text provides applicants with direction in completing the screen. | ||
| Is Member Label |
Enter the name of the Member drop-down that appears within the Continue as Guest panel or Start New Application screen.
|
||
| Account Number Label |
Enter the name of the Account Number field that appears within the Continue as Guest panel or Start New Application screen.
|
||
| Hide Account Number |
Select this check box to determine whether or not an account number is required to initialize the virtual application process. When this check box is selected, the Account Number field does not appear within the Continue as Guest panel or Start New Application screen.
|
This section of the Login tab provides administrators with the ability to enable IP address tracking and configure the error message that displays when an applicant's IP address is blacklisted.

The following fields display within the Blacklist IP Address section:
| Field | Description | ||||
| Capture IP Address |
Select this check box to enable IP address tracking in Virtual Capture. When an application is saved within Virtual Capture, the IP address is stored within the IPAddress field available for addition to reports and screens in the Lifecycle Management Suite. If the IP address fulfills the Blacklist parameters defined in System Management > Modules > Origination, the IP address is prohibited, and is displayed within the list of blacklisted IP addresses in System Management > Virtual Capture > Blacklist IP Addresses.
|
||||
| Error Message for Blacklisted IP Address |
Enter the error message that is displayed within Virtual Capture when an applicant's IP address is blacklisted.
|
 |
For more information on IP address blacklisting, please see the Blacklist IP Address topic within this guide. |
The Cross-sells tab contains settings for the various loan, and non-loan cross-sells configured within Virtual Capture. This tab is populated with all of the cross-sells configured in System Management > Origination > Cross-sell Products.
 |
When a new cross-sell is added to System Management > Origination > Cross-sell Products, it is automatically added to the Cross-sells tab in Virtual Capture Settings, however it is not automatically marked as Active. |
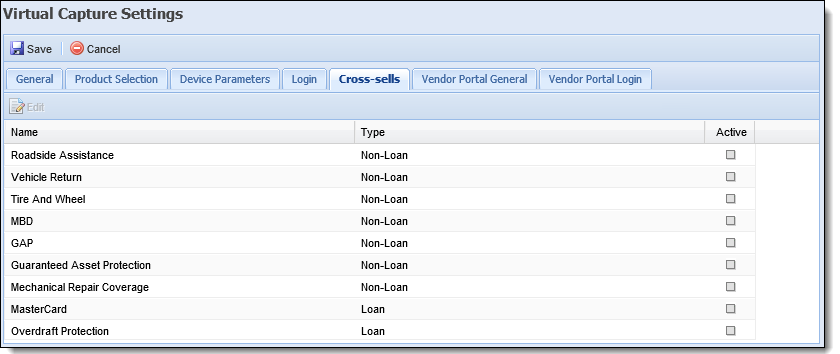
Information for Virtual Capture cross-sells is displayed within the following columns:
| Column | Description |
| Name | Displays the name of the cross-sell. |
| Type | Displays the type of the cross-sell. |
| Active | Displays a  if the product is enabled within Virtual Capture. if the product is enabled within Virtual Capture. |
The  button within the top of the tab provides the ability to update a cross-sell product for use in Virtual Capture.
Selecting  opens the Cross-sell configuration window to update the cross-sell product for use in Virtual Capture.
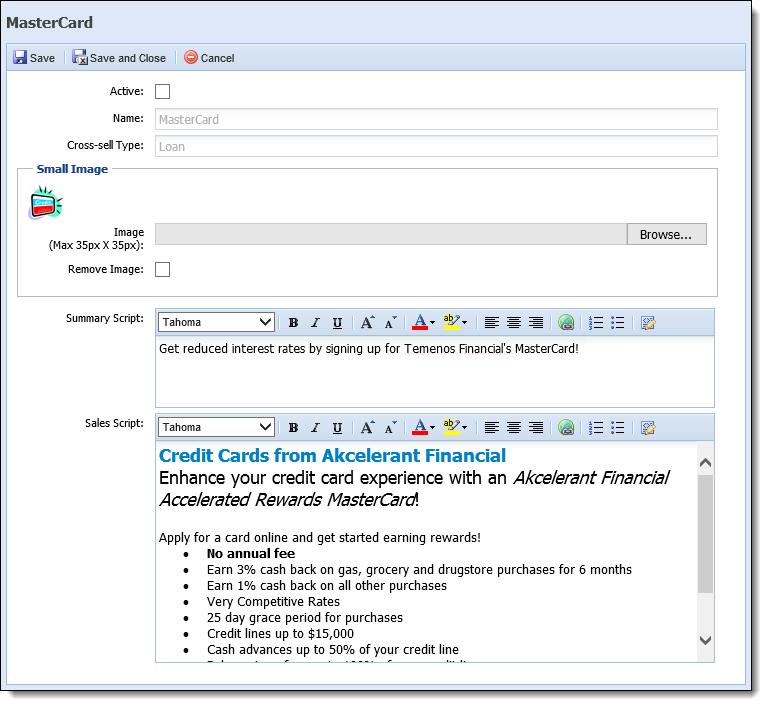
The following fields are displayed within the Cross-sell configuration window:
| Field | Description | ||
| Active | Select this check box to activate the cross-sell within Virtual Capture. Active cross-sells can be offered to applicants through the Cross-sell panel during the virtual application process. | ||
| Name |
Displays the name of the cross-sell as defined in System Management > Origination > Cross-sell Products.
|
||
| Cross-sell Type |
Displays the cross-sell type as defined in System Management > Origination > Cross-sell Products.
|
||
| Small Image |
Click Browse... to locate and upload a small image (maximum 35 pixels by 35 pixels) to associate with the cross-sell. The small image appears within the Cross-sell panel when rendered in Virtual Capture.
|
||
| Summary Script | Enter an informational and appealing short value statement for the product to be used as a sales tool during cross-sell selection. The Summary Script appears within the Cross-sells panel that applicants use to select the cross-sell product for which they want to apply. | ||
| Sales Script |
Enter an informational and appealing value statement for the product to be used as a sales tool during cross-sell selection. The Sales Script appears within the Cross-sells panel details that applicants use to select the cross-sell product for which they want to apply.
|
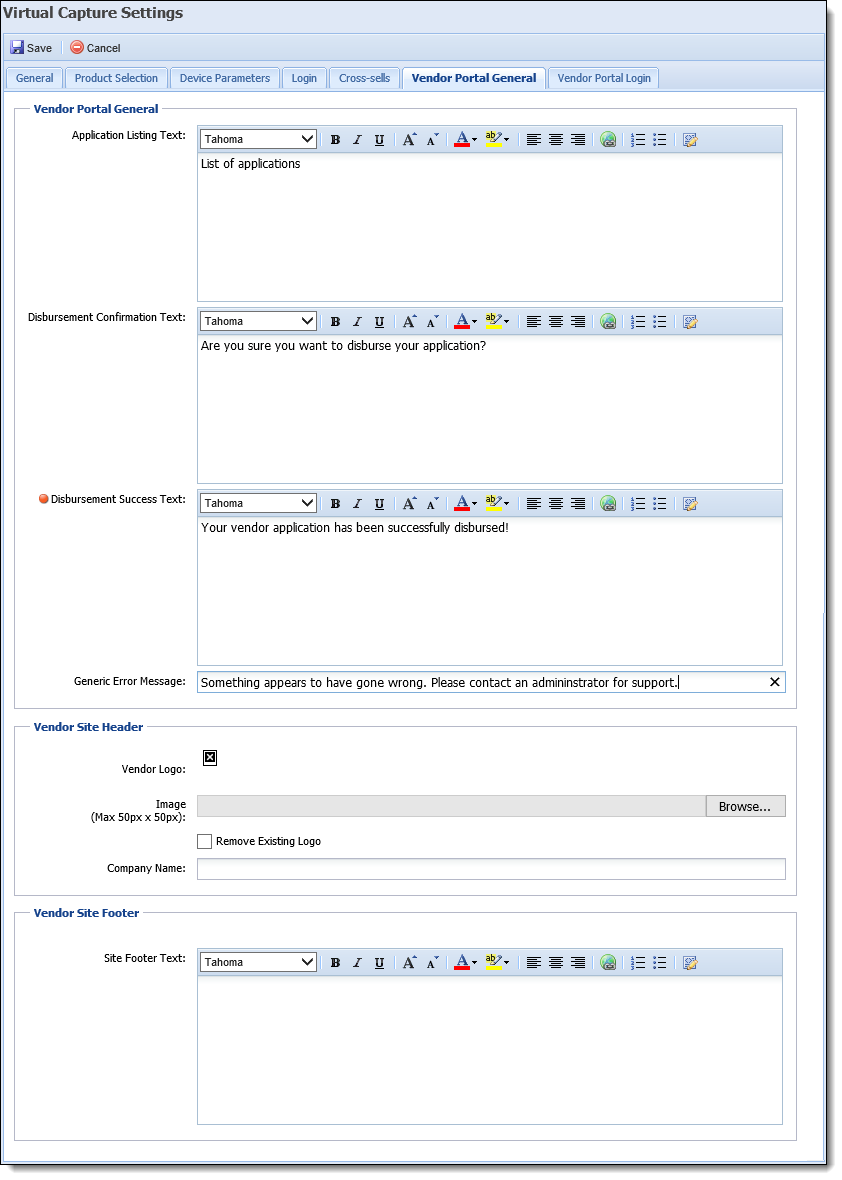
The Vendor Portal General tab contains settings that enable administrators to define the style and appearance of Virtual Capture for vendors accessing the module through the Vendor Portal.
 |
The Vendor Portal General tab contains the same fields as the General tab. Please refer to the General tab section of this topic for information on the fields that are available within this tab. |
The Vendor Portal Login tab contains settings that control how the log-in process works for a vendor initializing Virtual Capture through the Vendor Portal.
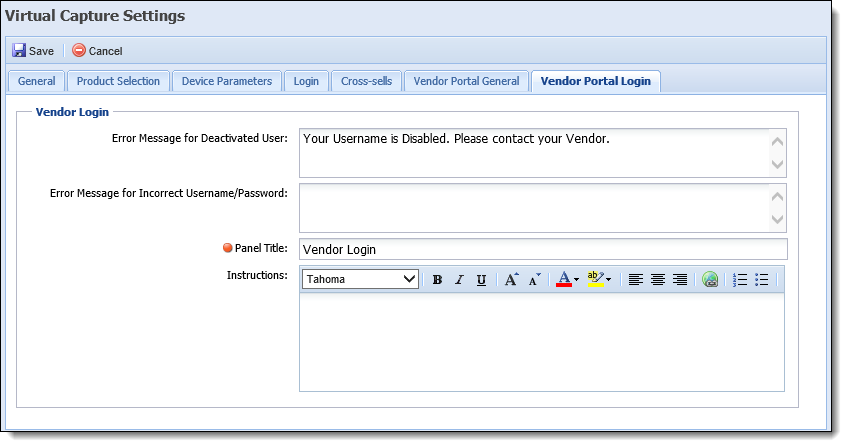
The following fields are displayed within the Vendor Login tab:
| Field | Description | ||
| Error Message for Deactivated User |
Enter the error message text to display within Virtual Capture when a deactivated vendor user attempts to access the module.
|
||
| Error Message for Incorrect Username/Password |
Enter the error message text to display within Virtual Capture when a vendor user attempts to access the module with an incorrect username and/or password.
|
||
| Panel Title |
Enter the name of the login panel as it should appear for vendors within Virtual Capture.
|
||
| Instructions | Enter the text to display as instructions to assist vendor users with logging in to Virtual Capture. |
To define settings for the Virtual Capture application:
To create a product within the Product Selection tab:
 .
. |
If creating a loan product, the Select Product window includes a list of all active loan application types configured in System Management > Origination > Loan > Loan Application Types. |
 to retain the settings and return to the Virtual Capture Settings page.
 The Product Selection tab provides the ability to modify the attributes for an existing product within the Product Configuration window, as well as supports the ability to edit the following fields directly within the grid:
To modify attributes within the Product Configuration window:
 .
. to retain the updated settings and return to the Virtual Capture Settings page.
To modify values within the grid:
 within the top of the Virtual Capture Settings page to retain the modified value(s).
 |
When a field is updated within the grid,  must be clicked within the top of the Virtual Capture Settings page in order to retain the modified value for the product. If must be clicked within the top of the Virtual Capture Settings page in order to retain the modified value for the product. If  is not clicked after a field is updated within the grid, the field reverts to the existing value once the Virtual Capture Settings page is refreshed. is not clicked after a field is updated within the grid, the field reverts to the existing value once the Virtual Capture Settings page is refreshed. |
To remove a product from Virtual Capture Settings:
 .
. within the top of the Virtual Capture Settings page to retain the configurations.
  |
Any changes made within the Virtual Capture Settings page are not applied in Virtual Capture until the web application is refreshed. By default, Virtual Capture is automatically refreshed every 30 minutes to apply the updated configurations from the Lifecycle Management Suite to the Virtual Capture application.
|