
Temenos Lifecycle Management Suite - Collection Product Guide
Case Tasks
| Administrator Guide > Cases > Case Tasks |
Case tasks are individual tasks created to be added to cases that are in progress. Case tasks can be included in a case without being part of an existing case process.
For example, in a foreclosure case, property maintenance is needed monthly for the duration of the time that an institution controls the property. A property maintenance case task can be configured to allow users to add the task every month to keep track of each month's maintenance individually.
By navigating to the System Management > Collections > Case Tasks page administrators can manage existing case tasks and create new case tasks.
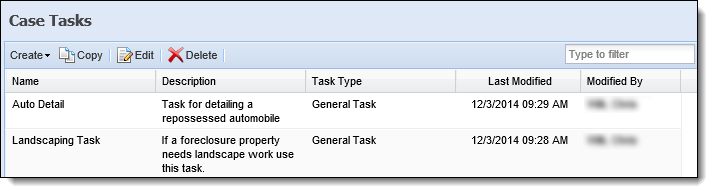
The following columns display on the Case Tasks page in System Management:
| Column Name | Description |
| Name | The name of the Case Task. |
| Description | If provided, displays a description of the Case Task. |
| Task Type | Denotes the task type of the Case Task. |
| Last Modified | Denotes when the last modification was made to the Case Task. |
| Modified By | Denotes who made the last modification to the Case Task. |
The following list contains task attributes defined in the task type configuration processes:
There are five different task types available within the module.
| Task Type | Description | ||
| Execute Code |
This task type is used to run custom code that integrates with the API to update an external system.
|
||
| Execute Rules | This task type is used to execute business rules. | ||
| General | This task type displays general information in a task. | ||
| Screen |
This task type is used to display a screen.
|
||
| Workflow | This task type provides the ability to run a workflow in a task. |
Each Task Type has unique business functions providing the ability to customize individual cases.
For example, an account holder can reinstate a loan during a Repossession Case. To quickly reinstate a loan an institution can allow users to run a Reinstate Loan workflow in a task. To update this information on the core, administrators can use an Execute Code task that runs automatically to update the core without user interaction.
All task types share common attributes that are defined while creating or editing a task.
 |
All task types, with the exception of the General task type, have specific attributes that are located on a tab named the same as the task type. |
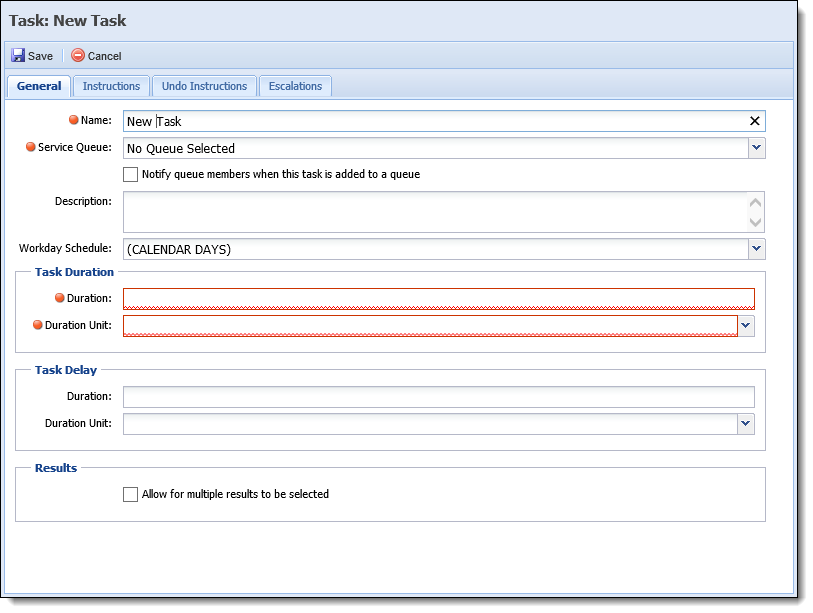
General attributes provide basic information for a task and are located within the general tab:
| Attributes | Description | ||||
| Name |
Provide a name for the task. This is a required field.
|
||||
| Case Queue |
Assign a case queue to a task for specific users and departments to work the task. Selecting a case queue from the drop-down list. Once the task is active, it is assigned to this case queue. This is a required field.
|
||||
| Notify queue members when this task is added to a queue. | Select this check box to send an email notification to users that have access to a queue, when a task enters that queue. | ||||
| Description | Provide a brief description of the purpose and use of the task. The description is displayed to end users on the Summary tab of a task, as well as the Case Tasks page in System Management. | ||||
| Workday Schedule |
Assign a workday schedule, by default the workday schedule is Calendar Days. This can be overridden by selecting the workday schedule from the drop-down list.
|
||||
| Task Duration |
Define the expected duration for the task to be completed using whole numbers. This is a required field. This value can be used for various purposes including SLA's reporting.
Select the Duration Unit:
|
||||
| Task Delay |
A task delay is used to start a task after a specified delayed period. For example, while wiring funds an institution allows 30 days for an account holder to return a signed wire transfer form. The administrator configures a Wire Transfer Confirmation task to have a delay of 30 days to allow the account holder enough time to return the forms.
Define the duration of the delay using whole numbers and select the Duration Unit:
|
||||
| Results |
Administrators allow tasks to have more than one result by selecting the Allow for multiple results to be selected check box.
If results are defined, the user must select the result(s) while completing the task. Results can be evaluated in business rules and code to determine what additional or remaining work is required to complete a service request.
|
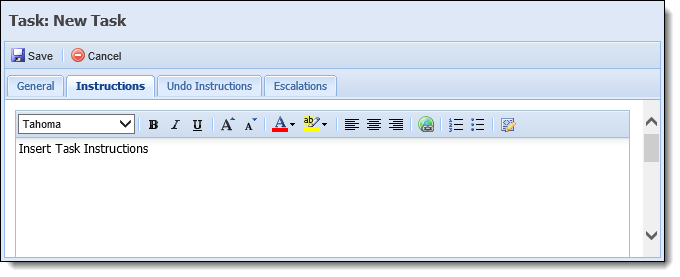
The Instructions attribute is used to provide clear instructions to the end-user explaining what work must be accomplished to complete this Task.
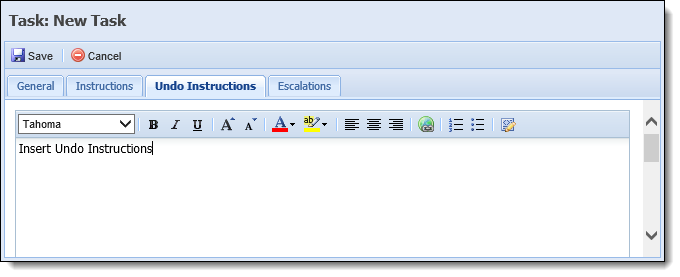
The Undo Instructions attribute is used to provide clear instructions to the end-user explaining what actions must be taken when a task status is undone.
 |
All task types must be completed manually when they are undone. Since users do not work automated tasks, such as Execute Code tasks, undo instructions on how to complete them manually are essential. |
Task Escalation is a rule based attribute that aids in assuring that SLA's are met.
A task can be assigned an escalation process that can be made up of one or more levels. Each task escalation level associates a time value and case queue to a task.
Tasks escalate by moving to the assigned queues at the associated times. Times adhere to the Workday Schedule that is assigned to the task and are defined in one of two types: Time or Duration.
|
If an Escalation Schedule is assigned to a task, the task begins escalation once it has been created in the ticket regardless of the task status. The only time a task does not escalate is while the person assigned to the ticket is in context. Once the person is no longer in context, the task resumes escalation. |
Use the Escalation Tab to create an escalation schedule for a task.
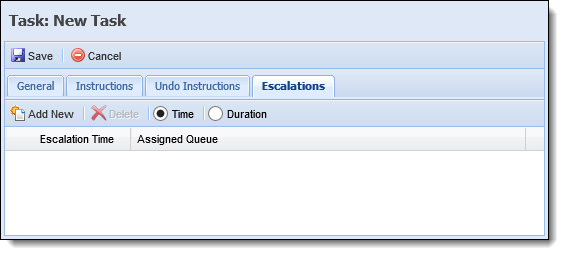
|
All levels within a single Task Escalation process can only use one time format, either Time or Duration. When changing between Escalation Types a message appears warning administrators that previous Escalation settings are lost if they continue. |
Time type escalation uses an absolute time method to escalate tasks. Administrators select this escalation type when a task needs to be completed by a specific time in a workday.
The below example uses a Time type escalation and a workday schedule with a start time of 9:00 am and end time of 5:00 pm.
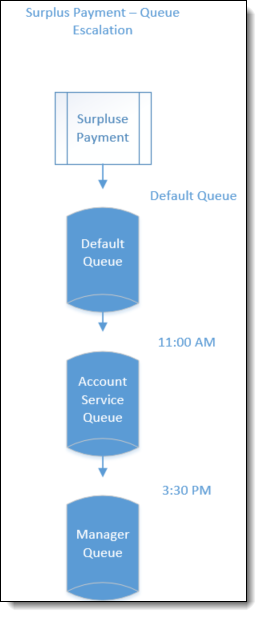
Surplus Payment task is created to have a default queue and 2 levels of escalation.
If a case containing the Surplus Payment task is created at 4:00 PM, the task escalates directly to the Manager Queue.
This occurs because 4:00 PM is within the Workday schedule start and end time but after both escalation levels time settings.If a case containing the Surplus Payment task is created at 5:30 PM, the task is placed in the Default Queue and escalates to the Account Service Queue at 11:00 AM the following morning.
Since the 5:30 PM start time is outside the workday schedule, the escalation process begins at 9:00 AM the following morning.To set escalation times using Time type, select the Time radio button in the Escalation tab toolbar.

| Field | Description |
| Escalation Time | Enter the Time using absolute time values such as 10:00, 11:15, and 3:45. Also, from the drop-down select A.M. or P.M. |
| Assigned Queue | Enter the task queue for the escalation level. |
Building a Time Escalation Schedule:
While building a Time Escalation Schedule administrators can add or delete levels of escalation.
To add an escalation level to a task:
Click  to populate a new escalation level.
Assign an Escalation Time and Queue to the escalation level from the drop-downs.
|
When escalation level attributes are updated, the changes must be saved or canceled. If the administrator attempts to continue without saving or canceling, an error message is received. |
To remove an escalation level from a task select the level and click  .
.
 |
When multiple escalation levels are added to the Escalation Schedule, they automatically sort (from top to bottom) in the order of escalation based on the Escalation time assigned. |
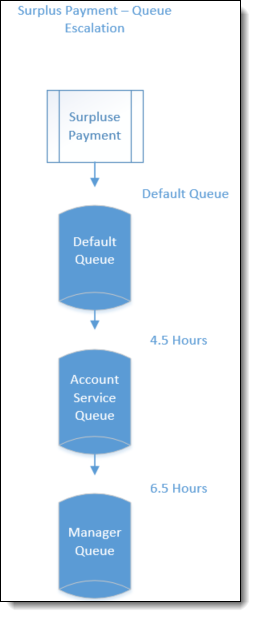
Duration type escalation times use a relative time method to escalate tasks. Administrators select this escalation type when a task needs to be completed within an allotted amount of time from when it is created.
The below example uses a Duration type escalation and a workday schedule with a start time of 9:00 AM and end time of 5:00 PM.
A Surplus Payment task is created to have 2 levels of escalation.
If a case containing the Surplus Payment task is created at 4:30 PM, the task is placed in the Default Queue and escalates to the Account Service Queue at 1:00 PM the following workday.
Adhering to the workday schedule, the escalation process begins and runs until 5:00 PM on the start date. This process resumes escalation at 9:00 AM the following workday.
If a case, containing the Surplus Payment task is created at 5:30 PM, the task is placed in the Default Queue and escalates to the Account Service Queue at 12:30 PM the following workday.
Since 5:30 PM is outside of the defined workday, 9:00 AM to 5:00 PM, the escalation process starts at 9:00 AM the following workday.
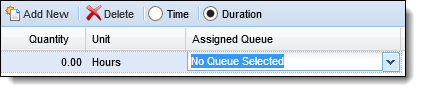
To set escalation times in Duration type, select the Duration radio button on the Escalation tab.

| Field | Description | ||||||||||
| Quantity |
Enter the Time using whole numbers for hours and decimals for minutes. Please see below for some examples:
|
||||||||||
| Unit | Displays the unit of measurement for the quantity. Duration escalation is always set in hours. | ||||||||||
| Assigned Queue | Enter the Service queue for the escalation level. |
Building a Duration Escalation Schedule:
While building a Duration Escalation Schedule, administrators can add or delete levels of escalation.
To add an escalation level to a task:
Click to populate a new escalation level.
Assign a Quantity and Queue to the escalation level.
|
Quantity is calculated as the total time elapsed from the creation of a task. In the above example, the Surplus Payment task spends two hours in the Account Service Queue before escalating to the Manager queue because the difference between the total time to reach the Manager Queue (6.5 hours) and the Account Service Queue (4.5 hours) is 2 hours. |
|
When escalation level attributes are updated, the changes must be saved or canceled. If the administrator attempts to continue without saving or canceling, an error message is received. |
To remove an escalation level from a task select the level and click .
|
When multiple escalation levels are added to the Escalation Schedule, they automatically sort (from top to bottom) in the order of escalation based on the Quantity of time. |
The Execute Code task type is automated to run code that evaluates data and interact with systems outside the module. If the task is completed, results automatically activate the next task in the case.
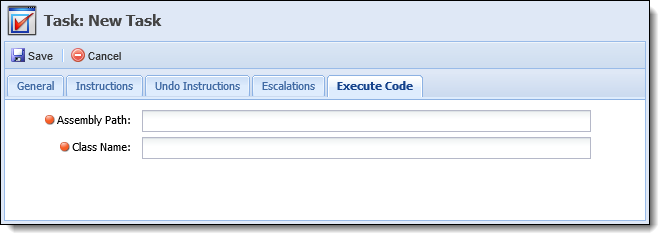
The Execute Code attributes displayed on the Execute Code Tab are Assembly Path and Class Name. Both of these attributes are required.
| Attribute | Description | ||
| Assembly Path |
Provide the assembly path of the custom code.
|
||
| Class Name |
Provide the class name of the custom code.
|
The Execute Rules task type is automated to apply business rules to analyze data at precise steps in a case process. The results returned by the assigned business rule(s) are used to drive users down different paths in a case process.
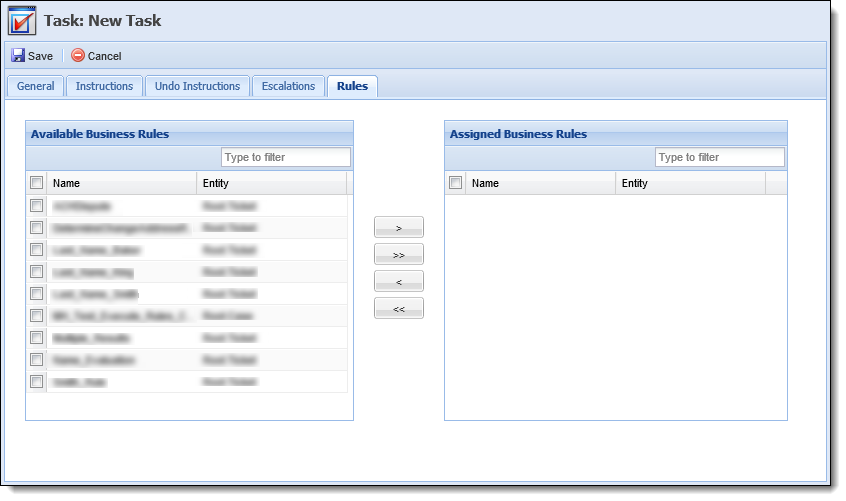
The Execute Rule attributes display on the Rules Tab:
| Attribute | Description | ||
| Available |
Displays a list of the Available Rules configured in System Management > Collections > Rules Manager. Assign a rule to evaluate by selecting the desired rule from the list and moving the rule to the Assigned Rules list using the arrows that are displayed.
|
||
| Assigned | Displays a list of all rules that have been assigned to the task. Multiple rules can be assigned to a single task. All rules execute simultaneously |
|
Although an execute rule task can include multiple rules, it is recommended to configure a single rule to accomplish the desired task. This practice is beneficial for configuring rules and troubleshooting if there are any issues. |
The Screen task type allows users to view and edit a screen in the Lifecycle Management Suite. Tasks such as filing for Bankruptcy can be completed in a screen task.
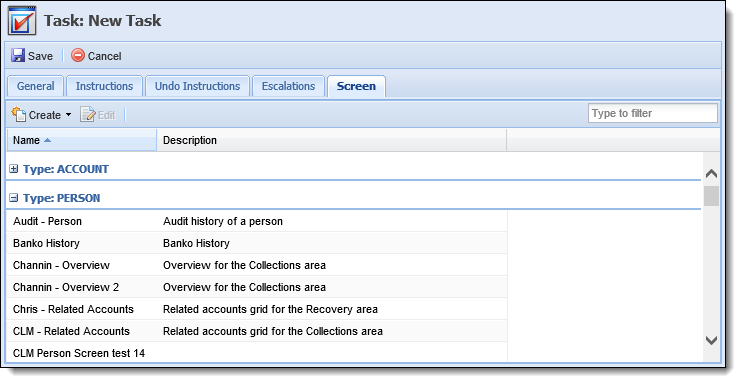
The Screens tab displays a grid with two fields Name and Description. These fields display the name and description that are provided to the screen when it is created. The grid organizes all Person, Account, and Case screens that are available in the system by type. Administrators must select the desired screen from the list or an error message appears when attempting to save the task.
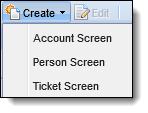
From the Screens tab toolbar, administrators have the ability to create a new person, account, or ticket screen by selecting a screen type from the create drop-down.
Administrators can also edit existing screens by selecting a screen from the list and clicking  .
.
|
When a new screen is created through a task, it is available throughout the module the same as if it was created through the System Management > Screens page. For more information about creating and editing screens, please see the Screens topic of this guide. |
Workflows are step-by-step processes used to perform work on one or more accounts. The Workflow task type provides the ability to run both automated and manual workflows within a case. For example, a deficiency payment workflow has multiple steps to complete the deficiency payment process. This process may need to be completed independently or it can be included in a case such as a "Auto Repossession" case.

The Workflow attribute includes a drop-down list of all workflows listed in alphabetical order. The first workflow in the list is pre-populated by default. Administrator must select a workflow or the default workflow is assigned to the task.
|
Once a workflow is created it is included in the drop-down list. See the Workflow section of this guide for more information on creating a workflow. |
Once all the neccessary attributes have been defined, click  to save the task and return to the task process screen.
|
Click |
The Create function enables administrators to configure a new task that can be added to a Case by a user.
 , and select the desired task type of the new task..
The Copy function enables administrators to duplicate the configuration of an existing Case Task. The existing screen can be used as a base for creating a new Case Task.
 . to return to the Case Task page.
The Edit function enables users to revisit an existing case task and modify the current configuration.
 . to return to the Case Task page.
The Delete function enables administrators to removed case tasks from the Lifecycle Management Suite.

 Time Type
 in the toolbar. If a rule is created while in the Task Edit screen, clicking
  displays the new rule.
 to disgard changes to the task attributes and return to the