
Temenos Lifecycle Management Suite - Account Origination Product Guide
Create
| End-User Guide > Desktop and Ribbon Bar > Create |
The Create section of the Ribbon bar contains functionality that enables the ability to originate account applications in the Lifecycle Management Suite.

 |
Check out the Creating an Account Application video tutorial for an overview of the application initialization process and the account product functionality in the New Application screen. |
The Create topic provides the following information and instructions to assist users with creating an application:
To originate an application, click  within the Ribbon Bar.
Upon selecting , the New Application screen appears in a new window.
The New Application screen provides users with the ability to enter the information required to initiate an application as well as start the application process. This screen can also be customized to include a detailed value statement that can be used as a sales tool when initiating a new application.

The New Application screen includes the following sections:
The Application Information section allows users to input the information required to initiate an application, such as the type of application being created, the product being applied for, the application source, channel, and/or vendor, as well as an account number or Taxpayer Identification Number (TIN) to identify the applicant.
The toolbar within the top of this section provides the ability to perform the following actions:
| Icon | Description | ||
 |
Allows a user to save the data entered in the Application Information section and create the application.
|
||
 |
Allows a user to cancel the application process. |
Reference the table below to assist with completing the fields within this section of the New Application screen:
| Field | Description | ||||
| Application Type |
Identifies the type of application being created.
|
||||
| Applying For |
Select the product for which the applicant is applying. This drop-down contains the active sub-products configured for the identified application type and defaults to the first sub-product listed alphabetically.
|
||||
| Application Source | Use the drop-down to select how the application is being received. | ||||
| Channel | Use the drop-down to select the Channel that is submitting the application. | ||||
| Vendor |
Use the Search function to select the Vendor that is submitting the application.
|
||||
| Account Number |
If the applicant is a current account holder, enter the account number to associate with the application.
|
||||
| TIN |
If the applicant’s account number is unknown, or the applicant is not a current account holder, enter the applicant’s Tax Identification Number. This is also used for the Applicant’s Social Security Number (SSN).
As part of the application initialization process, the Lifecycle Management Suite uses the TIN to search the core and previous applications for the following information:
Demographics
Addresses
Assets
Liabilities
Core Messages Important core messages |
 |
At least one account product must be active in order for the Account Products section to appear within the New Application screen. For more information, please see the Account Products topic in the Administrator Guide. |
The Account Products section displays a list of the active account products configured by the system administrator in System Management > Origination > Account > Account Products.
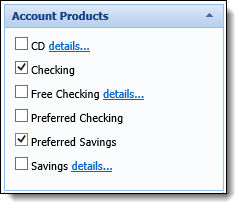
From this section of the New Application screen, users are provided with the ability to add an account product and view account product offerings.
To add an account product from the New Application screen, select the check box next to the desired account product(s).
|
If configured by the system administrator, multiple account products of the same type can be added during the application process; however, only one of each account product type can be added to an application from the New Application screen. For more information, please see the Adding Account Products section of the Account Products topic in this guide. |
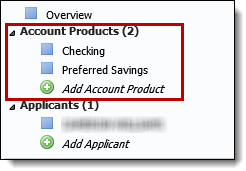
Once is clicked, the selected account product(s) appear within the People and Products section in the Application Navigator.
When configuring an account product, system administrators have the ability to customize a detailed value statement for each account product that can be used as a sales tool when initiating a new application.
|
For more information on configuring a sales script for an account product, please see the Account Products topic in the Administrator Guide. |
If a sales script has been configured for an account product, a details... link appears next to the account product name as shown for Free Checking in the example below:
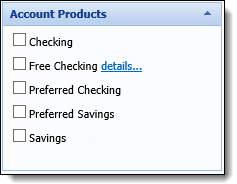
Click details... to view the sales script for the account product.

Upon selecting the sub-product being applied for, the Product Offering section populates with the customized Product Details and/or Sales Script configured by the system administratorSystem Management > Origination >Account > Account Application Types. This section provides a detailed value statement about the selected product that can be used as a sales tool when initiating a new application.
|
Information within the Product Offerings section may change based on the sub-product selected within the Applying For drop-down. |
Once all information within the New Application screen is complete, click to create the application.
When an application is being created for an existing account holder, once is selected, the Lifecycle Management Suite performs an automatic search for the following information using the account number or TIN provided within the New Application screen:
When there is one or more existing applications in progress, the Review Active Applications and/or Promotional Offers screen appears in a new window. This screen contains a list of in-progress applications associated with the applicant. In progress applications include all applications without a status of Withdrawn, Disbursed, Auto-withdrawn, LO Rejected, Invalid, Rejected, or Not Eligible.
|
As shown in the below example, an Active Offers tab appears next to the Active Applications tab to list the promotional offers for which an applicant is eligible to apply. While the Promotions functionality is not currently available for the account origination solution, this tab continues to display within the screen, but the grid within the Active Offers tab appears blank. |
By default, applications appear in the grid in a descending order with the most recently created application appearing at the top of the list. This list can be reorganized into ascending or descending order by clicking within the desired column and selecting the  that appears, as shown in the Application column in the below example.
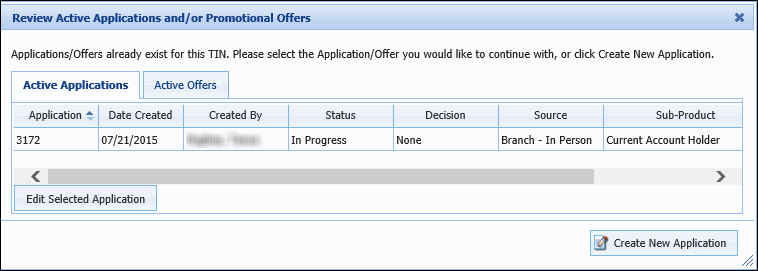
The grid within this screen displays the following columns of information for each active application:
| Column | Description |
| Application | Displays the Application number. |
| Date Created | Displays the date that the application was created. |
| Created By | Displays the name of the user who created the application. |
| Status | Displays the status of the application. |
| Decision | Displays the decision status of the application. |
| Source | Displays the source of the application. |
| Sub-Product | Displays the name of the application sub-product. |
| Requested Amount | Displays the Requested Amount for the application. |
To open an existing application, highlight the desired application within the grid and click  . The existing application opens and allows the user to continue processing the application.
|
When an existing application is loaded, the workspace automatically opens to the screen that was in progress when the application was last open. |
If none of the existing applications apply, select  to disregard all existing applications and create a new application.
Back to Create Application for Existing Account Holder ^
Back to Create Application for Existing Account Holder ^
When the account number or TIN provided for the applicant is associated with more than one record in the core, the Lifecycle Management Suite prompts users to select the account from which data is retrieved within the Select Person to Create Application window.
|
If contact with the core fails and the Lifecycle Management Suite fails to retrieve applicant information upon application initialization, an error message stating the exception details is displayed to the user. |
This window contains a list of all person records associated with the provided TIN or account number and enables the ability to select an applicant to assign to the application.
|
When a TIN is entered to create the application, the Lifecycle Management Suite returns all records for the primary applicant that are related to the TIN. When an account number is entered to create the application, the Lifecycle Management Suite returns all records related to the account number, including those for Joint applicants related to the account. If a Joint record is selected, a message is received to inform that the application will be created as a non-member application. |
Highlight the desired record within the grid and click OK to proceed with the application process.
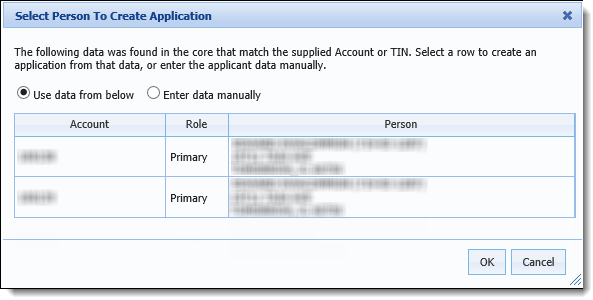
By default, the Use data from below radio button is selected, but the option to manually enter information for the applicant is available. If none of the records within the grid apply, select Enter data manually and click OK to manually enter information for the applicant.
|
When a record from the core is not selected, the Lifecycle Management Suite creates the application as a non-member application. For more information, please see the Create an Application for a Non-Account Holder section within this topic. |
Back to Create Application for Existing Account Holder ^
When the primary applicant exists as a joint/non-primary account holder within the core, the Lifecycle Management Suite prompts users to select the account from which data is retrieved within the Select Person to Create Application window. This window contains a list of all person records associated with the provided TIN or account number and enables the ability to select an applicant to assign to the application.
|
If a non-primary account holder is the primary applicant, the Lifecycle Management Suite creates the application as a non-member application. |
Highlight the desired record within the grid and click OK to proceed with the application process.
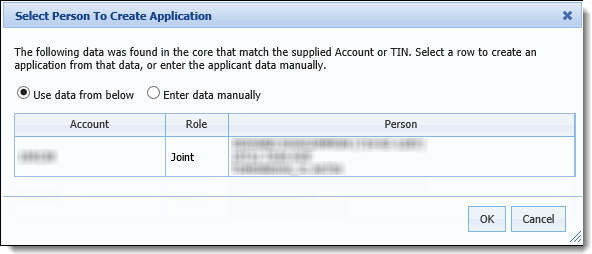
By default, the Use data from below radio button is selected, but the option to manually enter information for the applicant is available. If none of the records within the grid apply, select Enter data manually and click OK to manually enter information for the applicant.
Back to Create Application for Existing Account Holder ^
When the primary applicant is a non-account holder and/or data cannot be located in the core for the supplied TIN, an application is created as a Non-Member application. Upon selecting , the following window appears to enter information for the applicant:
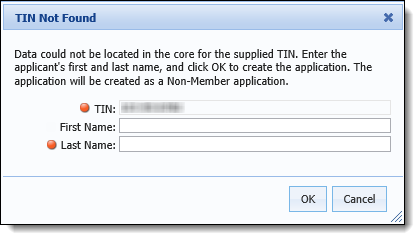
The TIN pre-populates with the number provided within the New Application screen. Enter the applicant's First Name and/or Last Name within the fields that display and click OK.
If enabled within the Solutions.Origination page, Validation rules are processed against the criteria entered in the request.
TIN Validation Rules enable the Lifecycle Management Suite to efficiently handle invalid Tax Identification Numbers entered in the application request.
|
Additional applicants added to an application are subject to TIN validation. |
If a TIN fails validation, the Is Invalid TIN field becomes selected and prior applications are not searched for applicant information with matching TINs.
|
The Is Invalid TIN field is a read only field and cannot be manually cleared by a user. |
 Application Initialization Validation