Temenos Lifecycle Management Suite - Account Origination Product Guide
Account Products
| Administrator Guide > Account Origination Overview > Account Products |
Account Products allow administrators to maintain and customize the account products available at their institution.
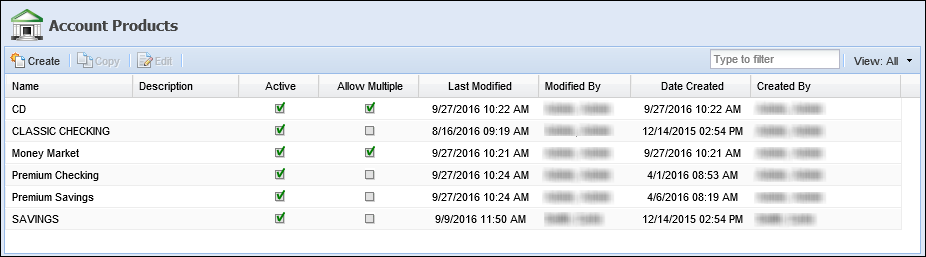
The Account Products page can be accessed from System Management > Origination > Account > Account Products and provides a complete list of all account products available within the Lifecycle Management Suite’s account origination module. From this page, administrators are provided with the functionality to customize the properties of each account product to meet their institution's business needs.
 |
To see the Account Product functionality in action, view the Creating Account Products video tutorial. |

The grid within the Account Products page displays the following columns of information about each account product:
| Column Name | Description |
| Name | Displays the name of the account product. |
| Description | If provided, displays a description of the account product. |
| Active | Displays a  if the account product is active. if the account product is active. |
| Allow Multiple | Displays a if multiple of the account product can be added to an application. |
| Last Modified | Displays the date that the last modification was made. |
| Modified By | Displays who made the last modification. |
| Date Created | Displays the date that the account product was created. |
| Created By | Displays who created the account product. |
The Account Products topic includes the following attributes and instructions to assist administrators with creating, copying, and editing account products:
All Account Products share common attributes that are defined when creating, copying, or editing an account product.
General attributes include basic information pertaining to the account product.
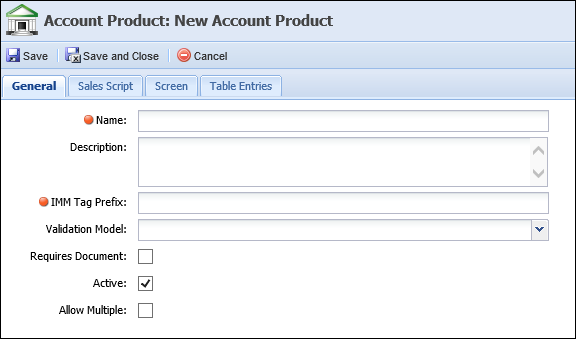
The following General attributes are defined on the General tab:
| Attribute | Description | ||||||
| Name |
Enter a unique name for the account product, such as Basic Savings or Free Checking. This is a required field.
|
||||||
| Description | Enter a description that identifies the purpose of the account product. | ||||||
| IMM Tag Prefix |
Enter a unique set of three alphanumeric characters to be used as a prefix for the IMM tag that associates an IMM document to an account product during document generation. For example, enter SAV for a Savings account product.
For more information on this field, please see the IMM Connector Guide. |
||||||
| Validation Model |
Select a Validation Model from the drop-down list to assign to the account product. This functionality enables institutions to ensure data entered for the selected account product matches an expected value prior to rendering a decision, generating documents and issuing disbursement for the account product. This drop-down includes a list of all Validation Models configured in System Management > Origination > Validation Models.
|
||||||
| Requires Document |
Select the check box to enable the ability to add documents for the account product within the IMM Documents screen. With this check box selected, the account product populates as an available option within the Create drop-down when adding documents to an application through the IMM Documents screen.
|
||||||
| Active |
Select the check box to make the account product available for selection within an application.
|
||||||
| Allow Multiple |
Select the check box to enable the ability to add more than one of the same account product type to an application. When this check box is selected, the account product remains available for selection within the Add Account Product window once it is added to an application. If this check box is not selected, then the account product is removed from the Add Account Product window after it is added to the application.
For example, if Money Market is an active account product that is not configured to allow multiple, Money Market no longer appears as an option within the Account Product drop-down list in the Add Account Product window once it is added to an application. If configured to allow multiple, the Money Market option remains in the Account Product list after it is added to the application.
|
Sales Script attributes enable administrators to enter an account product value statement that can be used as a sales tool when initiating a new application. The sales script populates when the details... link next to the account product is clicked in the Account Products section of the New Application screen.
 |
For more information on how the Sales Script appears in the New Application screen, please the Account Products section of the Create topic in the User Guide. |
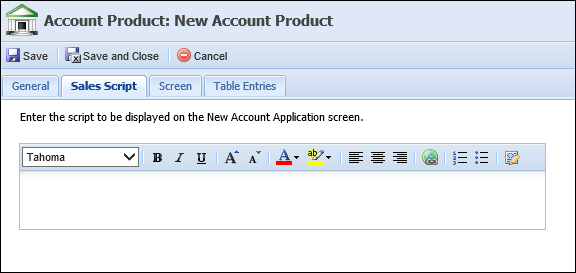
Within the text box, enter the desired sales script using the following rich text options:
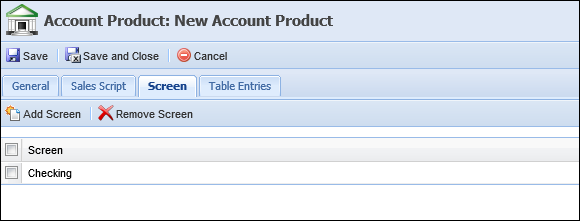
Screen attributes enable administrators to select the screen that populates to capture and display information for the account product such as the Account Number, related Document Set and identification of whether the account is a Base Share and/or requires a Debit Card.
|
To configure a screen for an account product, navigate to System Management > Origination > Screens and select the Account Product screen type. |
 |
In order for an account product to be funded, the Account Product Funding panel must be configured to appear within the screen assigned to each account product in this tab. Additionally, the Description field must be configured to appear in the screen in order for users to be able to append a description to the account product name in the application. |
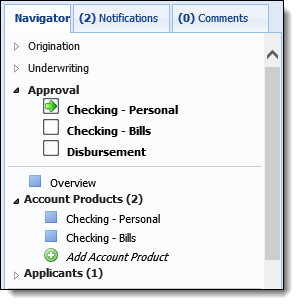
During application processing, the screen assigned within the Screen tab appears upon selecting the product within the Application Workflow or Account Products section of the Application Navigator:
|
For more information, please see the Creating Account Products section within this topic. To learn more about the Application Navigator, please see the Application Workspace Overview topic. |
The Screen tab displays the name of the screen assigned to the account product and provides administrators with the ability to perform the following actions:
| Action | Description |
 |
Click this button to select an Account Product screen to assign to the account product. |
 |
Click this button to remove the screen assigned to the account product. |
From the Table Entries tab, administrators can define the field options that are available for each account product. This configuration ensures only relevant values populate as options within drop-downs and tables.
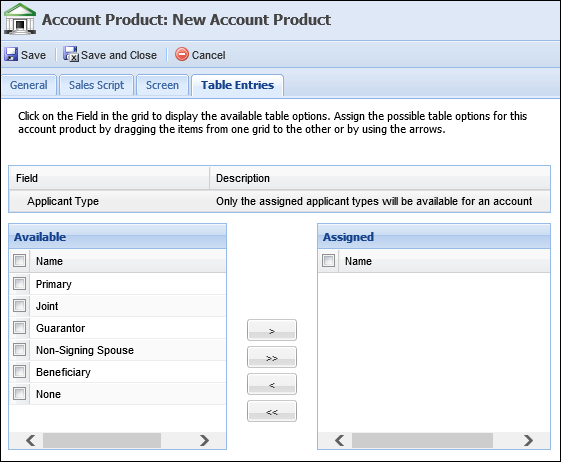
The following field can be configured within the Table Entries tab:
| Field | Description | ||
| Applicant Type |
Select the applicant types that are available to be assigned within an application. This list includes all system-defined and custom applicant types configured in System Management > Origination > Applicant Types.
|
When the Applicant Type field is selected within the Table Entries grid, the options related to that field populate in the Available box located under the grid. Reference the table below for an overview of the Available/Assigned Table Entry attributes:
|
The available Applicant Type lookup values are defined within Field Configurations. |
| Attribute | Description |
| Available | Displays a list of the table options available for the Applicant Type field. Assign applicant types to the account product by dragging and dropping the desired item(s) from the Available grid to the Assigned grid or by using the arrow keys. |
| Assigned | Displays a list of the applicant types assigned to the account product. The assigned applicant types populate as options within the account product drop-downs that appear for the Applicant Roles field and Add Applicant window. |
To create an account product, navigate to System Management > Origination > Account > Account Products and click  .
.
Within the Edit Account Product window, define the General account product attributes.
Once all General attributes are defined, create the script to be displayed in the New Account Application screen within the Sales Script tab.
After a sales script has been created, navigate to the Screen tab to perform one of the following actions:
 .
.
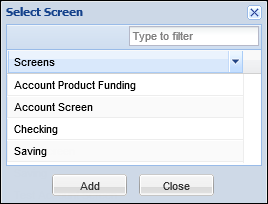
The Select Screen window lists all Account Product screens created in System Management > Origination > Screens.
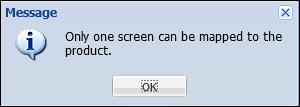
Only one screen can be assigned to each account product. If a screen has already been assigned to the account product, the following message appears upon clicking
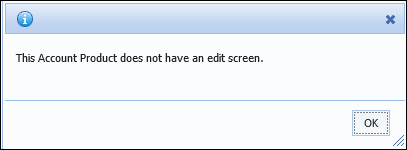
If a screen is not assigned to an account product that appears within the Account Products section in the Application Navigator, the following message is received upon selecting the product:
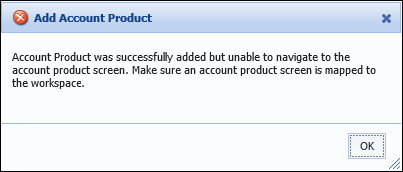
If a screen is not assigned to an account product being added to an application, the following error message displays upon clicking OK within the Add Account Product window:
 .
.Once a screen has been assigned to the account product, navigate to the Table Entries tab to select the applicant types that are available for the account product.
|
At least one Primary applicant type must be assigned to the account product. |
After all account product attributes have been defined, click  . The newly created account product appears within the Account Products grid and is available to be added to an application.
Depending on the configuration of the workflow model assigned to the application type, an itemized list of the account products added to an application can be configured to appear in the Application Workflow. Clicking the product name navigates the user to the screen assigned within the Screen tab.
View the Account Product Listing in the Application Workflow tutorial and/or reference the diagram below for an overview of the steps required to configure account products to appear in the Application Workflow:

For more information, please see the Account Workflow Models and/or Account Application Types- Sub-Products topics within this guide.
The Copy function enables users to duplicate the logic and structure of an existing account product. The existing account product can be used as the base for creating a new account product.
 . to retain all changes and finalize the creation of a new account product.
The Edit function enables users to revisit an existing account product and modify the logic to enhance usability.
 . to finalize the modifications to the account product.
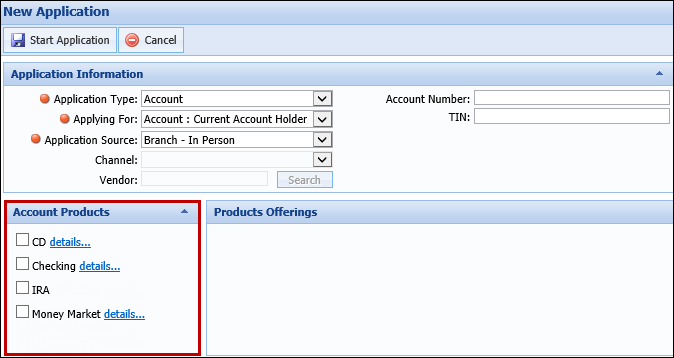
 Add Screen