Temenos Lifecycle Management Suite - Account Origination Product Guide
Account Products
| End-User Guide > Application Processing > Origination > Account Products |
The Account Origination module provides users with the ability to efficiently collect pertinent account product information directly within screens and panels, as well as easily modify account product information throughout the application process.
 |
The Account Origination module supports the ability to add multiple account products to an application. |
The Account Products topic includes an overview of account product details to assist users with the collection of account information, as well as provides instructions for adding, editing, and deleting account products from an application.
|
For an overview of the Account Product functionality in the workspace, view the Account Products in an Application tutorial. |
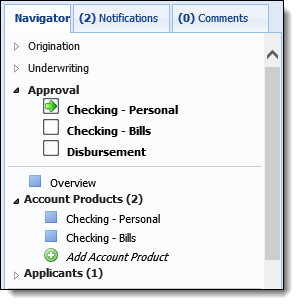
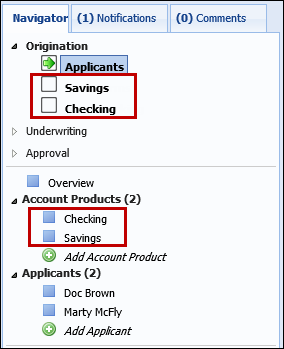
Depending on the configuration of the workflow model assigned to the sub-product, a list of the account product(s) added to an application may appear within the Workflow and/or People and Products section of the Application Navigator.
|
At least one account product must be active in order for the Account Products heading to appear within the People and Products section. For more information, please see the Account Products topic in the Administrator Guide. |
|
If a description is entered for an account product in the Account Product screen, the description text is appended to the account product name in the Application Workflow and Account Products section of the Application Navigator. For more information, please see the Entering Account Information section in this topic. |
Clicking a product name within these sections opens the assigned Account Product screen to enter information for the account.
 |
When an account product is added to an application without an assigned screen, the account product does not appear under the workflow category. While the account product does appear within the People and Products section, an error message is received upon selecting the account product. For more information about assigning a screen to an account product, please see the Account Products topic in the Administrator guide. |
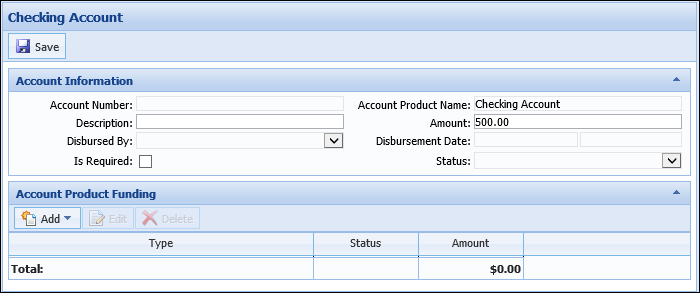
The screen that appears for each account product is configured by the system administrator in System Management > Origination > Screens. Depending on the configuration of the Account Product screen, different fields may appear to allow users to capture important account information, such as Account Number, related Document Set, and identification of whether the account is required.
Each Account Product screen may also be configured to include panels that provide instructions or enable the ability to capture information specific to the funding of the account product.
|
For more information about the Account Product Funding panel, please see the Funding topic within this guide. |
|
When the Description field is configured to appear in an Account Product screen by the system administrator, a description is appended to the name of the account product in the following locations:
This configuration enables users to distinguish between account products when multiple of the same type are added to an application. For example, if two checking accounts are added to an application, one for bills and one for personal use, the account products are listed in the Application Workflow and Account Products section of the Application Navigator as follows:
For more information on how the description appears in each location, please see the Overview of the Account Products Card View section in this topic as well as the Add Applicants and Applicant Roles sections of the Applicants topic in this guide. |
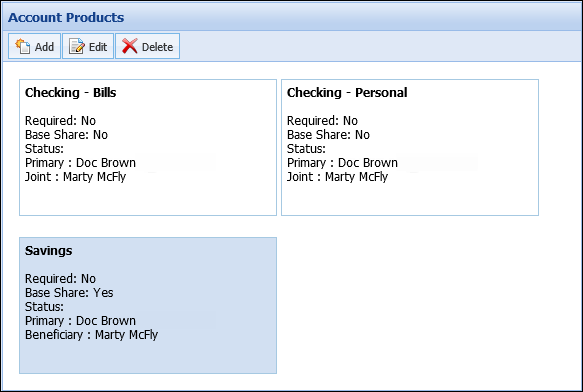
When the Account Products heading is selected within the Application Navigator or the Account Products screen is selected within the Screens List, the Account Products Card View appears displaying all account products related to the application.
The Account Products Card View provides an overview of information specific to each account product as well as enables users to perform various account product actions throughout the application process.

This screen displays a card for each account product added to the application including the name of the account product and the following account information:
|
If a description is entered for an account product in the Account Product screen, the description text is appended to the account product name listed in the card as shown in the above example. For more information, please see the Entering Account Information section in this topic. |
| Field | Description | ||
| Required |
Displays Yes or No to identify if the account product is required for the application.
|
||
| Base Share |
Displays a Yes or No to identify if the account product is a Base Share.
|
||
| Status |
Displays the disbursement status of the account product.
|
||
| Applicant Identification | Displays the role of each applicant on the account product followed by the name of the applicant. |
A toolbar is located at the top of the screen that enables the ability to perform the following actions:
| Icon | Description |
 |
Allows a user to add an additional applicant to the current application. |
 |
Allows a user to edit an applicant that is assigned to the current application. |
 |
Allows a user to remove an applicant from the current application. |
Account products can be added to an application from various areas within the application workspace. This section provides an overview of the methods and processes available for adding an account product.
Account Products can be added from the following sections of an Application:
|
In addition to the methods reviewed within this section, an account product may also be automatically added to an application as required, optional or a base share through rules. For more information, please see the following Rule Vocabulary Template Examples in the Administrator guide: |
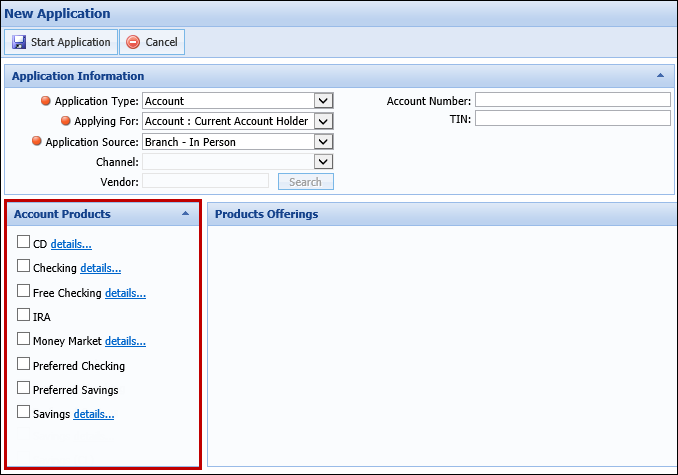
When  is selected within the module Ribbon, the New Application screen appears to identify information for the application, including the addition of account products.
To add an account product from the New Application screen, select the check box next to the desired account product(s) within the Account Products section.
|
At least one account product must be active in order for the Account Products section to appear within this screen. For more information, please see the Account Products topic in the Administrator Guide. |
 |
For more information about the New Application screen, please see the Create topic in this guide. |
Back to Add Account Product Methods ^
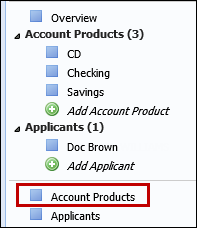
When account products are added to an application, their records appear in the People and Products section of the Application Navigator for easy access. Each account product record is added to the Account Products list located beneath the Workflow. A number corresponding to the amount of account products assigned to the application displays next to the Account Products heading.
From the People and Products section there are two methods to add account products:

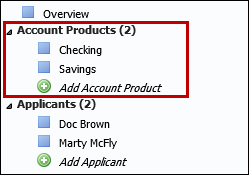
Selecting the Applicants heading opens the Account Products Card View to provide the ability to add an account product to the application.
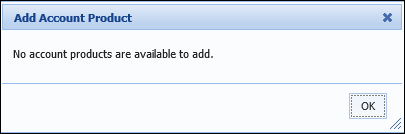
Selecting automatically prompts the Add Account Product window to open to identify an account product and assign each applicant a role on the account.
|
If no account products are available to add to the application, the following message appears upon selecting
|
Back to Add Account Product Methods ^
Depending on the configuration of the workflow model, the Screens List in the Application Navigator may contain a screen that allows users to add and identify account product details. Selecting the Account Products screen within the Screens list opens the Account Products Card View to enable the ability to add an account product to the application.
Back to Add Account Product Methods ^
|
The Account Products screen must be assigned to the Workflow Model mapped to the sub-product in order for the screen to appear within the Application Navigator. |
When the Account Products heading is selected within the Application Navigator or the Account Products screen is accessed from the Screens List, the Account Products Card View appears displaying all account products related to the application.
To add an account product to an application, click .
|
For more information on this screen, please see the Overview of the Account Products Card View section within this topic. |
Back to Add Account Product Methods ^
The Add Account Product window appears when the following actions are performed:
within the Account Products Card View within the Application Navigator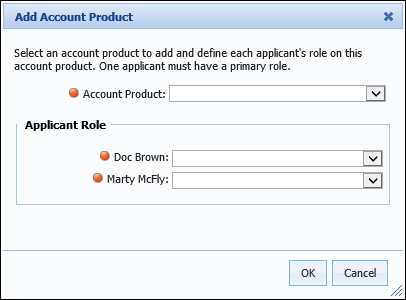
In the Add Account Product window, select the account product to be added to the application from the Account Product drop-down list.
|
This drop-down includes a list of all active account products for an application. If the system administrator has configured an account product to allow multiple of the same type, then the account product remains available for selection within the Account Product drop-down once it is added to an application. If the account product does not allow multiple of the same type, then the account product is removed from the drop-down list once it is added to the application. For example, if Money Market is an active account product that is not configured to allow multiple by the system administrator, then Money Markey no longer appears as an option within the Account Product drop-down list once it is added to an application. If configured to allow multiple, the Money Market option remains in the Account Product list after it is added to the application.
For more information on configuring an account product to allow multiple, please see the Account Products topic in the Administrator Guide.
|
Once an account product is identified, assign each applicant a role on the account product. The Applicant Role drop-down lists include all applicant types assigned to the account product by the system administrator.
|
The applicant types that populate within the Applicant Role drop-down list are assigned from the Table Entries tab when creating an account product in System Management > Origination > Account > Account Products. |
|
The Primary role on an account product is only available to be assigned to the Primary applicant on the application. |
|
All applicants must be assigned a role on the Account Product or an error message is received upon clicking OK to close the Add Account Product window. If an applicant should not have a role on the account product, select "None" as the Applicant's Role. If the "None" applicant type is not available, please contact the system administrator. For more information on applicant roles, please see the Applicants topic within this guide. |
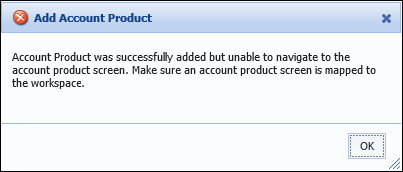
When all fields within the Add Account Product window are complete, click OK to add the product to the application and automatically open the screen assigned to the account product. Click Cancel to close the Add Account Product window without adding the product to the application.
|
If a screen is not assigned to an account product being added to an application, the following error message displays upon clicking OK:
|
When processing an application, users are able to revisit the account product in order to edit information that was previously provided.
Account Product information can be modified from the following sections within the Application Navigator:
To edit account product information from the workflow within the Application Navigator:
 within the Workflow toolbar until the desired account product's screen is active to make modifications.
 to retain the changes.
Back to Editing Account Products ^
To edit applicant information from the People and Products section in the Application Navigator:
to retain the changes.Back to Editing Account Products ^
To edit applicant information from the Screens List in the Application Navigator:
Back to Editing Account Products ^
When the Account Products heading is selected within the Application Navigator or the Account Products screen is selected from the Screens List, the Account Products Card View appears displaying all account products related to the application.
To edit information for an account product, double-click on the card for the desired account product or highlight the card and click .
The Account Product screen opens to make any necessary modifications.
|
If a screen is not assigned to an account product, modifications to the account product cannot be made and the following message is received upon selecting the product within the Account Products Card View:
|
After all changes have been made, click to retain the updated account product information.
Back to Editing Account Products ^
|
Accounts Products marked as a Base Share and/or Required cannot be deleted from an application. |
To delete an account product, select the Account Products heading within People and Products section of the Application Navigator to open the Account Products Card View.
Highlight the account product record to be removed and click .
A confirmation message appears to confirm whether the selected account product should be deleted. Select Yes to remove the account product from the application or No to retain the account product and return to the Account Products Card View.