
Temenos Lifecycle Management Suite - Loan Origination Product Guide
Application Workspace Overview
| Administrator Guide > Application Workspace Overview |
This section provides an overview of the configurable areas within the Lifecycle Management Suite's application workspace. Many areas of the application workspace can be configured by administrators to display institution-specific information and this section serves as a guide to where those configurations can be made.
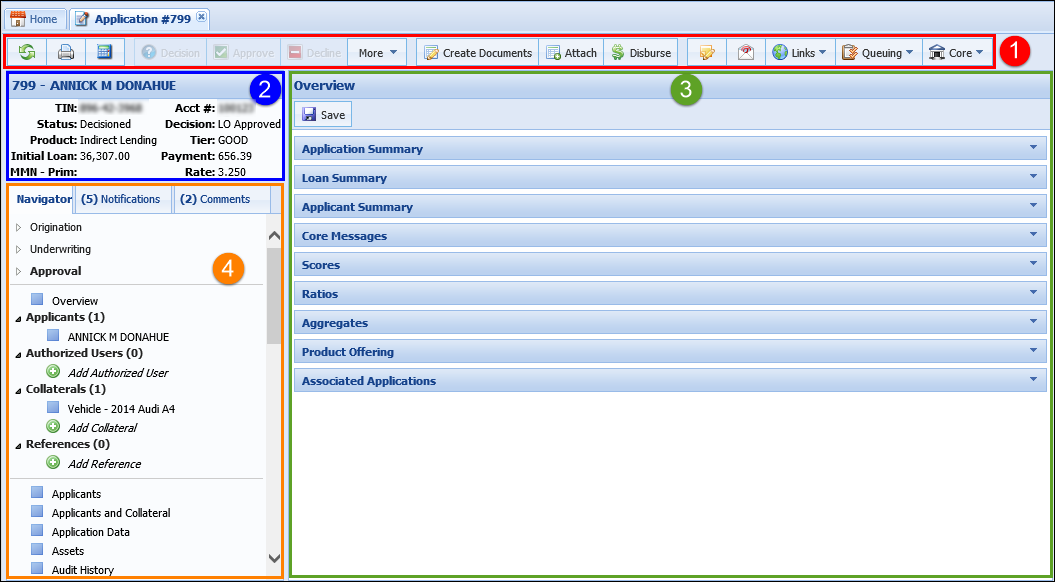
The workspace toolbar is located on the top of all workspaces. The icons within the toolbar are always displayed; however, the availability and functionality of these icons is configurable. Below is an overview of the Toolbar icons that can be configured by system administrators:


In order for to be active in the toolbar and the end-user to be able to manually approve an application, the following must be configured by the system administrator:
 |
If the Approve Loan permission is enabled, the availability of the icon is dependent on the state of the application. If an application decision has already been rendered, is disabled. |

When the Decline Application permission is enabled, the icon is active in the toolbar. If active, users are able to manually decline an application. To configure the Decline Application permission:
|
If the Decline Loan permission is enabled, the availability of the icon is dependent on the state of the application. If an application decision has already been rendered, is disabled. |
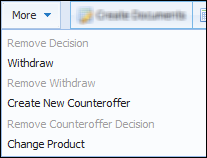
The More icon provides additional decision actions. It is always active within the toolbar; however, the following decision actions are dependent on the associated permissions.
| Decision Action | Description | Permission | ||
| Remove Decision |
If enabled, this action allows users to remove an application's decision.
|
Remove Decision on Application | ||
| Withdraw |
If enabled, this action allows users to withdraw an in progress application.
|
Withdraw Application | ||
| Remove Withdraw |
If enabled, this action allows users to restore a previously withdrawn application to an in progress state.
|
Remove Withdraw Status From Application | ||
| Create New Counteroffer |
If enabled, this action allows users to create alternate loan terms for an application.
|
Counteroffer - Add, Edit and Delete | ||
| Remove Counteroffer Decision |
If enabled, this action allows users to reset the loan terms to the original terms prior to the first Counteroffer.
|
Remove Decision on Application | ||
| Change Product |
If enabled, this action allows users to change the product of the current application.
|
Change Product on Application |
To configure permissions for More decision actions:

The Create Documents icon is always active within the toolbar; however, the behavior of this button depends on the documentation connector that is active within the Lifecycle Management Suite.
opens the screen of the active documentation connector.
When the Disburse Loan permission is enabled, the icon is active in the toolbar. If active, users are able to disburse an application. To configure the Disburse Loan permission:
|
If the Disburse Loan permission is enabled, the availability of the icon is dependent on the state of the application. If an application has already been disbursed or is not in a disbursable state, is disabled. |

When the Send Custom Emails permission is enabled the send email icon is active in the toolbar. If active, users are able to send emails from within an application. To configure the Send Custom Emails permission:
Clicking the send email icon populates the Send Email pop-up window.
Within this window, users are able to send a custom email or use one of the institution-defined templates, which are defined in System Management > Origination > Email Templates.

The Links icon is always active within the toolbar. However, the links it contains depends on items defined within System Management > Origination > Hyperlinks.
In order to define the hyperlinks that populate in this drop-down, the Hyperlinks permission must be enabled. To configure the Hyperlinks permission:
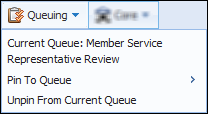
The Queuing icon is always active within the toolbar. It contains functionality that enables users to view which queue the application is currently assigned. It also allows users to perform the following queuing actions:
| Action | Description | Permission | ||
| Pin To Queue |
Allows users to assign the application to a specific queue.
|
Pin Application to Queue | ||
| Unpin From Current Queue |
Allows users to remove an application from the queue it was pinned to.
|
Pin Application to Queue |
To configure the queuing permission:
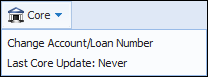
If the application has not been disbursed, the core button is active. It contains functionality that allows users to perform the following core actions:
| Action | Description | Permission |
| Change Account/Loan Number | Allows users to identify the account number for the account holder and loan assigned to the application. With Change permission to Create New Member Account for an Existing Member, users are also able to create a new record for an existing primary applicant in the core system. |
N/A to allow a user to access the Change Account/Loan Number screen and generate an account number for a new account holderand the loan assigned to the application. Create New Member Account for an Existing Member must be set to Change to enable the Generate button in the Member Account Number section of the Change Account/Loan Number screen and allow a user to create a new record for the existing primary applicant in the core system. |
| Core Update | Allows users to view the last time a core update was performed on an application. It also allows users to perform a manual core update, if the appropriate permission is granted. | Update Application From Core set to Change. |
To configure the above permissions:
Within Event Processing, the following two actions can be configured to execute during a specified event to automatically generate a Member Account Number and/or Loan Account Number/Suffix:
| Action | Description |
| Generate Account Number |
Automatically assigns a new loan/suffix based on the following logic:
|
| Create Member Account Number |
Automatically creates a record in the core for the primary applicant and returns a member account number in the application based on the following logic:
|
|
For more information on configuring Event/Action pairs, please see the Event Processing topic in this guide. |
To automatically create a new record in the core for an existing primary applicant, system administrators can author a rule in Rules Management to set the value of the NewMembership field to Create New Member Account. When the value of the NewMembership field is set to Create New Member Account, a new record is automatically created in the core for the primary applicant when the rule executes.
This field can be set through a rule configured to execute at any point in the application process that is prior to when the applicant record should be created. For example, if it is desired to create the new applicant record during a specific event, an Event Processing rule can be authored and assigned to an Event/Action pair that includes the Create Member Account Number action. When the action is fired during the specified event, the NewMembership field is set to Create New Member Account, which automatically creates a new record in the core for the primary applicant.
Reference the table below for an overview of the rule logic that can be used to automatically create a record in the core for an existing primary applicant:
| Entity Level | Rule Template | Example | ||
| Application | Set the value of a field |
|
|
For more information on authoring rules, please see the Rules Management topic in this guide. |
The Applications Summary panel is configured in the Workspace Summary attributes of each sub-product within Loan Product definition. Here, administrators are able to define the content and layout of the application summary as well as assign it to one or more sub-products.

For more information on defining the application summary for a loan application, see the Workspace Summary section within Loan Application Types topic.
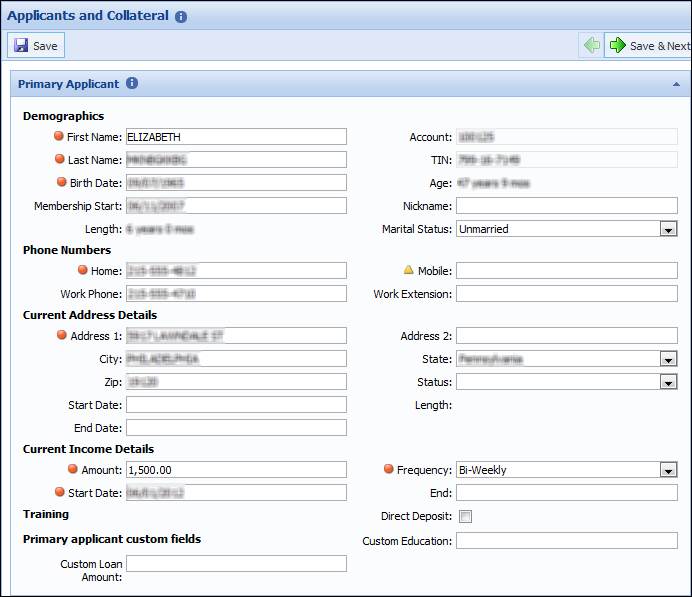
The application workspace consists of screens and workflow toolbars.
Applicant, Collateral and Application screen content is defined within System Management > Origination > Screens.
The workflow toolbar only populates when processing an application using the workflow. The following icons populate within the workflow toolbar toggle based on the application's progress within the workflow and the user/security group's permissions:
| Icon | Title | Workflow Stage | Permission |
 |
Back | All | None |
 |
Save and Next | All | None |
 |
Decision | Origination |
None |
|
Approve | Underwriting |
Approve Application
To configure the Approve Loan permission:
|
|
Decline | Underwriting |
Decline Application
To configure the Decline Loan permission:
|
|
Disburse | Approval |
Disburse Loan Application
To configure the Disburse Loan permission:
|
The Application Navigator contains three tabs: Navigator, Notifications, and Comments. Each tab is always visible and does not depend on user or group permissions.
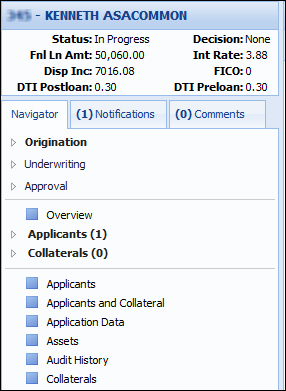
The navigator is divided into three sections: Workflow, People and Collateral, and Screens.
The Workflow is located at the top of the Navigator tab. It is a series of screens that aid users in the application process.
 |
To learn more about the application tracking icons that appear within the Workflow, please see Application Progress Indicators within the Application Navigator section of the User Guide's Lifecycle Management Suite Workspace topic. |

To define workflows, navigate to System Management > Origination > Loan > Loan Workflow Models. Within a workflow model, administrators are able to assign screens on the Workflow tab according to the various stages of an application life cycle.
Workflow models are then assigned in the General attributes of each sub-product within Loan Product Definition. At the bottom of the General tab, update the Workflow Model field to identify the desired workflow.
|
For more information on assigning workflow models, refer to the Model Selection section within the Loan Application Types topic. |
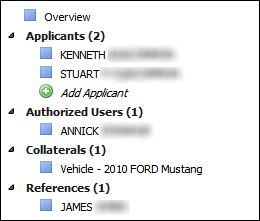
The People and Collateral section includes an Overview screen as wells as an index of all People , and Collateral associated with the application. This section is driven by configurations made within a Workflow Model's Screens attributes.
To assign screens to this section, the following screen types must first be created:
 |
Administrators must map an Overview, Primary Applicant, and Other Applicant screen. |
|
If screens are not mapped to the Authorized Users, Collaterals, or References fields, users are unable to add authorized users, collateral, or references from the application navigator. |
| Screen | Description | Screen Type | Workflow Model Configuration | Required | ||
| Overview |
An application screen that provides users a summary of the application.
|
Application | Screens > Edit Screens > Overview | Yes | ||
| Add Applicant |
The default screen that opens when a user adds or edits an applicant from the Application Navigator. |
Applicant |
Screens > Edit Screens > Primary Applicant
Screens > Edit Screens > Other Applicant |
Yes
|
||
| Add Authorized User |
The default screen that opens when a user adds or edits an authorized user from the Application Navigator.
If an authorized user screen is not mapped to the Authorized User edit screen within Workflow Models, users are unable to add authorized users from the Application Navigator. |
Authorized User | Screens > Edit Screens > Authorized User | |||
| Add Collateral |
The default screen that opens when a user adds or edits collateral from the Application Navigator.
If collateral screens are not mapped to the pledge, real estate, stock and vehicle edit screens within Workflow Models, users are unable to add collateral from the Collateral screen.
|
Collateral |
Screens > Edit Screens > Pledge Collateral
Screens > Edit Screens > Real Estate Collateral
Screens > Edit Screens > Stock Collateral
Screens > Edit Screens > Vehicle Collateral |
|||
| Add Reference | The default screen that opens when a user adds or edits references from the Application Navigator. | Reference | Screens > Edit Screens > Reference |
The Screens section is located at the bottom of the Navigator. It contains a list of all the screens available to users for processing an application.
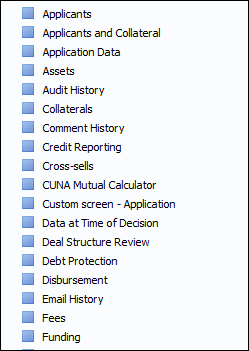
The screens that populate in this section are configured within a Workflow Model's screen attributes. To assign screens, navigate to System Management > Origination > Loan > Loan Workflow Models. At the bottom of the Screens tab, move the desired screens from the Available Screens box to the Assigned Screens box.
|
Only application screens are able to be assigned to the screens section. |
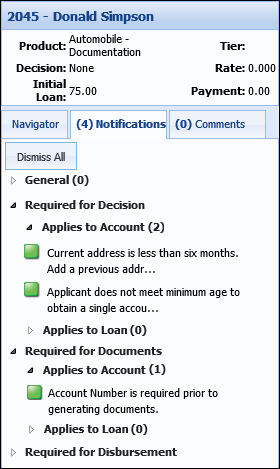
The Notifications tab displays all informational and validation messages that have been called by rules when an application is saved, calculated, or called by actions. The notifications that populate within this section appear automatically during the application process and are driven by:
No configurations are required to view or maintain comments.

 within the New Rule window to retain the rule logic. Click
  within the Rule Application Toolbar to save the logic to the rule application.