
Temenos Lifecycle Management Suite - Loan Origination Product Guide
Virtual Capture Overview
| Administrator Guide > Virtual Capture Overview |
The Virtual Capture Overview topic provides an outline of the configurable areas within the Virtual Capture web application. Many areas of Virtual Capture can be configured by administrators to display institution-specific information and this topic serves as a guide to where those configurations can be made in the Lifecycle Management Suite.
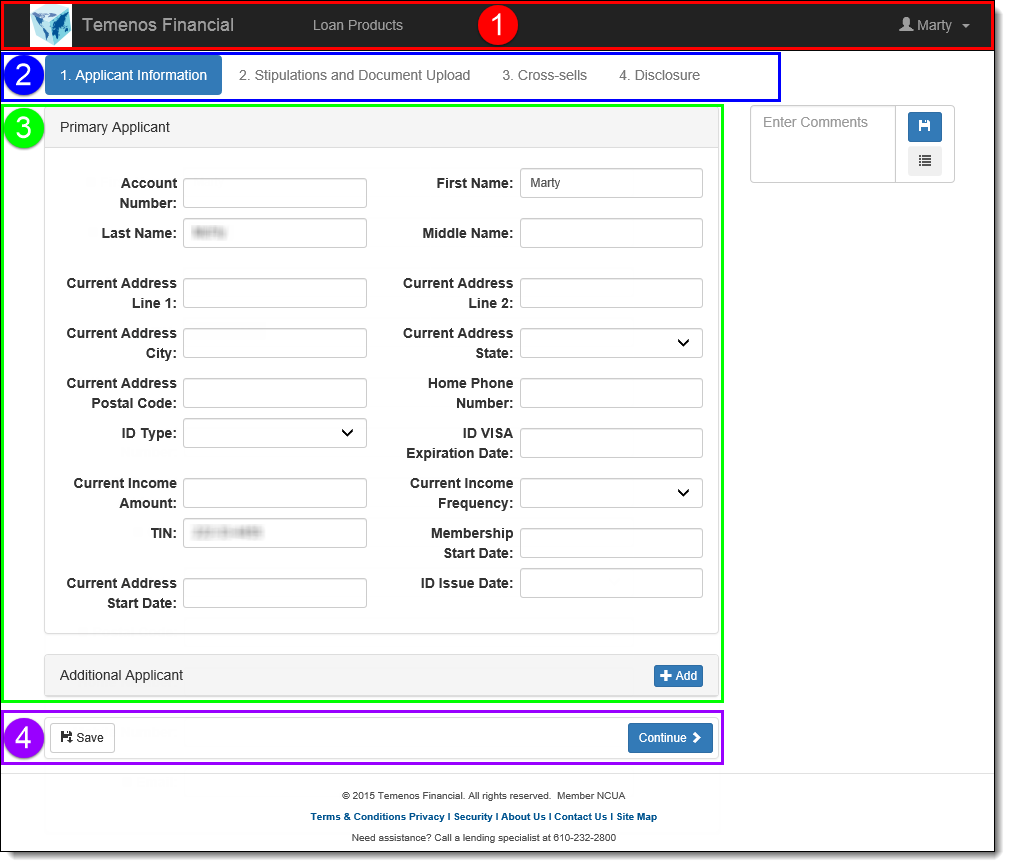
The Virtual Capture navigation bar is located at the top of the Virtual Capture web application and displays the following components:
| Component | Description | ||||||||
| Company Logo and Name | Displays the company logo and name defined in System Management > Origination > Virtual Capture > Virtual Capture Settings > General tab. | ||||||||
| Product Categories ( Loan Products) |
Displays the product categories defined in System Management > Origination > Virtual Capture > Product Selection. When clicked, displays the products in the category organized by sub-categories.
|
||||||||
| Sign In |
Displays a link that allows an applicant to log on to an existing online profile. Clicking this link populates the Sign In panel for an applicant to enter the email address and password required to access his or her online profile.
The Sign In link only appears in the Navigation Bar when the applicant has not accessed Virtual Capture through an institution's website. After the applicant logs on to an online profile or begins the Guest application process, the Sign In link is replaced by the applicant's name. |
||||||||
| Applicant's Name |
Displays the name of the applicant that is currently logged on to Virtual Capture. When clicked, the following options are displayed: List Applications
When clicked, this option displays a list of all applications on which the applicant is Primary.
To edit/continue with an application, click the Manage Profile
When clicked, allows the applicant to update the details of his or her online profile, such as email address, password, and/or security questions and answers.
Sign Out When clicked, logs the applicant off of Virtual Capture. |
The Screen Links section of the Virtual Capture web application displays the name of each screen configured in the Virtual Capture Workflow Model assigned to the product. Each screen is numbered according to the order in which they are presented within the workflow model.
 |
Virtual Capture Workflow Models are assigned within the Products Selection tab in System Management > Origination > Virtual Capture > Virtual Capture Settings. |
The name of the screen currently in context within the web application is shaded in blue. Once the screen is completed and is  clicked, the next screen in the workflow model is presented and shaded in blue. The previous screen appears as a blue hyperlink that, when clicked, navigates the applicant back to that screen for editing. Screens in the workflow that have not yet been accessed by clicking appear in grey text and cannot be opened by clicking on the screen name.
The Buttons section of the Virtual Capture web application displays a combination of the following buttons, depending on the screen in context.
| Button | Description | ||||
 |
Click this button to save the current screen and navigate to the previous screen in the application.
|
||||
 |
Click this button to save the information entered within the current screen. | ||||
 |
This button only appears in Guest applications. Click this button to exit the Guest application process and create an online profile.
|
||||
|
Click this button to save the current screen and navigate to the next incomplete screen in the application.
|
||||
 |
Click this button to save the current screen and submit the application to the financial institution. This button is only displayed on the final screen in the application workflow category.
|
||||
 |
Click this button to add an applicant, collateral, or reference to an application. Once this button is clicked, fields display to allow information to be entered for the applicant, collateral, or reference.
|
||||
 |
Click this button to remove an applicant, collateral, or reference from an application. Once this button is clicked, a confirmation window appears to confirm that the applicant, collateral, or reference should be removed from the application.
|
Upon accessing Virtual Capture, applicants are navigated to the Product Selection page where the first active product category listed alphabetically within the Product Selection tab in Virtual Capture Settings (System Management > Origination > Virtual Capture > Virtual Capture Settings) is displayed. From this page, applicants are able to sign in to an online profile or initiate the login process by selecting the desired product from the category in context or clicking a Product Category within the top navigation bar to display different loan product options.
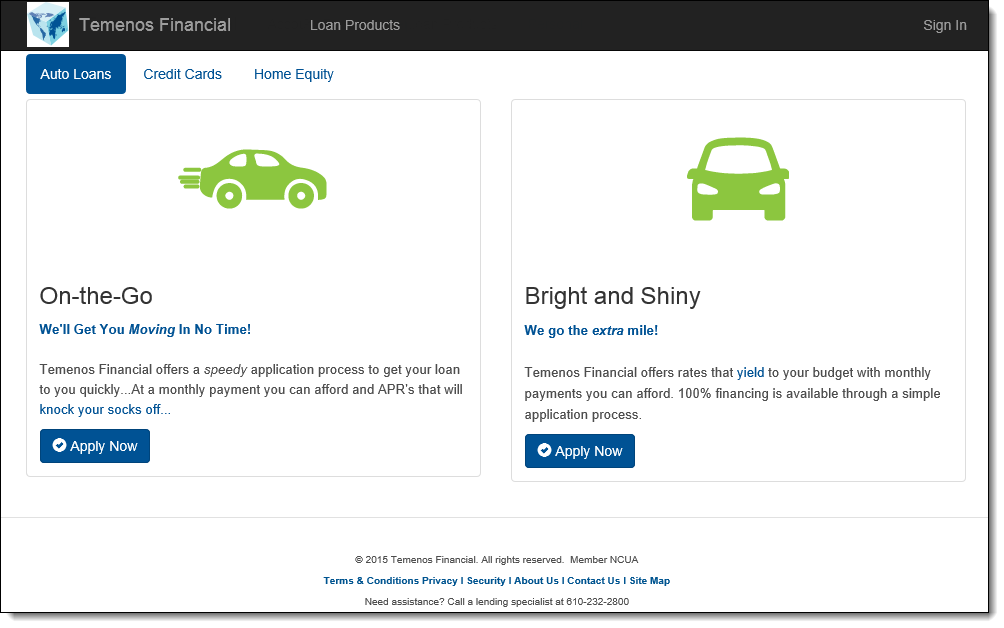
If the applicant has not clicked Sign In to access an online profile, selecting a product and clicking  initializes the login process.
There are multiple login methods available for Virtual Capture to allow applicants to access the Virtual Capture application and initiate the application process. This section provides an overview of the following login methods:
 |
If an open session of Virtual Capture has been idle for 15 minutes, the applicant is automatically signed out and redirected to the Online Profile login page. |
When the Single Sign On method is implemented for an institution, applicants are provided with seamless navigation between the institution's website and the Virtual Capture application. Once the desired product has been selected by the applicant, clicking initializes the application process.
|
For more information on the Single Sign On process, please see the Virtual Capture Sign On Specifications document available on the Temenos Collaboration Portal. |
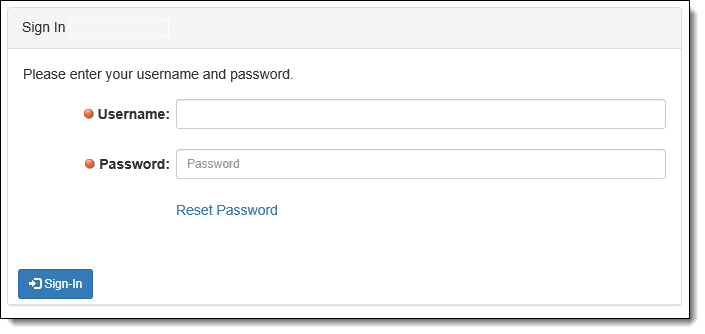
The Online Profile functionality allows new account holders and applicants who do not log in through their financial institution's web site to establish a secure online profile where they can safely create and manage applications in Virtual Capture. The Sign In panel enables applicants to access their secure online profile to create a new application or view/update an existing application. If an applicant has not created an online profile, this panel also provides the ability to easily create one by clicking the Create an online profile link. The Sign In panel displays upon clicking Sign In in the Navigation Bar or by selecting a product and clicking to populate the Login screen.
|
For information on creating and managing an online profile, please see the Online Profile Management topic in this guide. |
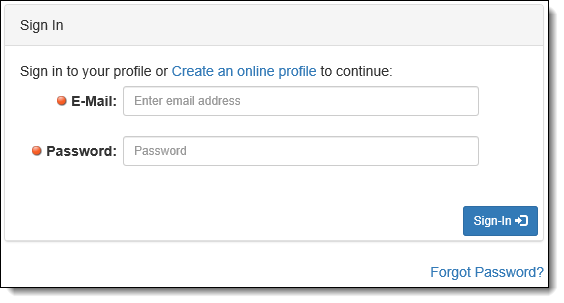
To access an online profile, the applicant must enter his or her email address and password within the corresponding panel fields and click  .
.
|
The value entered for the password is case sensitive and must be an exact match to the password provided in the Online Profile Management screen. |
|
If the email address and/or password entered does not match the value provided in the Online Profile Management screen, an error message is presented to the applicant upon clicking |
Upon clicking , one of the following screens may appear:
When an applicant accesses his or her online profile from an unregistered device, the User Authentication screen appears to validate the applicant's identity. This screen includes the Security Image and Welcome Phrase configured for the online profile as well as two Challenge questions that must be answered to proceed with the login process. The questions that appear are randomly populated from the list of five questions configured for the online profile.
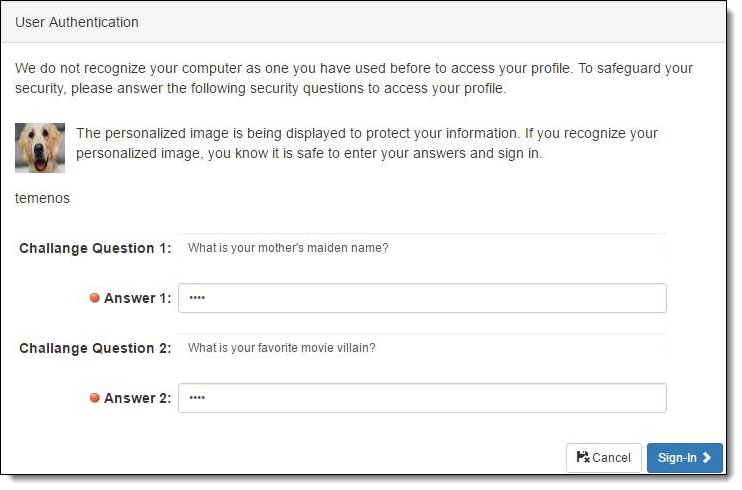
To continue with the login process, the applicant must enter a response in each Answer field and click  .
.
|
The values within each Answer field are masked to ensure the security of the information entered. The responses are not case sensitive, but must match the answers provided in the Online Profile Management screen. If either of the questions are answered incorrectly, two additional Challenge questions are presented to the applicant upon clicking . If both questions are not answered correctly after three attempts, the online profile is locked for 20 minutes. For information on how to unlock an online profile before the 20 minutes expire, please see the Forgot Password section in this topic. |
Once both Challenge questions have been answered correctly, the applicant is navigated to the Start New Application screen.
The Start New Application screen provides applicants with the ability to enter the information required to begin the application process, such as their SSN and/or Account Number. Within this screen, the First Name and Last Name fields pre-populate with the first and last name provided for the online profile.

To complete the login process, the applicant must enter an SSN and select Yes or No from the Member drop-down to identify his or her account holder status. If Yes is selected, the Account Number field becomes enabled and is required to complete the screen.
|
System administrators are provided with the ability to remove the Account Number field from the Start New Application screen by enabling the Hide Account Number parameter within the Login Tab in Virtual Capture Settings. When this parameter is enabled, the Account Number field does not appear in this screen regardless of an applicant's account holder status. For more information on this functionality, please see the Login Tab section of the Virtual Capture Settings topic. |
Once all information is complete, clicking initializes the application process.
|
For information on the process that occurs after an application is created, please see the Virtual Application Process Overview section in this topic. |
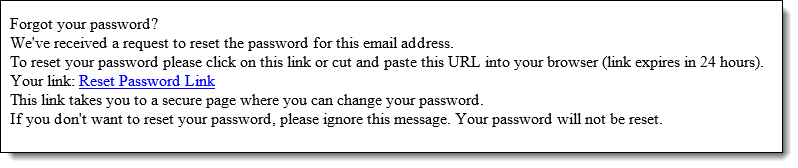
In order to access their online profile, applicants must enter the email address and password they provided in the Online Profile Management screen. In the event that an applicant does not remember the password for his or her online profile, a Forgot Password? link appears under the Sign In panel to allow the applicant to easily reset his or her password.
Applicants must take the following steps to reset their password:
|
A Validation error is received upon clicking Forgot Password? if the value entered for the email address does not match an email address on record. |
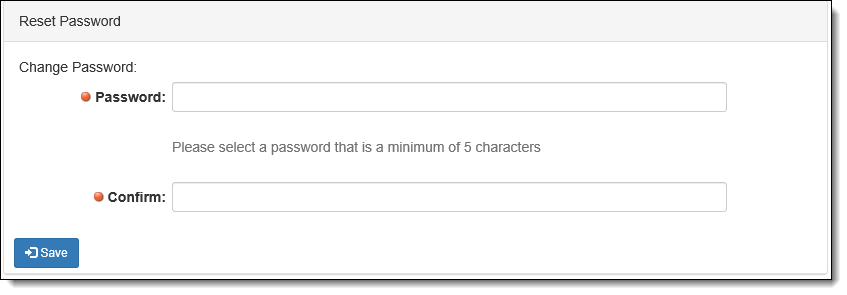
 retains the new password for the online profile.
|
The password entered in this field must meet the requirements set by the system administrator in the Security tab of Administrative Settings (System Management > Administrative Settings) or a validation error is received upon clicking . Please see the Administrative Settings topic in this guide for more information. |
If a correct email address and/or password is not entered within the Sign In panel after three attempts, the applicant's online profile is automatically locked for 20 minutes. When this occurs, a message including a Forgot Password? link displays to inform the applicant that his or her online profile has been locked and provide the ability to unlock the profile before the 20 minutes expires. If desired, the applicant can click Forgot Password? to update his or her password and unlock the online profile following the above steps.
The Continue as Guest panel provides applicants with the ability to log on to Virtual Capture without creating an online profile.
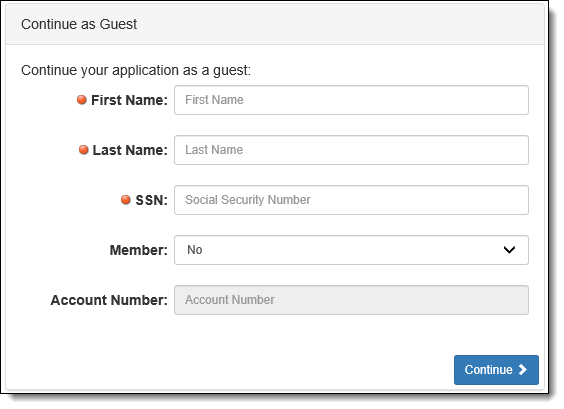
To continue as a Guest, the applicant must enter information into the required First Name, Last Name, and SSN fields in the panel.
Within the Member drop-down, the applicant can select Yes to identify that he or she is a current account holder with the financial institution or No to identify that he or she is not a current account holder. If Yes is selected, the Account Number field becomes enabled and is required to complete the screen.
|
System administrators are provided with the ability to remove the Account Number field from the Continue as Guest panel by enabling the Hide Account Number parameter within the Login Tab in Virtual Capture Settings. When this parameter is enabled, the Account Number field does not appear in the Continue as Guest panel regardless of an applicant's account holder status. For more information on this functionality, please see the Login Tab section of the Virtual Capture Settings topic. |
Once all information is entered in the Continue as Guest panel, clicking initializes the application process.
|
Upon clicking , if Yes is selected from the Member drop-down, and the SSN and Account Number entered within the Login screen does not match an account in the Lifecycle Management Suite, the application is not created and the text configured for the "Error Message for Account Holder not found in Core" parameter in Virtual Capture Settings is displayed. For more information on configuring this parameter, please see the Login Tab section of the Virtual Capture Settings topic. |
|
For information on the process that occurs after an application is created, please see the Virtual Application Process Overview section in this topic. |
In addition to supporting the application process for individual applicants, the Lifecycle Management Suite provides vendors with the ability to access the Virtual Capture module to create, submit, and view applications on behalf of their customers.
|
The Vendor Portal (Merchant Lending) is only available with the Loan Origination module and requires a second instance and URL configuration in Server Manager. Please see the Getting Started with Virtual Capture topic of this guide for more information. |
The Vendor Login panel provides individual vendor users with the ability to log on to Virtual Capture with the username and password defined by a system administrator in System Management > Origination > Loan > Vendor Management.
Once the Username and Password fields are complete, click to initialize the application process.
If the vendor user has forgotten their password, clicking the Reset Password link on the Vendor Login panel displays the Reset Password panel. Within the panel, enter the username and old password, and then enter a new password within the New Password and Confirm Password fields.
|
If the "Force Password Change on Next Login" option is selected for the user within the Contacts tab in System Management > Origination > Loan > Vendor Management, the Reset Password panel is displayed upon navigating to the Vendor Portal, instead of the Vendor Login panel. |
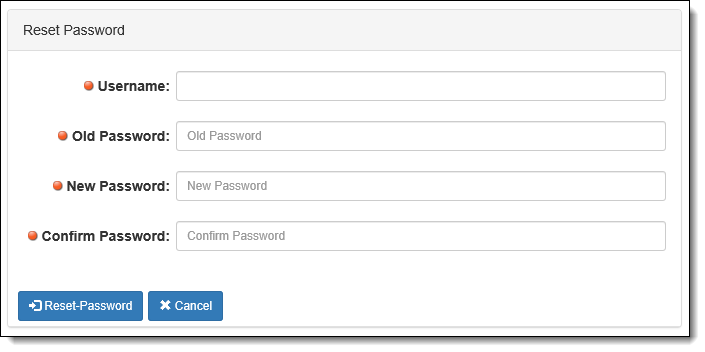
When finished entering the password information, click  . Upon successful reset, the vendor user is returned to the Vendor Login panel to login using their username and new password information.
Login Method OverviewTo protect applicant security, features available within Virtual Capture are enabled/disabled based on the login method. The following matrix provides an overview of the features enabled by each Virtual Capture login method. |
||||||
| Method | Feature Supported? | |||||
| Create Applications | Application Data Populates from Core | Application Data Populates from Previous Apps | List Applications | Edit/Open Applications | ||
| Single Sign On |  |
|
|
|
|
|
| Online Profile | |
|
|
|||
| Guest Login | |
|||||
| Vendor Login | |
|
|
|
||
Once the applicant or vendor has been successfully authenticated and logged on to Virtual Capture, the application process begins.
|
If the applicant has selected a loan product, the application is created based on the associated Loan Application Type. |
The screen presented to the applicant depends on the login method used to initialize the application process. Reference the table below for an overview of the screen presented with each login method:
| Login Method | Screen Presented to Applicant | ||||
| Single Sign On | After clicking , the applicant is presented with the first screen in the workflow model that is assigned to the selected product. |
||||
| Online Profile |
When an online profile is first created:
When an online profile is created during the Guest application process:
When the applicant logs on to an existing online profile from the Sign In panel:
|
||||
| Guest Application | After clicking in the Continue as Guest panel, the applicant is presented with the first screen in the workflow model that is assigned to the selected product. |
||||
| Vendor Login |
After clicking Clicking
|
|
Security measures are in place within Virtual Capture to prevent an applicant from navigating to an application that is not their own as well as ensure the safety of idle applications. Reference the Applicant Security topic below for an overview of the security methods that occur during the virtual application process:
The following security methods occur during the virtual application process regardless of the applicant's login method: Verification of Application IDThe Application ID of the application in context is tracked and a unique Owner ID is displayed within the Virtual Capture URL. The value of the Application ID is validated each time one of the following actions is performed during the application process:
If an applicant tries to navigate to another application by changing the Owner ID, the applicant is automatically logged out of the application and redirected to the Product Selection screen. A message displays on the screen to inform the applicant that he or she is being logged out for security purposes. Verification of TINThe TIN for the logged-in user is compared to the TIN of the primary applicant on the application, and, if they do not match, the applicant is redirected to an error page.
Idle ApplicationsThe following security measures are in place to ensure the safety of an idle application:
|
|
System administrators can configure the Search Core for Applicant action in System Management > Origination > Event Processing to search the financial institution's core for existing records for the applicant, if the applicant has selected No from the Member drop-down on the Continue as Guest panel. For more information on the Search Core for Applicant action, please see the Event Processing topic of the Lifecycle Management Suite Administrator Guide. |
During the virtual application process, the applicant must enter information within each screen and click until all screens are complete. If necessary, the applicant can click to return to the earlier screen in the application.
|
Clicking on any Virtual Capture screen does not save the information entered within the current screen; it simply navigates to the previous screen. However, clicking does save the information entered within the current screen and navigates to the next screen. |
Once the final screen of the Origination workflow category is complete, clicking sends the application to the financial institution for review and decisioning.
Once decisioned and in the Approval workflow category, clicking sends the application to the financial institution for disbursement.
 |
Prior to using Virtual Capture, a Default Values rule should be authored in System Management > Origination > Rules Management to set the IsAutoDisburse flag to false for applications created through Virtual Capture. Authoring this rule ensures the applicant is able to complete and review all information and confirmations prior to disbursement. |
|
The button is disabled if the application is in a Pending Review, Rejected, or Declined status. |
Upon clicking to disburse the application, the Disbursement Confirmation Text configured within the General tab in Virtual Capture Settings is displayed for the applicant to confirm that he or she agrees with the terms and wants to proceed with the disbursement process. This text must be confirmed by the applicant in order to initiate the disbursement of the application.
|
If any funding validation errors occur during disbursement, a "friendly" error message is displayed indicating the field(s) that must be corrected. The applicant can correct the issue(s) then re-attempt the disbursement process. |
Upon successful disbursement, the Disbursement Success Text configured in Virtual Capture Settings appears to signify the completion of the virtual application process.
When an application is created and presented to the applicant in Virtual Capture, the application is also able to be accessed within the Lifecycle Management Suite. The application is populated with the applicant's name, Account Number, and/or TIN. When an institution uses the Single Sign On method, and the applicant is a current account holder, if the "Copy Demographics for Account Holder" parameter is enabled in Virtual Capture Settings, the applicant's address, phone number, and income information are also pre-populated in the application.
|
Demographics are not pre-populated within applications created through the Guest application process or Online Profile. |
|
When an application is submitted from Virtual Capture, the Lifecycle Management Suite is unable to distinguish whether the application was initiated through a Web or mobile device. Therefore, the application source populates as Virtual Capture in the Lifecycle Management Suite. |
 1 - Navigation Bar
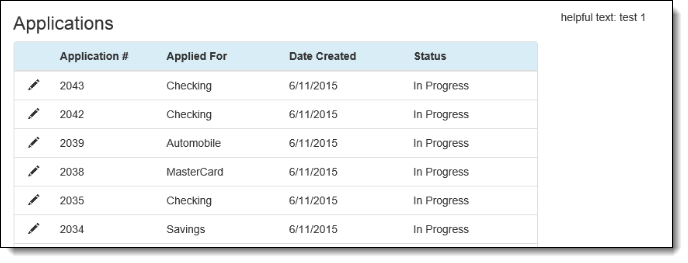 The text that is displayed to the right of the Applications grid is defined within the General tab in System Management > Origination > Virtual Capture >
  icon next to the desired application listed within the Applications grid. The last active screen is displayed to allow the applicant to continue through the virtual application process.