
Temenos Lifecycle Management Suite - Origination Product Guide
Virtual Capture Overview
| Administrator Guide > Virtual Capture Overview |
The Virtual Capture Overview topic provides an outline of the configurable areas of the Virtual Capture web application, as well as an overview of the virtual application process.
Institutions are provided with the ability to create separate instances of Virtual Capture, which can be customized to meet the needs of a specific group of applicants. Within each instance, system administrators can configure Virtual Capture application to display institution-specific information and preferences, including the text within the navigation bar and site footer, the details and presentation of the Product Selection page, and the screens presented to applicants during the virtual application process. This section serves as a guide to where system administrators can configure the Navigation Bar and Site Footer, the Product Selection page, and Virtual Capture screens for each instance of Virtual Capture.
 |
For more information on configuring separate instances of Virtual Capture, please see the Virtual Capture Settings topic in this guide. |
The navigation bar displays along the top of the Virtual Capture web application to provide applicants with a link to the Product Selection page, and access to
a list of applications and/or the online profile management screen throughout the application process.
This navigation bar includes the following components:
| Component | Description | ||||||||||||||||||||||||||
| Company Logo and Name |
The Company Name and Logo that appear in the navigation bar are defined within the Site Header section of the Branding tab in System Management > Origination > Virtual Capture > Virtual Capture Settings for each instance. These components are configurable by instance; therefore, can be modified to display differently for a particular group of applicants.
|
||||||||||||||||||||||||||
| Products Link |
The Products link enables applicants to navigate directly to the Product Selection page for a specific instance during the application process. When clicked, the applicant is directed to the first sub-category under the first category listed in the page. By default, the title of this link is Products, but can be modified within a Custom Settings file for the instance of Virtual Capture.
|
||||||||||||||||||||||||||
| Sign In/Applicant's Name |
The Sign In link allows an applicant to log on to an existing online profile. Clicking this link populates the Sign In panel for an applicant to enter the email address and password required to access his or her online profile.
The Sign In link only appears in the Navigation Bar when the applicant has not accessed an instance of Virtual Capture through an institution's website. After an applicant logs on to an online profile or begins the Guest application process, the Sign In link is replaced by the name of the applicant or vendor user currently logged on to Virtual Capture as shown below:
When the name drop-down is clicked, the following options are displayed: When Contact Management is selected, a list of all the vendor's contacts displays to the user.
When List Applications is selected, a list of all applications on which the applicant is Primary, or all applications associated to the vendor, is displayed. This page displays all applications created by an applicant, or vendor, regardless of whether the application was created in the current instance.
Clicking the
When Reports is selected, users are able to access the vendor reports to which they have permission to view.
When Manage Profile is selected, the applicants is presented with the Manage Profile screen to update the details of his or her online profile, such as email address, password, and/or security questions and answers.
When Sign Out is selected, the applicant's session is ended, and he or she is signed out of the Virtual Capture application.
|
 |
When using a small device, the navigation bar appears as shown in the following example:
Clicking
|
The Site Footer appears along the bottom of the Virtual Capture web application to display institution-specific information throughout the application process. The text that appears in the Site Footer is defined within the Branding tab in System Management > Origination > Virtual Capture > Virtual Capture Settings for each instance of Virtual Capture. This text is configurable by instance; therefore, can be modified to display differently for a particular group of applicants.
|
For more information on these parameters, please see the Branding section of the Virtual Capture Settings topic in this guide. |
|
When hovering over the site footer, Virtual Capture indicates alternate text that is available to applicants using a screen reader. The alternate text for the site footer consists of following text concatenation: <Company Name> + "Footer." |
The Product Selection page provides applicants with the ability to select the product(s) for which they want to apply. System administrators are able to configure many details of the Product Selection page, including how the page renders for the device used to access the instance of Virtual Capture.
The Product Selection page includes the following configurable areas:
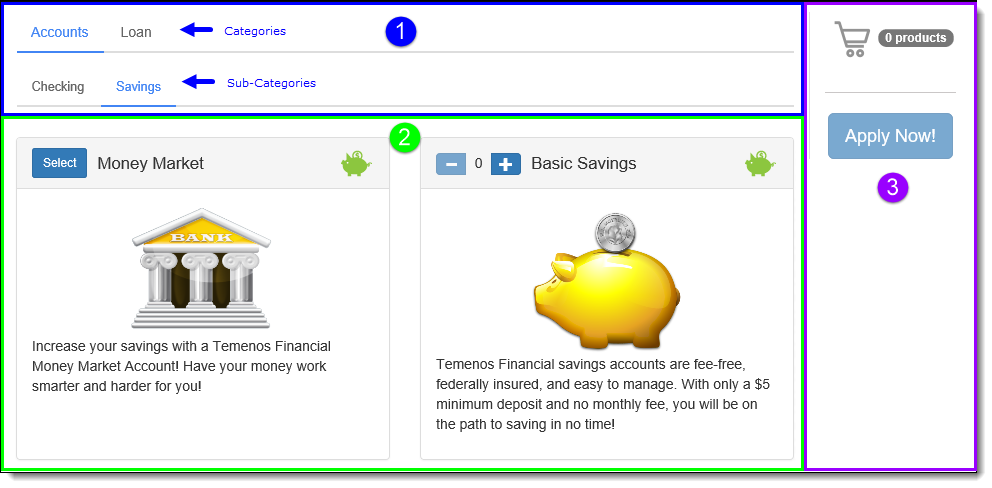
 1- Product Categories/Sub-Categories
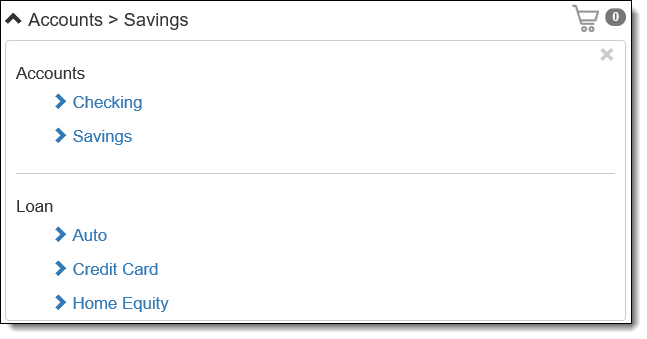
Categories provide a method of organizing groups of similar Virtual Capture products, while Sub-Categories allow administrators to further organize the Virtual Capture products under each Category, and can be used to identify the specific type of product to be added to the application. For example, Checking Accounts or Auto Loans. When an applicant selects a Category in the Product Selection page, he or she can then click a sub-category to access the products that are available to add to the application.
This section displays an alphabetical list of the categories and sub-categories defined for the products assigned to the instance of Virtual Capture in System Management > Origination > Virtual Capture > Virtual Capture Products.
|
If all products are listed under the same sub-category, only the category is displayed in the Product Selection page. For more information on product categories and sub-categories, please see the General Product Attributes section of the Virtual Capture Products topic in this guide. |
By default, when an applicant accesses Virtual Capture from an institution's website, he or she is navigated to the first Product Sub-Category that is listed under the first Category in the Product Selection page.
|
Institutions are able to customize their Virtual Capture URL to automatically direct applicants to a specific product when Virtual Capture is accessed from their website. When this occurs, applicants are automatically navigated to the category and/or sub-category specified in the URL upon accessing an instance of Virtual Capture. For more information, please see the Getting Started with Virtual Capture topic in this guide. |
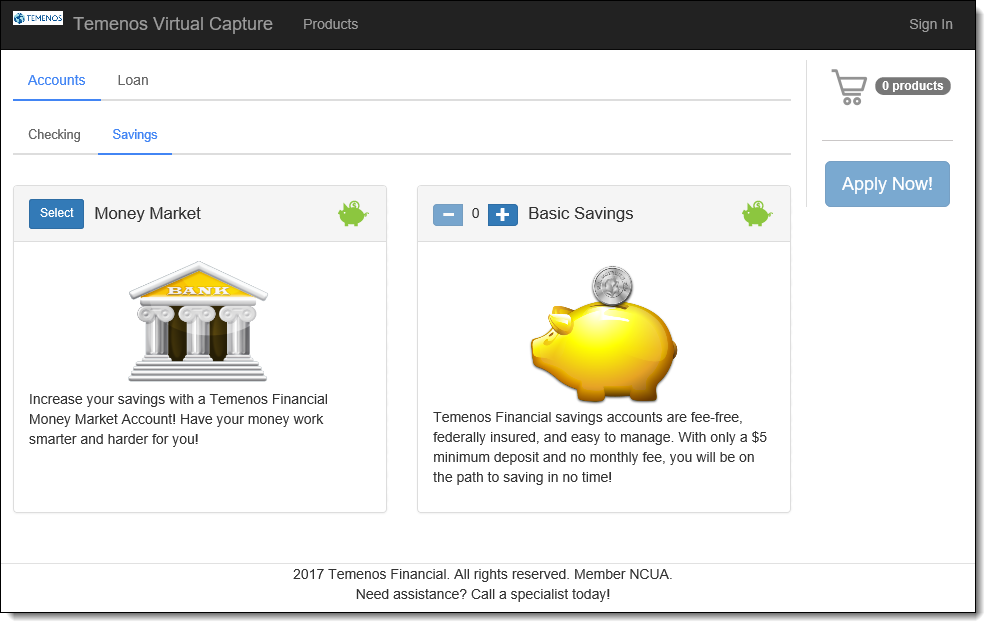
Once a category and sub-category are selected within the top of the Product Selection page, applicants are presented with a product card for each active product configured for the sub-category that is assigned to the instance of Virtual Capture.
The large or small device parameters set for the instance of Virtual Capture determines the contents in each Product Card, and layout of the Product Card section.
|
Please see the Device Parameters section in this topic for more information on the configurable settings for large and small devices. |
The order in which product cards are listed under the selected sub-category, and the content that appears in each product card, is determined by the following attributes set for the product in the General tab in Virtual Capture Products:
| Product Attribute | Description | ||
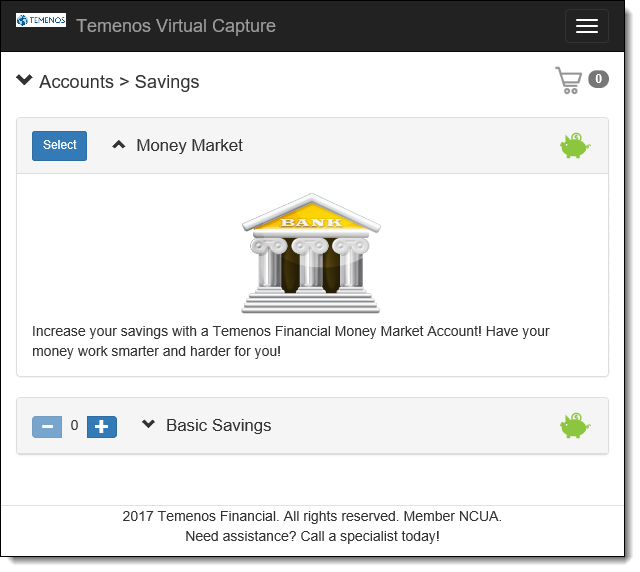
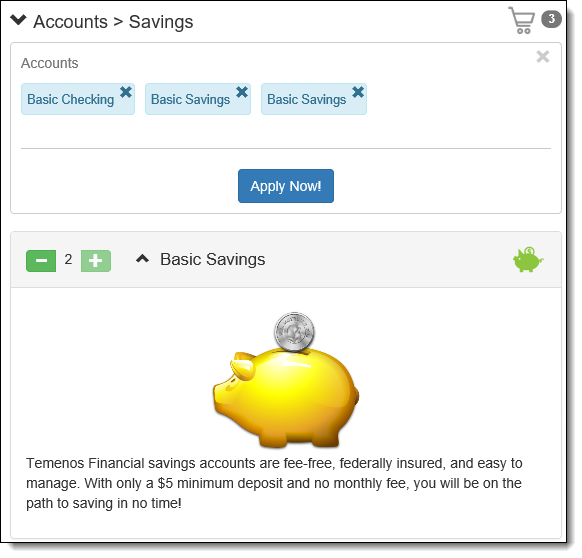
| List Order | Determines the order in which product cards are listed in the Product Selection page. In the above example, Money Market has a list order of 1, and Basic Savings has a list order of 2. | ||
| Display Name | Determines the name that appears for the product. For example, Money Market. | ||
| Small Image |
Determines the image displayed in the header of the product card, when the Display Header and Display Header Image parameters are enabled for the device. For example:
|
||
| Large Image |
Determines the large image displayed in the body of the product card, when the Display Card Image parameter is enabled for the device. For example:
|
||
| Sales Script | Determines the informational text that appears under the large image in the body of the product card. |
System administrators can also determine the text that is displayed within the button on each product card, and the buttons that appear for an account product. The following table provides an overview of the button configurations that are available for the Product Selection page:
| Button | Available Configuration | ||||
 |
This button appears in the product card for each loan product, and when the Maximum Number Allowed parameter is set to 1 for an account product in the General tab of Virtual Capture Products. When
If desired, the text that appears within
|
||||
 |
These buttons appear in the product card when an account product has been configured to allow more than one instance on an application. These buttons are displayed when the Maximum Number Allowed parameter set to a value greater than 1 for an account product in the General tab of Virtual Capture Products.
|
|
To learn more about the behavior of the above buttons during the application process, please see Product Selection within the Virtual Application Process Overview section of this topic. |
The Product Cart is a configurable feature for each instance, which provides applicants with the ability to apply for multiple products simultaneously in Virtual Capture.
|
The availability of the Product Cart is controlled by the Use Shopping Cart parameter located on the Messaging tab for each instance in System Management > Origination > Virtual Capture > Virtual Capture Settings. This parameter is configurable by instance; therefore, can be modified to display differently for a particular group of applicants.
|
Similar to the card for each product, system administrators are able to customize the following attributes of the product cart within a Custom Settings file for their institution:
 button.
 |
When hovering over the shopping cart image, Virtual Capture indicates "Product Shopping Cart" as the alternate text that is available to applicants using a screen reader. |
|
For more information on customizing the above settings for the product cart, please see the Customizing Global Product Selection Settings for Virtual Capture topic in this guide. To learn more about adding products to the cart during the application process, please see Product Selection within the Virtual Application Process Overview section of this topic. |
Using the Virtual Capture Screens, Settings, and Workflow Models functionality, system administrators are able to define the information that appears within each screen in Virtual Capture, the order in which each screen is presented in an application, as well as configure various settings that determine the look and feel of the application, such as the progress bar display.
The virtual application includes the following configurable sections:

|
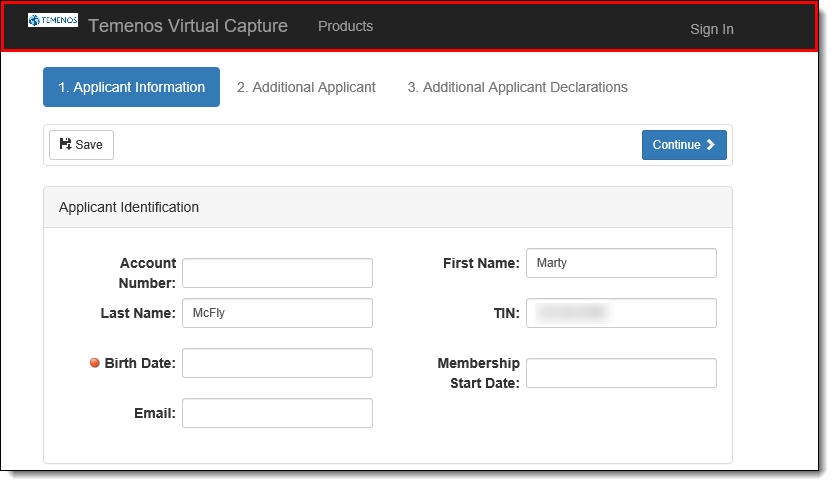
The TIN and Birth Date fields masks all values entered, except for the last four digits. Click  to unmask the values in the field. Once unmasked, the values remain visible until the user navigates away from the screen or to unmask the values in the field. Once unmasked, the values remain visible until the user navigates away from the screen or  is clicked. is clicked. |
The Screen Links section provides applicants with the ability to easily navigate between different screens in the Virtual Capture application. This section displays either the name of each screen included in the Virtual Capture Workflow Model assigned to the product, or the name of the subcategories assigned to each screen for the Workflow Model, depending on configurations made by the system administrator.
|
The above configurations are made in the Workflow tab of the Virtual Capture Workflow Models page (System Management > Origination > Virtual Capture > Virtual Capture Workflow Models). |
If no subcategories are assigned to the screens for a Workflow category, the name of each screen displays within the Screen Links section. If a subcategory is assigned to each screen, the name of each subcategory displays within the top of the Virtual Capture application.
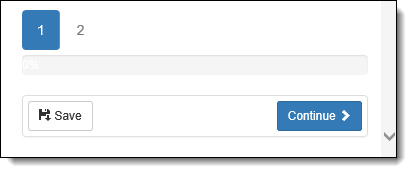
When subcategories are not assigned to the screens for a Workflow category, a link to each screen is displayed within the Screen Links section. Each screen is numbered according to the order in which they are presented within the workflow model, as shown in the below example:
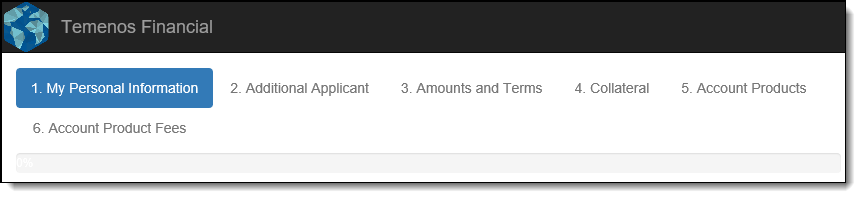
The name of the screen in context is shaded in blue. Once the screen is completed, and  clicked, the next screen in the workflow model is presented and shaded in blue. The previous screen appears as a blue hyperlink that, when clicked, navigates the applicant back to that screen for editing. Screens in the workflow that have not been accessed by clicking appear in gray text, and cannot be opened by clicking on the screen name.
|
When Virtual Capture is accessed using a small device, the same behavior occurs within the Screen Links section, but only the number of the screen is displayed as shown in the below example:
|
When subcategories are assigned to the screens for a Workflow category, a link to each subcategory is displayed within the Screen Links section, as shown in the below example:
|
Subcategories are displayed in the order that they are assigned to the screens in the Workflow tab of the Virtual Capture Workflow Models page. The first subcategory listed in the Screen Links section of the application is the first subcategory assigned to the first screen under the workflow category. For more information on assigning subcategories to workflow model screens, please see the Virtual Capture Workflow Models topic in this guide. |

Clicking a subcategory link navigates the applicant to the first screen assigned to the subcategory. The name of the subcategory in context is shaded in blue. Once the screen is completed, and clicked, the next screen assigned to the subcategory is presented. When all screens assigned to the subcategory are complete, clicking navigates the applicant to the first screen assigned to the next subcategory in the workflow. The previous subcategory appears as a blue hyperlink that, when clicked, navigates the applicant back to the first screen assigned to the subcategory for editing. Any subcategories that have not been accessed by clicking appear in gray text, and cannot be opened by clicking on the subcategory name.
|
When Virtual Capture is accessed using a small device, the same behavior occurs within the Screen Links section, but a number is displayed in place of the subcategory name as shown in the below example:
|
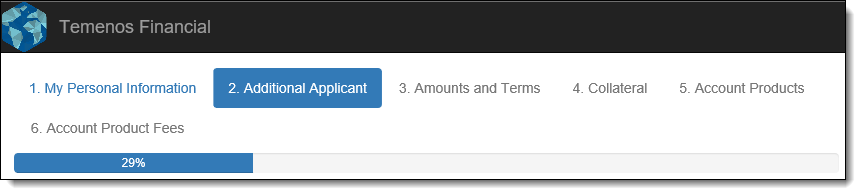
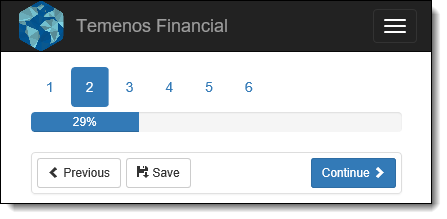
The Progress Bar enables applicants to track their progress through the Origination stage of the workflow. This bar only displays in a Virtual Capture application when the Display Progress Bar parameter is set to true for the instance of Virtual Capture accessed by the applicant, as well as the type of device being used.
|
The progress bar functionality does not apply to Applicant screens configured as edit screens for a panel, such as the screen that appears when adding or editing an additional applicant. |
|
The Display Progress Bar parameter is configurable by instance; therefore, can be modified to display differently for a particular group of applicants. This parameter is set for each instance within both the Small Device and Large Device sections of the Device Parameters tab in System Management > Origination > Virtual Capture > Virtual Capture Settings.
|
The progress bar is calculated based on the total amount of panels across all of the Origination screens assigned to the Virtual Capture Workflow Model, and automatically adjusts as applicants move forward or backward through a workflow to display their percentage of completion.
To calculate the percentage for the progress bar, the system totals the number of panels across all of the Origination screens assigned to the Virtual Capture Workflow Model, and then divides the total number of panels by 100. Each system panel is counted as one panel in the total percentage.
As part of this calculation, the system automatically rounds percentage totals, and separately determines the worth of the last panel, to account for instances where the percentage is not an even number, and ensure that a total of 100 is reached. To calculate the worth of the last panel, the system takes the total of all prior panels and subtracts the total from 100.
For example, if there are five panels on all screens in the Origination stage, each panel is calculated as 20% since 100 divided by 5 equals 20.
If there are six panels on all screens in the Origination stage, the progress bar is calculated as follows: 100 divided by 6 = 16.6666667. Since this calculation results in an uneven number, the percentage is rounded each time a screen loads in the application to ensure that an even number is populated for the progress bar. The system then totals the first five panels, and subtracts the total from 100 to determine the worth of the final panel.
The table below provides an overview of the percentage that is calculated for the progress bar upon completion of each screen in the Origination stage, using the above example:
| Panel Number | Exact Percentage Calculated | Rounded Percentage Populated for the Progress Bar |
| 1 | 0% | 0% |
| 2 | 16.66667% | 17% |
| 3 | 33.33334 | 33% |
| 4 | 50.00001% | 50% |
| 5 | 66.66668% | 67% |
| 6 | 83.33335% | 83% |
| Completion of Origination Stage | 100.00002% | 100% |
|
If a panel is hidden, as per screen interactions, the panel is excluded from the progress bar calculation. If a panel is hidden due to no data, the panel is considered complete in the percentage calculation for the progress bar.
|
When an applicant completes a screen, and clicks to proceed through the workflow, the progress bar automatically updates to reflect his or her progress in the application:
|
The above example depicts how the Progress Bar appears in a large device. In a small device, the Progress Bar appears as follows:
|
If an applicant clicks  , or clicks a link in the Screen Links section to return to a prior screen or subcategory, the amount in the progress bar is reduced to reflect the percentage of completion as of that screen.
|
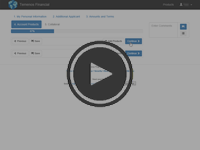
Watch the video below to see the progress bar in action:
|
The Buttons section of the Virtual Capture web application displays a combination of the following buttons, depending on the screen in context:
| Button | Description | ||||
|
Click this button to save the current screen, and navigate to the previous screen in the application.
|
||||
 |
Click this button to save the information entered within the current screen. | ||||
 |
This button only appears in Guest applications. Click this button to exit the Guest application process, and create an online profile.
|
||||
|
Click this button to save the current screen and navigate to the next incomplete screen in the application.
|
||||
 |
Click this button to save the current screen and submit the application to the financial institution. This button is only displayed on the final screen in the application workflow category.
|
||||
 |
Click this button to add an applicant, collateral, or reference to an application. Once this button is clicked, fields display to allow information to be entered for the applicant, collateral, or reference.
|
||||
 |
Click this button to add an account product to the application. Once this button is clicked, the Account Product selection window appears to allow the applicant to add the desired account product(s) to the application.
|
||||
 |
Click this button to remove an account product from the application. Once this button is clicked, a confirmation window appears to confirm that the account product should be removed from the application.
|
||||
 |
Click this button to remove an applicant, collateral, or reference from an application. Once this button is clicked, a confirmation window appears to confirm that the applicant, collateral, or reference should be removed from the application.
|
The Screen section of the Virtual Capture web application displays the screen configured in System Management > Origination > Virtual Capture > Screens.
Once configured, screens are assigned to Virtual Capture Workflow Models in System Management > Origination > Virtual Capture > Virtual Capture Workflow Models. Workflow Models are then assigned to loan application types within the General tab of the Virtual Capture Products page, and account application types within the Account Application Types tab in Virtual Capture Settings.
|
In addition to the aforementioned configurations, the Comments panel also conditionally displays based on the HideUserCommentBox parameter within the Settings.json file. For more information on this parameter, please see the Customizing Global Settings for Virtual Capture topic in this guide. |
|
Vendor Contacts with an access level of Limited may prevent them from accressing a previously completed screen, or panel. |
Since Virtual Capture is a web application that can be accessed from various devices, system administrators are provided with the ability to configure the look and feel of the application when an applicant uses a large device, such as a tablet or laptop, or a small device, like a smart-phone or mini tablet.
The parameters within the Device Parameters tab of Virtual Capture Settings allow administrators to control how certain settings are presented for each type of device an applicant may use to access each instance of Virtual Capture.
|
These parameters are configurable by instance; therefore, can be modified to display differently for a particular group of applicants. |
System administrators are provided with the ability to determine the following settings for each device in the Device Parameters tab:
|
For more information on the above parameters, please see the Device Parameters section of the Virtual Capture Settings topic in this guide. |
When an applicant accesses Virtual Capture from an institution's website, he or she is navigated to the Product Selection page for that instance. By default, all active products for the instance that are assigned to the first Product Sub-Category listed under the first Category are displayed.
|
The product category and sub-category selected upon accessing Virtual Capture is determined by the Virtual Capture URL implemented for the institution. For more information, please see the Getting Started with Virtual Capture topic in this guide. |
From the Product Selection page, applicants are able to sign in to an online profile from the top navigation bar, or select the desired product(s) to add to the cart,and initiate the login process.
If the applicant has not clicked Sign In to access an online profile, he or she must select the desired products from the Product Selection page. The product category and sub-category links at the top of the page allow applicants to easily navigate between different sub-sets of products to view all of the products that the institution has to offer.
|
While the product category and sub-category section is available for all devices, the appearance and behavior of the section differs in large and small devices. When an applicant accesses Virtual Capture on a large device, the product category and sub-category section is displayed as links along the top of the Product Selection page, as shown in the above example. The category and sub-category in context is highlighted blue, such as Accounts, Savings. Clicking a gray category or sub-category link changes the products that appear on the page. When an applicant accesses Virtual Capture on a small device, the product category and sub-category section is displayed as expandable/collapsible drop-downs. The drop-down for the category and sub-category in context is expanded in the top of the Product Selection page to display the available products for the sub-category, such as Accounts > Savings in the below example:
Clicking the drop-down for the category and sub-category in context expands a list of all categories and sub-categories that are available to select from in Virtual Capture. For example, clicking Accounts > Savings expands the following list:
The available sub-categories are listed in blue under each category. Clicking a sub-category collapses the list, and expands the drop-down to display the products assigned to that sub-category within the Product Selection page. |
Using the buttons that appear in each product card, the applicant can add one or more products to the product cart, and then click within the cart to initialize the login process.
|
The button is not enabled within the product cart until a product is selected within the Product Selection page. |
Each product card includes a or  button to allow applicants to select the desired product(s) before creating an application. The button appears for all loan products, and for any account products that only allow one instance of the product to be added to the application.
|
If the Use Shopping Cart parameter is set to False, the button is replaced with the button. |
When an account product allows more than one instance to be added, the following set of buttons appear within the product card to allow the applicant to manage the number added to the application: .
|
If the Use Shopping Cart parameter is set to False, the
|
Clicking the or button within a card adds the product to the product cart.
|
Only one loan product can be added to an application. If a loan product is added to the cart, and the applicant selects another loan product from the Product Selection page, a message appears to confirm which loan product should be added to the product cart. For example, if an Automobile product is added to the cart, and the applicant also selects a Mastercard product within the Product Selection page, the following message is received to confirm whether the Automobile or Mastercard product should remain on the application; clicking
|
Once a product is added to the cart, the button within the product card updates as follows:
| Button | Behavior When Selected | ||
|
The color and text of the button updates to identify that the product has been selected:
|
||
|
The color of the buttons updates to green, and the number updates to reflect the total number of the account product that has been added to the application:
|
If enabled, the product cart provides an organized view of the products that have been selected for the application, and enables applicants to initialize the application process.
 |
System administrators can disable the product cart for each instance of Virtual Capture by setting the Use Shopping Cart parameter to false within the Messaging tab in System Management > Origination > Virtual Capture > Virtual Capture Settings. This parameter is configurable by instance; therefore, can be modified to display differently for a particular group of applicants. For more information, please see the Messaging section of the Virtual Capture Settings topic in this guide. |
|
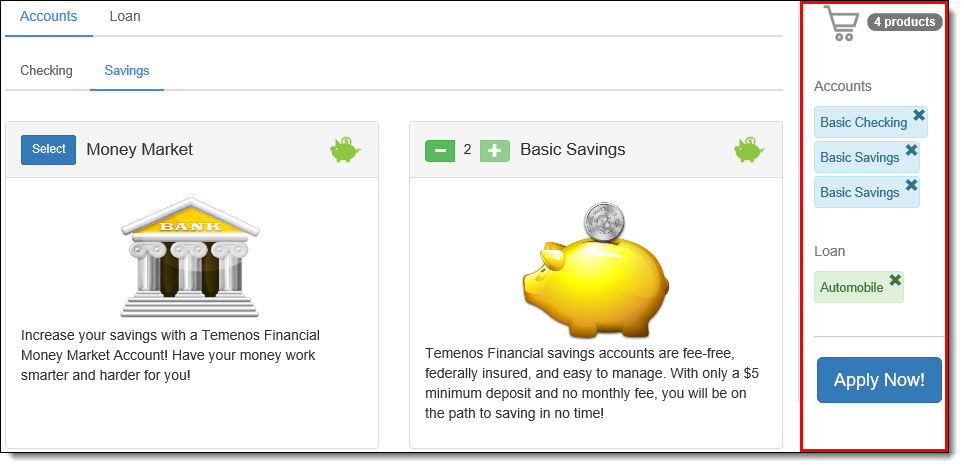
While the behavior within the product cart is consistent across all devices, the appearance of the cart differs in large and small devices. Reference the following sections for an overview of how the product cart is displayed in a large device and a small device: When an applicant accesses Virtual Capture on a large device, the product cart is displayed within the right side of the Product Selection page, and remains visible when the page is in context:
When an applicant accesses Virtual Capture on a small device, the product cart is hidden by default; only the cart icon is displayed within the top of the Product Selection page, as shown in the following example:
Clicking the cart image expands the cart to display the list of products that were selected within the Product Selection page.
|
Each time a product is selected within the Product Selection page, the name of the product populates within a colored box in the cart: account products in blue and the loan product in green. The badge in the top of the cart acts as a counter to display the total number of products in the cart. When a product is added or removed, the number within the badge updates accordingly.
|
By default, the product cart is organized by category as shown in the below example; however, this view can be updated to display by sub-category in the Custom Settings file for each instance of Virtual Capture. Additionally, the cart image, and the text within the badge displaying the total product count may also differ from the below example, as institutions are able to update these parameters within the Custom Settings file as well. For more information, please see the Customizing Global Settings for Virtual Capture topic in this guide. |
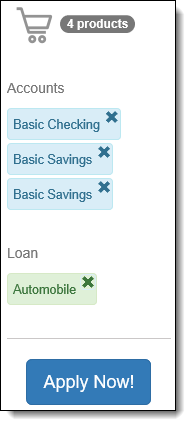
If desired, a product can be easily removed from the cart by clicking the "x" that appears in the top of a product box. Upon clicking the "x," the product is removed from the cart, and the number within the badge is updated to reflect the current total of products.
|
When a product is removed from the cart, the button within the card on the Product Selection page is also updated to allow the product to be re-selected if desired. For example, the  button becomes . For more information please see the Adding Products to the Product Cart section in this topic. button becomes . For more information please see the Adding Products to the Product Cart section in this topic. |
Once the desired products appear in the cart, the applicant can click to initialize the log-in process for the virtual application.
|
When an applicant clicks the Products link to return to the Product Selection page during the application process, all products that were added to the application continue to appear in product cart. |
There are different login methods available for Virtual Capture to allow applicants to access the Virtual Capture application through an individual or vendor instance, and initiate the application process.
|
If an open session of Virtual Capture has been idle for 15 minutes, the applicant is automatically signed out and redirected to the Product Selection screen. |
This section provides an overview of the following login methods:
|
If desired, system administrators can author a rule including the VC Login Method field in System Management > Origination > Rules Management to determine the source that is used to enter a Virtual Capture application. This a lookup field that includes a value for each of the login methods reviewed in the below section. The value of this field is not populated in an application; it is only captured within the database. |
When the Single Sign On method is implemented for an institution, applicants are provided with seamless navigation between the institution's website and the Virtual Capture application.
Once the desired product has been selected by the applicant, clicking initializes the application process. Applicants are taken to the Application Landing Screen for the Virtual Capture instance.
|
The Application Landing screen appears to allow applicants to enter information to create an application, such as Name and TIN. The screen that appears is determined by the screen assigned within the Application Landing Screen parameter for the Individual instance in the Login tab of Virtual Capture Settings. |
Upon clicking Continue on this screen, applicants may be prompted to resume an existing application, or create an application from a Promotion.
|
When resuming an application, applicants are taken to current screen in the application workflow. If a new application is being created, applicants are taken to the first screen in the application workflow. |
|
For more information on the Single Sign On process, please see the Virtual Capture Sign On Specifications document available on the Temenos Client Portal. |
The Online Profile functionality allows new account holders, and applicants who do not log in through their financial institution's web site, to establish a secure online profile where they can safely create and manage applications in Virtual Capture. The Sign In panel enables applicants to access their secure online profile to create a new application, or view/update an existing application. If an applicant has not created an online profile, this panel also provides the ability to easily create one by clicking the Create an online profile link. The Sign In panel displays upon clicking Sign In in the Navigation Bar, or by selecting one or more products and clicking in the product card, or shopping cart, to populate the Login screen.
|
For information on creating and managing an online profile, please see the Online Profile Management topic in this guide. |
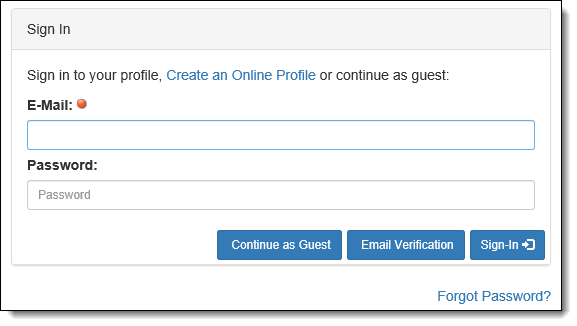
To access an online profile, the applicant must enter his or her email address and password within the corresponding panel fields and click  .
.
|
If desired, applicants can also click Enter on their keyboard to initiate the log-in process. |
|
Though Password is not marked as a required field, a value must be entered to access an Online Profile. Additionally, the value entered for the password is case sensitive and must be an exact match to the password provided in the Online Profile Management screen. If the email address and/or password entered does not match the value provided in the Online Profile Management screen, an error message is presented to the applicant upon clicking
If the correct email and/or password is not entered after three attempts, the online profile is locked for 20 minutes. A message displays to inform the applicant that the online profile has been locked and to provide a link for the applicant to update the forgotten password before the 20 minutes expire. For information on how to unlock an online profile, please see the Forgot Password section in this topic. |
Upon clicking , one of the following screens may appear:
|
The Start New Application screen appears to allow applicants to enter information to create an application, such as Name and TIN. The screen that appears is determined by the screen assigned within the Application Landing Screen parameter for the Individual instance in the Login tab of Virtual Capture Settings. |
When an applicant accesses his or her online profile from an unregistered device, the User Authentication screen appears to validate the applicant's identity. This screen includes the Security Image and Welcome Phrase configured for the online profile as well as two Challenge questions that must be answered to proceed with the login process. The questions that appear are randomly populated from the list of five questions configured for the online profile.
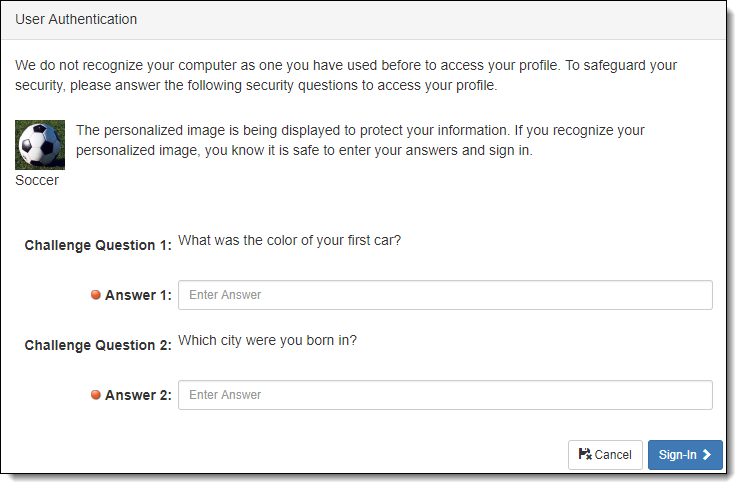
To continue with the login process, the applicant must enter a response in each Answer field and click  .
.
|
The values within each Answer field are masked to ensure the security of the information entered. The responses are not case sensitive, but must match the answers provided in the Online Profile Management screen. If either of the questions are answered incorrectly, two additional Challenge questions are presented to the applicant upon clicking . If both questions are not answered correctly after three attempts, the online profile is locked for 20 minutes. For information on how to unlock an online profile before the 20 minutes expire, please see the Forgot Password section in this topic. |
Once both Challenge questions have been answered correctly, the applicant is navigated to the Start New Application screen.
The Start New Application screen provides applicants with the ability to enter the information required to begin the application process, such as their SSN and/or Account Number. Within this screen, the First Name and Last Name fields pre-populate with the first and last name provided for the online profile.
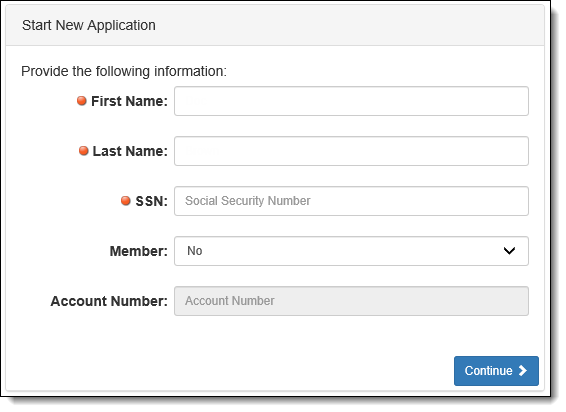
To complete the login process, the applicant must enter an SSN and select Yes or No from the Member drop-down to identify his or her account holder status. If Yes is selected, the Account Number field becomes enabled and is required to complete the screen.
|
System administrators are provided with the ability to remove the Account Number field from the Start New Application screen by enabling the Hide Account Number parameter for an instance within the Login Tab in Virtual Capture Settings. When this parameter is enabled, the Account Number field does not appear in this screen regardless of an applicant's account holder status. For more information on this functionality, please see the Login section of the Virtual Capture Settings topic. |
Once all information is complete, clicking initializes the application process.
|
For information on the process that occurs after an application is created, please see the Virtual Application Process Overview section in this topic. |
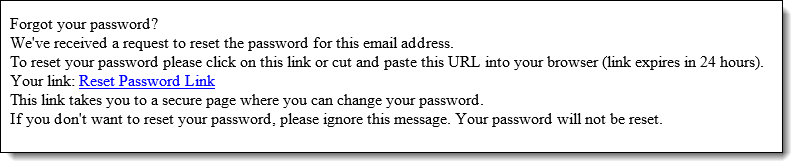
In order to access their online profile, applicants must enter the email address and password they provided in the Online Profile Management screen. In the event that an applicant does not remember the password for his or her online profile, a Forgot Password? link appears under the Sign In panel to allow the applicant to easily reset his or her password.
Applicants must take the following steps to reset their password:

|
In order to protect users from a brute force attack, the same message displays to the user if the email address that was entered does not match a record within the database |
|
The Reset Password link expires in 24 hours, if not used by the applicant, or expires immediately after an applicant successfully changes his or her password. |
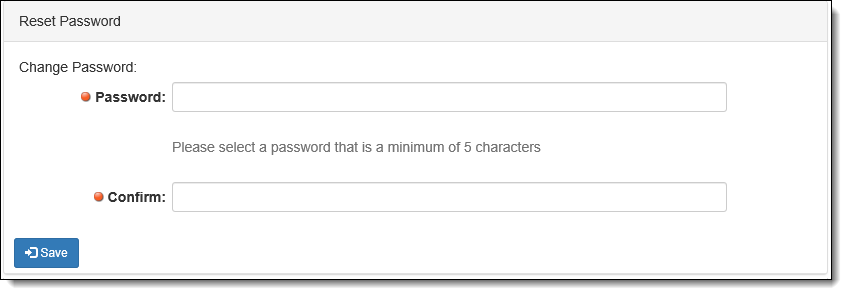
 retains the new password for the online profile.
|
The password entered in this field must meet the requirements set by the system administrator in the Security tab of Administrative Settings (System Management > Administrative Settings) or a validation error is received upon clicking . Please see the Administrative Settings topic in this guide for more information. |
If a correct email address and/or password is not entered within the Sign In panel after three attempts, the applicant's online profile is automatically locked for 20 minutes. When this occurs, a message including a Forgot Password? link displays to inform the applicant that his or her online profile has been locked and provide the ability to unlock the profile before the 20 minutes expires. If desired, the applicant can click Forgot Password? to update his or her password and unlock the online profile following the above steps.
The Guest Login process provides applicants with the ability to log on to an instance of Virtual Capture without creating an online profile. Depending on configurations made for the instance, applicants are provided with the ability to use one of the following methods on the Sign In screen to initiate an application with the guest login process:
If Guest Verification functionality is not active for the instance of Virtual Capture, or the applicant does not wish to use the Email Verification feature, he or she is provided with the ability to continue the virtual application as a guest.
Click  within the Sign In screen to continue as a guest.
Applicants are taken to the Application Landing Screen for the Virtual Capture instance. Once all information is entered in the Continue as Guest panel, clicking initializes the application process.
|
The applicant must enter information into the required First Name, Last Name, and SSN fields in the Application Landing Screen. |
|
System administrators are provided with the ability to remove the Account Number field from the Continue as Guest panel by enabling the Hide Account Number parameter for an instance within the Login Tab in Virtual Capture Settings. When this parameter is enabled, the Account Number field does not appear in the Continue as Guest panel regardless of an applicant's account holder status. For more information on this functionality, please see the Login section of the Virtual Capture Settings topic. |
|
Upon clicking , if Yes is selected from the Member drop-down, and the SSN and Account Number entered within the Login screen does not match an account in Temenos Infinity, the application is not created, and the text defined for the "Error Message for Account Holder not found in Core" parameter for the instance is displayed. |
|
For information on the process that occurs after an application is created, please see the Virtual Application Process Overview section in this topic. |
The Guest Verification process allows applicants to access applications previously created as a Guest without creating an Online Profile.
|
In order to use this functionality in Virtual Capture, the Activate Guest Verification parameter must be set to true for the instance in the Login tab of Virtual Capture Settings. For more information, please see the Login section of the Virtual Capture Settings topic in this guide. |
|
In order to access Virtual Capture using Guest Verification, the applicant's Birth Date and Email Address must be recorded within the previous Guest application, as the values of these fields are used to verify the applicant, and complete the Guest Verification process. It is highly recommended that these fields are marked required in the screen used to capture Applicant demographics to ensure the values are entered. |
When Guest Verification is active for an instance, an  button appears within the Sign In panel in Virtual Capture. To initiate the Guest Verification process, the applicant must enter his or her email address and click .
Upon clicking , the system searches for any applications associated with the email address, and sends an email to the address provided in the Sign In panel. A message is presented in Virtual Capture to inform the applicant that an email was sent, and advises the applicant to check his or her inbox.
If there are no applications associated with the email address, the applicant receives an email identifying that there are no applications to be accessed in Virtual Capture.
|
The message that appears in the email is configured for the instance in the Guest Verification with No Application section of the Login tab in Virtual Capture Settings. |
If the email address is associated with one or more Guest applications, the applicant receives an email with a link to the screen used to initiate the Guest Verification process.
|
The message that appears in the email is configured by the system administrator in System Management > Origination > Email Templates. When configuring the email template, administrators can add the ##VC Guest Verification Link## field to the template as a hyperlink, which navigates applicants to the screen used to validate their identity, and provides access to the list of applications created by the applicant during the Guest log-in process. The email template is then assigned to the Guest Verification process for an instance from the Guest Verification Email parameter in the Login tab of Virtual Capture Settings. For more information on the VC Guest Verification link, and an example of how to add the field as a hyperlink, please see the Email Templates topic in this guide. |
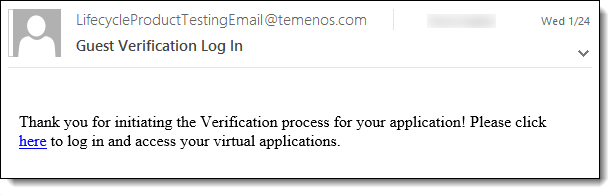
The following image displays an example of an email configured to include the VC Guest Verification Link field as a hyperlink:
|
The "From" address displayed in the email is the address set for the Lending Email Address in System Management > Administrative Settings. |
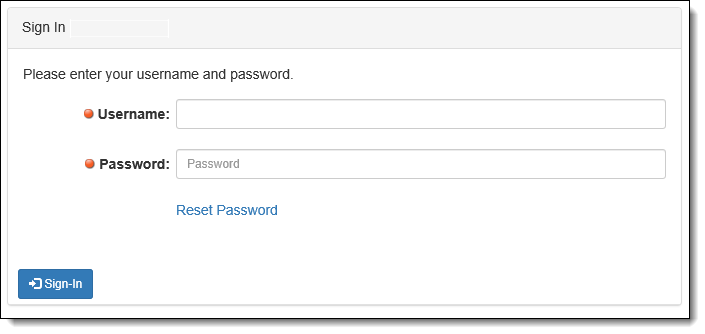
Upon clicking the link in the email, the applicant is navigated to the Guest Verification screen, which is used to validate their identity, and provide access to the list of guest applications associated with the email address.
|
The link to the Guest Verification screen is only active and valid for 15 minutes. |

Within the Guest Verification screen, applicants must enter their Birth Date, and the last four digits of their Social Security Number, and then click  to initiate the Guest Verification process.
|
The last four digits of the applicant's SSN are masked upon entry. |
Upon clicking , the system reviews the information entered to ensure it matches the data for the applicant.
|
If any of the fields cannot be verified, the applicant is unable to proceed with the Guest Verification process. An error message is received to inform the applicant that the data could not be verified, and provides a link to create a new application as a guest. Clicking the link in the error message navigates the applicant to the Product Selection page to create a new application. |
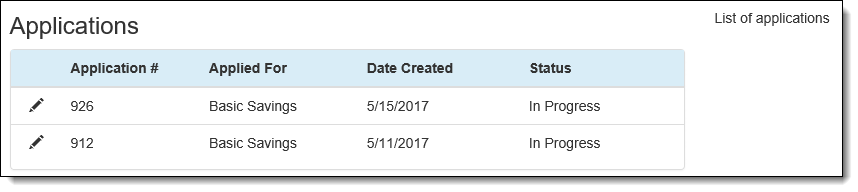
Upon a successful verification, the applicant is navigated to the List Applications page in Virtual Capture, which includes a list of all applications that were created as guest and associated with the email address.
|
When the Application Listing page is accessed through the Guest Verification process, any applications created by the applicant through the financial institution's website, or an online profile, do not appear in the list.
|
In addition to supporting the application process for individual applicants, vendors are provided with the ability to access vendor instances of Virtual Capture to create, submit, and view applications on behalf of their customers.
The Vendor Login panel provides the individual vendor users with the ability to log on to Virtual Capture with the username and password defined by a system administrator in System Management > Origination > Loan > Vendor Management.
|
In order to access a vendor instance of Virtual Capture, the vendor must be assigned to the instance in the Vendor Portal tab of Vendor Management, or the Login tab of Virtual Capture Settings. For more information, please see the Login section of the Virtual Capture Settings topic, or Vendor Portal section of the Vendor Management topic in this guide, |
Once the Username and Password fields are complete, click to initialize the application process.
|
If a vendor contact enters incorrect login credentials multiple times, their user is deactivated. In order to continue with the virtual application process, the vendor contact must be re-activated within the Contacts tab in Vendor Management. For more information, please see the Contacts section of the Vendor Management topic in this guide. |
If the vendor user has forgotten their password, clicking the Reset Password link on the Vendor Login panel displays the Reset Password panel. Within the panel, enter the username and old password, and then enter a new password within the New Password and Confirm Password fields.
|
If the "Force Password Change on Next Login" option is selected for the user within the Contacts tab in System Management > Origination > Loan > Vendor Management, the Reset Password panel is displayed upon navigating to the Vendor instance of Virtual Capture, rather than the Vendor Login panel. |
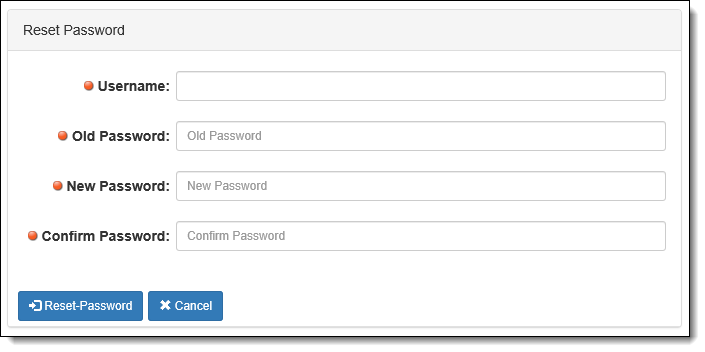
When finished entering the password information, click  . Upon successful reset, the vendor user is returned to the Vendor Login panel to login using their username and new password information.
Login Method OverviewTo protect applicant security, features available within Virtual Capture are enabled/disabled based on the login method. The following matrix provides an overview of the features enabled by each Virtual Capture login method. |
||||||
| Method | Feature Supported? | |||||
| Create Applications | Application Data Populates from Core | Application Data Populates from Previous Apps | List Applications | Edit/Open Applications | ||
| Single Sign On |  |
|
|
|
|
|
| Online Profile | |
|
|
|||
| Guest Login | |
|||||
| Guest Login - Guest Verification |
|
|
|
|||
| Vendor Login |
|
|
|
|
||
Once the applicant or vendor has been successfully authenticated, and logged on to an instance of Virtual Capture, the application process begins.
|
If the applicant selects a loan product, the application is created based on the associated Loan Application Type. If an applicant selects only an account product, the application is created based on the account application type that is associated with the account product category and sub-category criteria defined within a Product Selection rule. For more information, please see the Rule Configuration to set the Account Application Type section under Account Application Types in the Virtual Capture Settings topic. |
The screen presented to the applicant depends on the login method used to initialize the application process. Reference the table below for an overview of the screen presented with each login method:
|
The following table provides an overview of the screen presented to an applicant if the system is not configured to display promotional offers in Virtual Capture, or there are no promotional offers for the applicant. For information on the process that occurs when there are promotional offers for the applicant, please see the Promotions in Virtual Capture topic in this guide. |
|
When an applicant logs on to an instance of Virtual Capture using the Single Sign On, Online Profile, or Guest login method, the workflow model used is determined by the type of product(s) added to the product cart.
|
| Login Method | Screen Presented to Applicant | ||||
| Single Sign On |
If the Bypass Sign On Parameter is false: After clicking
Upon clicking
If the Bypass Sign On Parameter is true: After clicking
|
||||
| Online Profile |
When an online profile is first created:
When an online profile is created during the Guest application process:
When the applicant logs on to an existing online profile from the Sign In panel:
|
||||
| Guest Application |
When a guest application is created from the Guest Login panel:
When a guest application is created using Guest Verification:
|
||||
| Vendor Login |
After clicking Clicking
|
|
If configured within System Management > Origination > Virtual Capture > Virtual Capture Settings, a list of current applications displays to the applicant prior to creating an application when an applicant logs in using single sign-on, or online profile, in the following scenarios:
This functionality provides applicants the ability to review, and update an in-flight application, rather than creating a new one.
|
|
Security measures are in place within Virtual Capture to prevent an applicant from navigating to an application that is not their own, as well as ensure the safety of idle applications. Reference the Applicant Security topic below for an overview of the security methods that occur during the virtual application process:
The following security methods occur during the virtual application process regardless of the applicant's login method: Verification of Application IDThe Application ID of the application in context is tracked and a unique Owner ID is displayed within the Virtual Capture URL. The value of the Application ID is validated each time one of the following actions is performed during the application process:
If an applicant tries to navigate to another application by changing the Owner ID, the applicant is automatically logged out of the application and redirected to the Product Selection screen. A message displays on the screen to inform the applicant that he or she is being logged out for security purposes. Verification of TINThe TIN for the logged-in user is compared to the TIN of the primary applicant on the application, and, if they do not match, the applicant is redirected to an error page.
Idle ApplicationsThe following security measures are in place to ensure the safety of an idle application:
|
|
System administrators can configure the Search Core for Applicant action in System Management > Origination > Event Processing to search the financial institution's core for existing records for the applicant, if the applicant has selected No from the Member drop-down on the Continue as Guest panel. For more information on the Search Core for Applicant action, please see the Event Processing topic in the Administrator Guide. |
During the virtual application process, the applicant must enter information within each screen, and click until all screens are complete. If necessary, the applicant can click to return to the earlier screen in the application.
|
If an applicant attempts to navigate to a screen that is not part of the current workflow, an error message is received to inform that the requested section of the application is no longer available, and provide a button that allows him or her to re-enter the application. Upon re-opening the application, the applicant is navigated to the active screen in the current workflow. |
|
Vendor Contacts with an access level of Limited may prevent them from accessing a previously completed application, screen, or panel. |
|
Depending on various screen and panel configurations, different behavior may occur that determines how an applicant is navigated through the application workflow. Reference the list below for an overview of this behavior:
|
Once the final screen of the Origination workflow category is complete, clicking sends the application to the financial institution for review and decisioning.
Once decisioned and in the Approval workflow category, clicking sends the application to the financial institution for disbursement.
|
Prior to using Virtual Capture, a Default Values rule should be authored in System Management > Origination > Rules Management to set the IsAutoDisburse flag to false for applications created through Virtual Capture. Authoring this rule ensures the applicant is able to complete and review all information and confirmations prior to disbursement. |
|
The button is disabled if the application is in a Pending Review, Rejected, or Declined status. |
Upon clicking to disburse the application, the Disbursement Confirmation Text configured for the instance in the Messaging tab of Virtual Capture Settings is displayed for the applicant to confirm that he or she agrees with the terms, and wants to proceed with the disbursement process. This text must be confirmed by the applicant in order to initiate the disbursement of the application.
|
If any funding validation errors occur during disbursement, a "friendly" error message is displayed indicating the field(s) that must be corrected. The applicant can correct the issue(s) then re-attempt the disbursement process. |
Upon successful disbursement, the Disbursement Success Text configured for the instance appears to signify the completion of the virtual application process.
When an application is created and presented to the applicant in Virtual Capture, the application is also able to be accessed within Temenos Infinity. The application is populated with the applicant's name, Account Number, and/or TIN. When an institution uses the Single Sign On method, and the applicant is a current account holder, if the "Copy Demographics for Account Holder" parameter is enabled in Virtual Capture Settings, the applicant's address, phone number, and income information are also pre-populated in the application.
|
Demographics are not pre-populated within applications created through the Guest application process or Online Profile. |
|
When an application is submitted from Virtual Capture, the system is unable to distinguish whether the application was initiated through a Web or mobile device. Therefore, the application source populates as Virtual Capture in Temenos Infinity. |

 icon next to the desired application populates the last active screen in the workflow to allow the applicant to continue through the virtual application process.
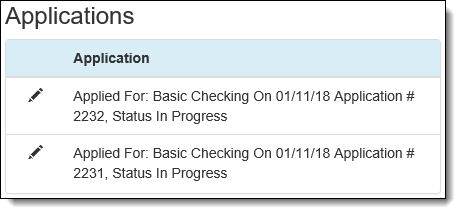

 expands a menu that provides access to the link for the Product Selection page, as well as the Sign In link or Applicant drop-down.
 .
.

 .
. .
.
 retains the current loan product in the cart, and clicking
  updates the cart to include the new product.
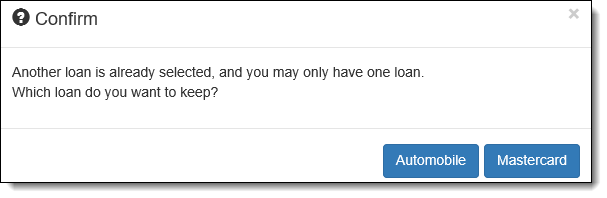
 . If
. If  . Clicking
  adds an additional instance of the account product to the cart; clicking
  removes an instance of the account product from the cart.
 .
.

 in the Sign In panel, the applicant is presented with the first screen in the workflow model that is assigned to the selected product.
 to access the associated edit screen that allows users to edit the application data. Within the Edit Screen, users are able to update the appropriate fields. For more information, please see the