This section provides an overview of the configurable areas within the Framework's person workspace. Many areas of the person workspace can be configured by administrators to display institution-specific information and this section serves as a guide to where those configurations can be made.
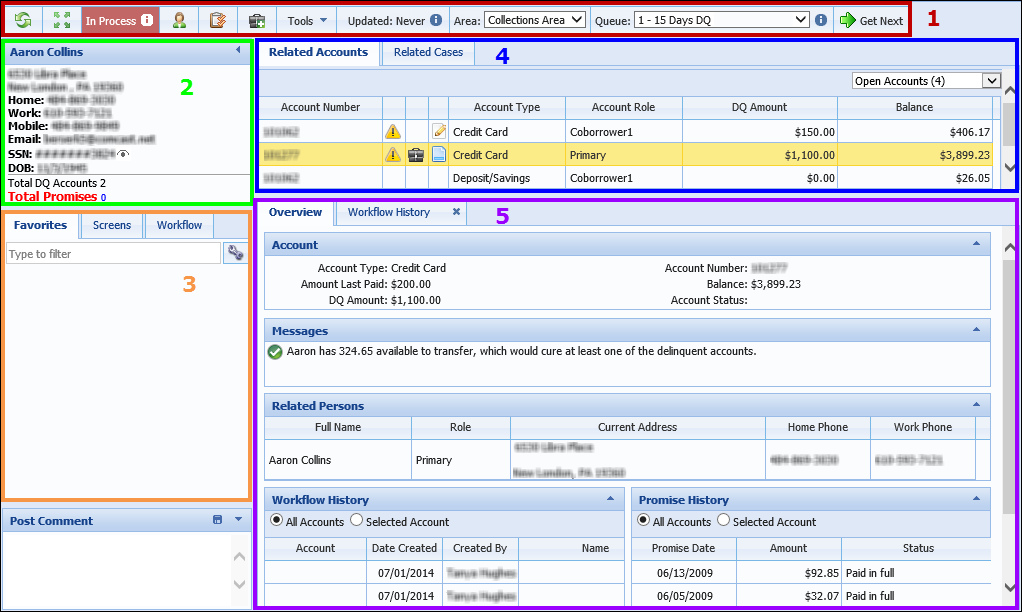
1- Workspace Toolbar

If configured to appear on the workspace toolbar, users can click this icon to turn Person Verification messages on or off for their user.

The Person Verification icon is configured to appear on the workspace toolbar in System Management > Areas.
The Security Information that displays within the Person Verification message can also be configured by administrators. For additional information, please see the Areas topic within this Guide.

For additional information on how to create and manage Queues, please see the Collection Queues topic within this guide.

Please see the Users and Security Group topics within this Guide for additional information regarding User Permissions.
To learn more about Case Customization, please see the Case Admin Introduction topic within this guide.

Queue Analyzer, Credit Reporting and Skip Trace functionality are also available in this drop-down.

The Areas available to each user are assigned by the system administrator in System Management> Areas. Areas are also assigned to individual users in System Management > Users and System Management > Groups > Security Group.
For additional information on Area configuration, please see the Areas topic within this guide.

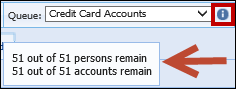
The Queue Selector drop-down is configured to appear on the workspace toolbar in System Management > Areas. It is here that system administrators also define whether an information icon appears within this section to display the number of persons and accounts remaining to be worked in that queue.

The Get Next button allows the user to advance to the next person in the queue. This feature is controlled by the system administrator in System Management>Areas.
System administrators can configure icons to appear in a column within the Related Accounts panel to identify the accounts that must be worked before selecting Get Next. For more information on these icons, please see the Top Area Screen section of this topic.
2- Person Summary Panel
The Person Summary Panel is designed to provide a quick, high-level overview of a person. The information that appears within the top of this box is system-defined and cannot be configured by system administrators.
Administrators can configure additional fields and/or aggregated information to appear below the system-defined data to provide quick access to important information for the person in context beyond demographics, such as the total number of promises and/or delinquent accounts for the person, if a case exists for the person, or if the person is an employee. By configuring Presentation rules in System Management > Collections > Rules Management and assigning them to this area of the workspace in System Management > Areas, administrators can eliminate the need for users to search for information and increase the time spent on collection efforts.
Rule Configuration
 |
In order to assign rules to the Person Summary Panel, the ability to author Business Rules must be enabled for your institution. For more information about how to enable this functionality, please contact your Akcelerant Customer Care Representative. |
Rules for the Person Summary Panel are configured in System Management > Collections > Rules Management. Use the following table to assist with configuring business rules to execute within the Person Summary panel:
| Action Template | What it Does | Category Selection |
| add a field to a panel | Adds a field to the Person Summary panel- label, order  |
Presentation |
| add a field to a panel with attributes | Adds a field to the Person Summary panel- label, order and then attributes include size, color and style 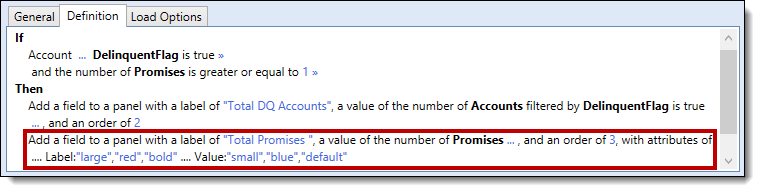 |
Presentation |
| add a line to a panel | Adds a line to Person Summary panel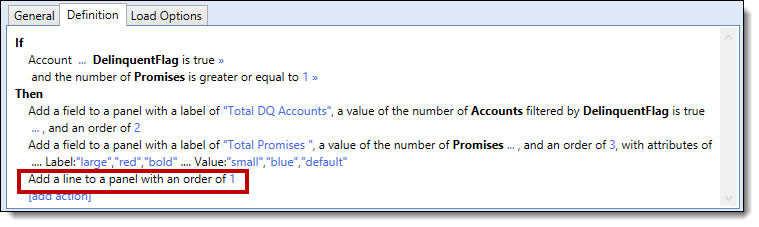 |
Presentation |
|
In order to produce the desired results, select the appropriate entity when authoring a rule. The entity Root.Person is the recommended entity for the Person Summary panel, but does not reflect the only entity choice. The entity Person.Accounts can be selected to execute the rule on all the accounts related to the person in context and display new fields and/or aggregated information in the Person Summary for each account. The example above was written under the Root.Person entity to populate information within the Person Summary panel as shown below: 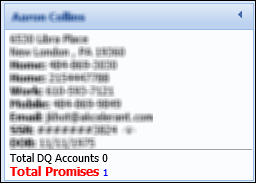 |
All Rules created under the Presentation category in Rules Manager are available to be assigned to the Person Summary panel from the Rules tab on the Area Configuration screen in System Management > Areas. To learn more about Area configuration, please see the Areas topic within this guide.
 |
An unlimited number of rules can be configured to appear in the Workspace Person Summary, however, while the height of the Person Summary expands to accommodate these rules, a scroll bar does not appear. This can significantly reduce the amount of space within the Left Navigation Panel, therefore it is recommended to be mindful of the number of rules assigned to execute within the Person Summary in order effectively use the Favorites, Screens, Workflow and Post Comment functionality in the workspace. |
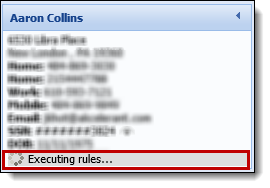
When rules are assigned to the Person Summary panel, a loading message displays within the panel while the assigned rules execute:
Please see the Rule Authoring topic of this Guide to learn more about authoring rules for the Person Summary panel.
3- Left Navigation Panel
| Tab | Description |
| Favorites | Contains a list of commonly used screens and workflows. This tab is managed by users by clicking the  icon. icon. |
| Screens | Contains a list of screens available to the user. These screens are created and managed by the system administrator in System Management>Screens and are configured to appear within this tab in System Management > Areas. |
| Workflow | Contains a list of available workflows. These workflows are created and managed by the system administrator in System Management>Workflow>Workflows and are configured to appear within this tab in System Management > Areas. |
4- Top Area Screen
The top area screen appears within the top section of the workspace and displays all account and case information for the person in context when configured to include the Related Accounts and Related Cases Panels.
For these panels to display, system administrators must configure a Person screen to include the Related Accounts and Related Cases panels in System Management> Screens. The fields that display within the Related Panels are also configured here.
When configuring the Related Accounts panel, there are fields that can be added to display an icon within a column of the panel. These icons alert users to important account information, such as which queue an account is in or if the account is associated with an open case. Hovering over the icon immediately displays the account information in the workspace. Reference the table below to assist with identifying these fields, the icon that displays when the field is configured to appear in the panel, a description of the icon, and the information that appears as the icon is hovered over in the workspace:
| Field Name | Icon | Description | Tooltip |
| Delinquency Indicator |  |
The account is delinquent. | This account is delinquent. |
| Queue Info | The account is not in a queue. | No message displays. | |
 |
The account is in the current queue. | This account is in the queue being worked. | |
 |
The account is in the current queue and must be worked before selecting Get Next. | This account is in the queue being worked and must be worked before getting next. | |
 |
The account is in a different queue. | This account is in the [name of queue] queue. | |
 |
The account is in a different queue and must be worked before selecting Get Next. | This account is in the [name of queue] queue and must be worked before getting next. | |
| Account Case Indicator |  |
The account is associated with one or more open cases. | Case Number(s) and Case Type(s). |
|
The functionality of Queue Information icon and icon is determined by the configuration of the Which accounts must be worked before allowing Get Next setting for the area in System Management > Areas. For more information on Area configuration, click here. |
Once the Person screen is created, administrators can map it to the top area section of the workspace in System Management > Areas.
5- Overview Screen
The Overview screen is a Person screen created by the system administrator in System Management > Screens where it can be configured to include Person, Account or Case panels that populate to display information regarding the specific account or case type in context.
Once this screen is created, administrators can map it to the overview tab section of the workspace in System Management > Areas.
For more information on each of these areas of the workspace, please see their respective sections within the Framework Workspace topic in the User Guide.